


Setting Shared Folder (Windows Vista)
Solution
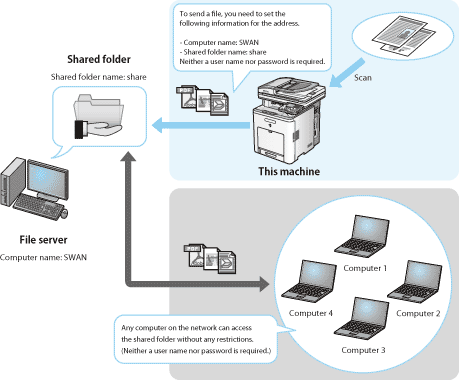
For the settings before using the Scan to File Server function (SMB) (related information), setting the IP address (related information), setting up a shared folder, and setting the machine for the Scan to File Server function are required.
This section describes how to setup a shared folder after the IP address is set.
There are two setting options for the shared folder.
- Shared Folder without Access Control
- Shared Folder with Access Control
NOTE
If "Access permissions" are granted to users who are registered for computers, they are authorized to operate folders and files.
This section describes the procedure for granting FULL Control permission to the "Everyone" account so that any user can access the shared folder.
There are two types of access permissions:
- Network-level access permission
This is to control users who access to the shared folder over the network.
- Local-level access permission
This is to control users who access folders by logging on to their computers.
The local-level access permission can be set only when the drive in which folders are located is formatted in NTFS.
This is useful when you want to share files with other users over a network without any restrictions.
Users can access these folders from any computer on the network without having to enter a user name and password.
Follow the procedure below to set up the shared folder without access control.
In Windows Vista, you can use the special folder name "Public folder," which allows files to be shared with other users on the same network. Using Public folder, you can set up a shared folder without access control.
 Sharing the Public folder
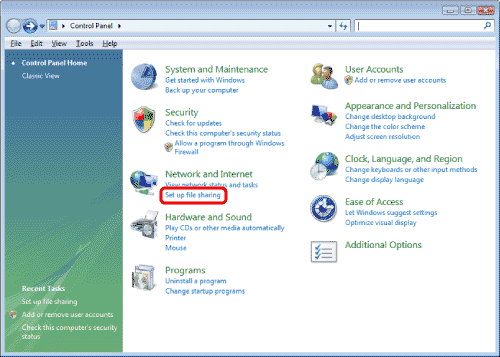
1. On the [Start] menu, select [Control Panel] to open [Control Panel].
2. Click [Set up file sharing] to open the [Network and Sharing Center] window.
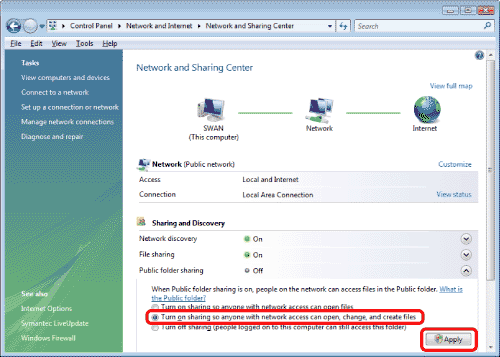
3. Select [Sharing and Security...] to open the [<Folder name> Properties] dialog box.
4. Select [Turn on sharing so anyone with network access can open, change, and create files], and then click [Apply].
NOTE
- Do not select [Turn on sharing so anyone with network access can open files]. Otherwise, you will not be able to store a document scanned with this machine in a shared folder.
- If the [User Account Control] dialog box appears in Windows Vista, click [Continue].
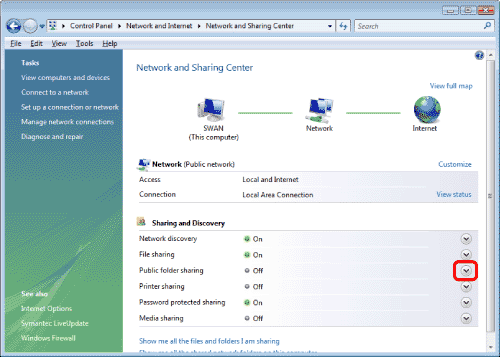
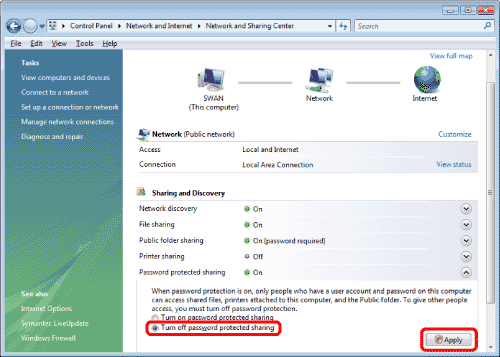
5. Click the downwards arrow next to [Password protected sharing].
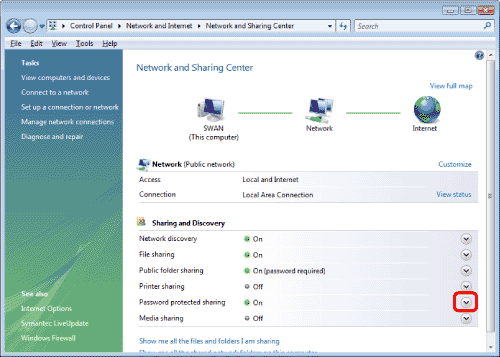
6. Click [Turn off password protected sharing], and then click [Apply].
NOTE
If the [User Account Control] dialog box appears in Windows Vista, click [Continue].
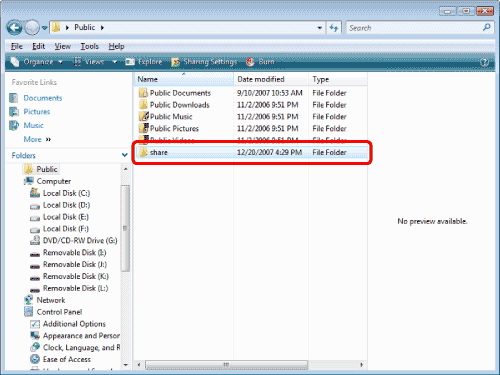
Creating a folder to store a fileYou can store a file in the first level of the Public folder. This section describes the procedure for creating a new folder in which to store a file in the Public folder.
1. Display the Public folder in Windows Explorer, etc.
2. Create a new folder in the Public folder.
This is useful when you want to limit access to certain users.
To access a shared folder of this type, users have account information (user names and passwords) for the shared folder. If they do not know their account information, they cannot access that shard folder.
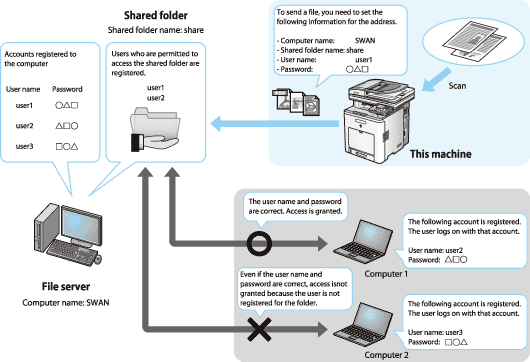
Follow the procedure below to access a shared folder with access control.
Creating a User Account for Accessing a Shared FolderYou need to create user accounts for users who access the shared folder in advance. This section describes the procedure for creating a new account on your computer.
NOTE
Even if you do not create a new account by following the procedures below, you can add a pre-registered account for users who are permitted to access the shared folder. In such case, you need to create a password if one has not been set for the preregistered account. Once the password is created, the user is prompted to type the password when logging on to a computer.
1. On the [start] menu, select [Control Panel] to open [Control Panel].
2. Click [Add or remove user accounts].

NOTE
If the [User Account Control] dialog box appears in Windows Vista, click [Continue].
3. In the [Manage Accounts] dialog box, click [Create a new account].
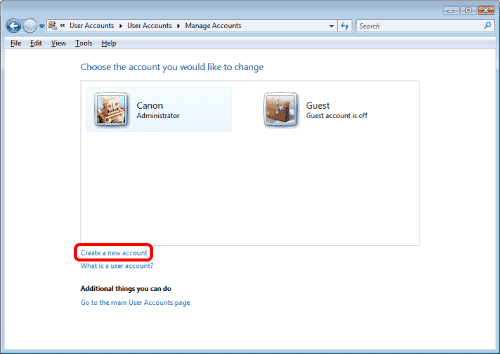
4. In the [Create New Account] dialog box, select [Standard user], and then click [Create Account].
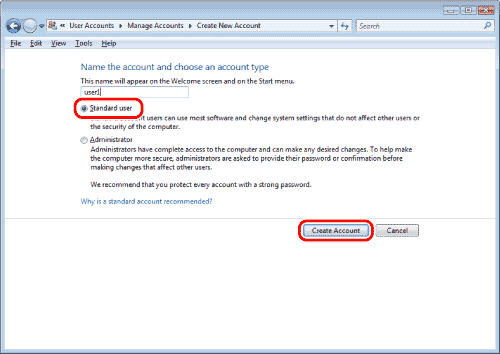
NOTE
The user name must be up to 20 alphanumeric characters long.
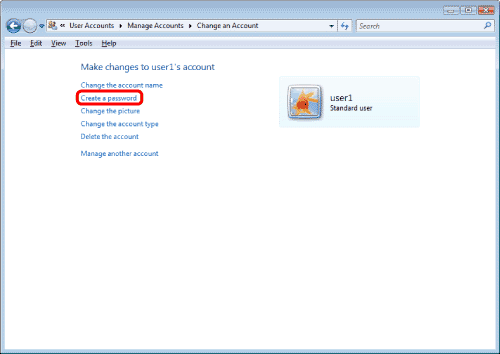
5. Click the user name created in the [Change an Account], and then click [Create a password].
6. In the [Create Password] dialog box, type the password in two boxes circled in black, and then click [Create password].
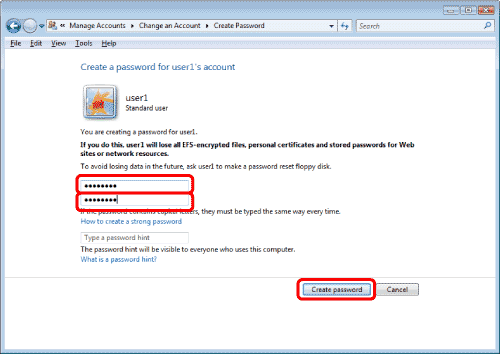
NOTE
The password must be up to 14 alphanumeric characters long.
7. Close the [Change an Account] dialog box.
Setting a Shared Folder and Access PermissionsOnce you create the account on your computer, create a shared folder. Add the created account to the shared folder as a user who is permitted to access that folder. Set access permissions so that the user can that folder as well.
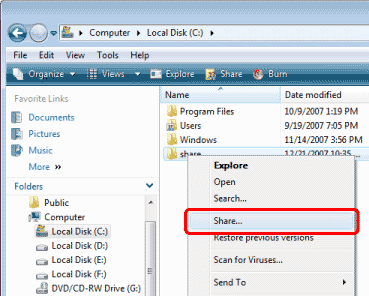
1. Create a shared folder in any drive.
It is recommended to create the folder in a place where users can find it easily, such as the first level in C drive.
Ex.: C:\share
NOTE
Use alphanumeric characters to name the folder.
2. Right-click the created folder.
3. Select [Share...] to open the [File Sharing] dialog box.
4. Click [  ] on the left side of [Add...]. Select the user. Click [Add...].
] on the left side of [Add...]. Select the user. Click [Add...].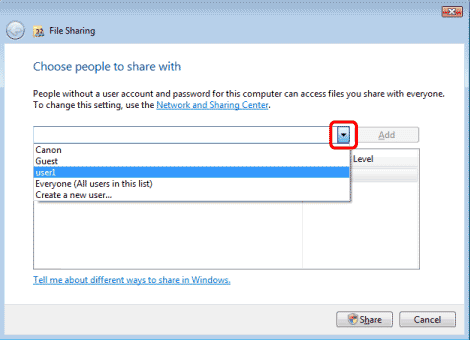
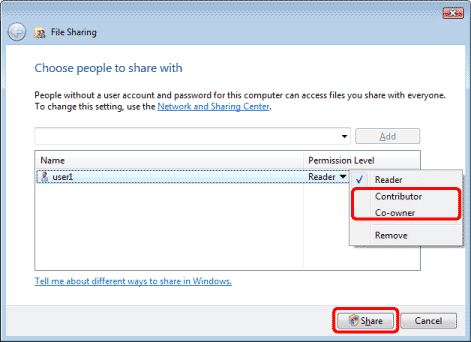
5. Select the added user. Select the [Contributor] or [Co-owner] check box. Click [Share].
NOTE
- If the [User Account Control] dialog box appears in Windows Vista, click [Continue].
- Access permissions in Windows Vista
- Reader: A reader can only view shared files.
- Contributor: A contributor can create, alter and delete shared files, but not alter access permissions.
- Co-owner: A co-owner can perform all file operations including creating, altering and deleting shared files and altering access permissions.
6. Click [Done] to close the [File Sharing] dialog box.