Solution
For the settings before sending/receiving e-mail/I-fax (related information), setting the IP address (related information) and setting the machine for sending/receiving e-mail and I-fax are required. This section describes how to check the necessary information to set the machine after the IP address has been set. Proceed to "Setting the Machine to Send/Receive E-mails and I-Faxes" (related information) after checking the information.
You may set your current e-mail account to the machine if you intend to use the machine only for sending scanned documents using the Scan to E-mail and I-fax function.
To set your current e-mail account to the machine, the following information is required:
This is the server address to which e-mails and I-faxes are sent.
The two authentication methods described below are supported. (The authentication may not be required for some internet providers.)
In the authentication method, the SMTP server checks the user name and password before sending e-mails and I-faxes.
In the authentication method, the POP server checks the POP address and POP password before sending e-mails. If your provider uses this method, you need to make settings both to receive and send e-mails and I-faxes on this machine. For details about the settings to receive e-mails and I-faxes, see " Preparing to Receive E-mails and I-faxes."
NOTE
If you set your current e-mail account to the machine, the machine receives e-mails instead of your e-mail software. Therefore, if you want this machine to receive e-mails, you need to provide the machine a separate e-mail account that is different from that for your e-mail software. For details about the settings for receiving e-mails, see "Preparing to Receive E-mails and I-faxes."
Preparing to Receive E-mails and I-faxes
If the provider uses POP before SMTP as the authentication method to send e-mails and I-faxes, or if you want this machine to receive e-mails and I-faxes, you need another POP 3 e-mail account for this machine in addition to your current e-mail account. For details on how to obtain another e-mail account, consult with your internet provider or network administrator. To make settings, the information outlined below is required.
NOTE
The accepted message format and file types are as follows:
- Message format: Plain text
- File types: TIFF-F (MH, MR, MMR compression), JPEG, Exif JPEG (Exif 2.2)
The server address that is used when receiving E-mails and Ifaxes In some cases, the address is the same as the SMTP server address.
This is sometimes referred to as a mail account or mail ID.
The password required in order to receive e-mails and I-faxes.
Checking Your E-mail Account
If you want to set your current e-mail account to this machine, you can view what information is required for your e-mail software. This section describes the procedures for checking your e-mail account, using Outlook Express 6.x (the e-mail software included with Windows XP) as an example.
NOTE
For Windows Mail (the e-mail software included with Windows Vista), you can check your e-mail account in the same way as for Outlook Express 6.x.
1. Start Outlook Express 6.x.
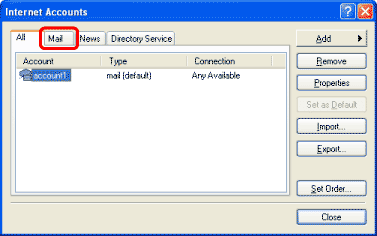
2. On the [Tools] menu, select [Account] to open the [Internet Account] dialog box.
4. Select the account in use. Click the [Properties] button to open the [<Account name> Properties] dialog box.
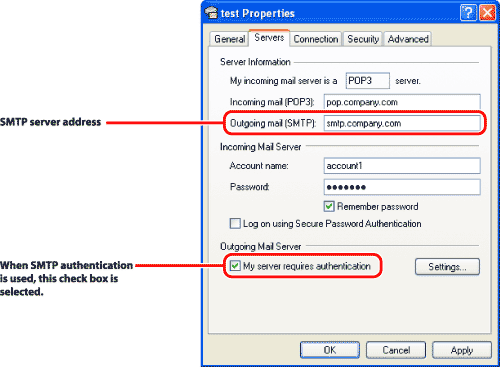
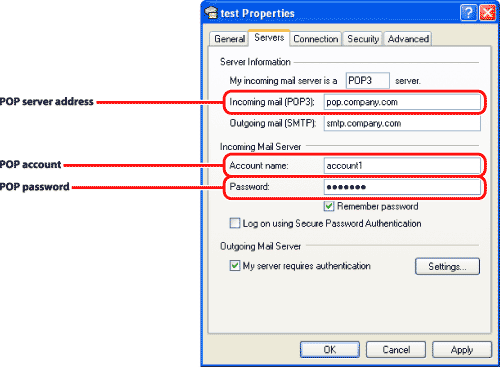
5. Click the [Servers] tab.
- To confirm the necessary information for sending e-mails and I-faxes
Confirm the SMTP server address in the [Outgoing mail (SMTP)] box.
If there is no need for authentication, proceed to Step 9.
If SMTP authentication is used, proceed to Step 6.
NOTE
If your provider uses the POP before SMTP authentication method, you need the information required for the settings to receive e-mails and I-faxes.
- To confirm the necessary information for receiving e-mails and I-faxes
Confirm the POP server address in the [Incoming mail (POP3)] box, the POP address in the [Account name] box, and the POP password in the [Password] box. Proceed to Step 9.
NOTE
- If you want this machine to receive e-mails and I-faxes, you need another POP 3 e-mail account for this machine in addition to your current e-mail account. For details on how to obtain another e-mail account, consult with your internet provider or network administrator.
- The typed password is hidden with bullets. To check the password, use a notification form delivered from your provider.
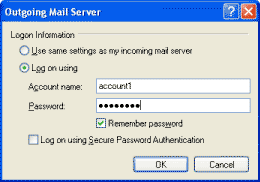
6. Under [Outgoing Mail Server], click [Settings] to open the [Outgoing Mail Server] dialog box.
7. Confirm [Account name] (user name authorized by SMTP server).
NOTE
The typed password is hidden with bullets. To check the password, use a notification form delivered from your provider.
8. Once you confirm all the information, click [Cancel] to close the [Outgoing Mail Server] dialog box.
9. Click [Cancel] to close the [<Account name> Properties] dialog box.
10. Click [Close] to close the [Internet Account] dialog box.


