Solution
Step 1: Connecting the Camera to a Printer via Wi-Fi
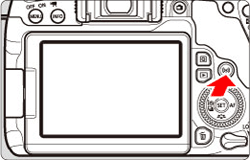
1. Turn on the camera and the printer.
2. Press the camera’s <

> button.
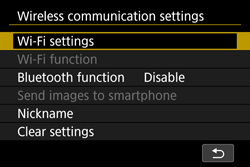
3. Select [Wi-Fi settings].
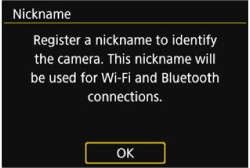
6. When the following screen appears, press <

>.
7. Enter the nickname. You can enter any characters between 1 to 8 characters in length.
When you finish entering, press the <MENU> button.
*For more information on using the keyboard, please refer to "Using the Virtual Keyboard".
NOTE
Before setting up a connection, set the camera’s nickname (for identification).
When the camera is connected to another device via a wireless LAN, the nickname will be displayed on the device. Be sure to set a nickname as otherwise you cannot go to the wireless LAN settings screen.
8. When the following screen appears, select [OK], then press <

>.
To return to the screen that appears when the <

> button is pressed, press the <MENU> button.
9. Select [Wi-Fi function].
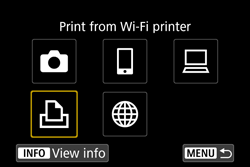
10. Select [

] (Print from Wi-Fi printer).
11. Select [Register a device for connection].
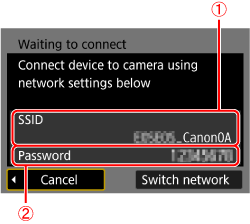
12. Check the SSID and password.
- Check the SSID (network name) (
 ) and password (
  ) displayed on the camera’s LCD monitor.
- In [Wi-Fi settings], if you set [Password] to [None], the password will not be displayed or required.
NOTE
"_Canon0A" is displayed at the end of the SSID.
13. Operate the printer to connect it to the camera via Wi-Fi.
- On the Wi-Fi settings menu of the printer to be used, select the SSID you have checked in step 12 (
 ) .
) .
- For the password, enter the password checked in step 12 (
 ).
).
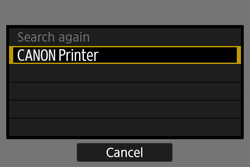
14. When a list of detected printers appears, select the printer to connect to via Wi-Fi, then press <

>.
- Some printers may make a beeping sound.
- When 16 or more printers are detected or the search takes over 3 minutes, you can select [Search again].
The processing screen is displayed.
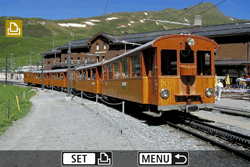
When a Wi-Fi connection is established, an image on the card will appear.
The settings for connecting to a printer are now complete.
1. Turn the <

> dial to select an image to print, then press <

>.
By pressing the <


> button, you can switch to the index display and select an image.
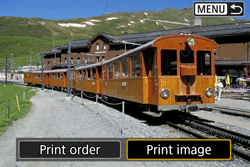
3. Select [Print].
- For the print setting procedures, see "Print Settings" in the Wi-Fi (Wireless Communication) Function Instruction Manual. The Instruction Manuals can be downloaded from the Canon Web site.
- When printing is complete, the screen for step 1 will reappear. To print another image, repeat steps 1 to 3.
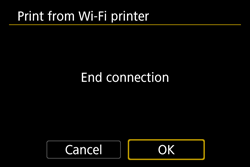
4. Press the <

> button to display the confirmation dialog. Select [OK], then press <

> to terminate the connection.
IMPORTANT
- With a Wi-Fi connection to a printer established, a picture cannot be taken even if the camera’s shutter button is pressed.
- Movies cannot be printed.
- Before printing, be sure to set the paper size.
- Certain printers may not imprint the file number.
- If [Bordered] is set, certain printers may imprint the date on the border.
- Depending on the printer, the date may appear faint if it is imprinted on a bright background or on the border.
- RAW images cannot be printed by selecting [Print order]. When printing, select [Print image] and print.
- The screen display and setting options vary depending on the printer. Some settings may not be available. For details, refer to the printer’s instruction manual.
NOTE
- When you use a battery to power the camera, make sure it is fully charged.
- Depending on the image’s file size and image-recording quality, it may take some time to start printing after you select [Print].
- To stop printing, press <
 > while [Stop] is displayed, then select [OK].
- When printing with [Print order], if you stopped printing and want to resume printing of the remaining images, select [Resume]. Note that printing will not resume if any of the following occurs.
- You changed the print order or deleted any of the print ordered images before resuming printing.
- When index is set, you changed the paper setting before resuming printing.
- The card’s remaining capacity was low when you paused printing.
Additional Information: Using the Virtual Keyboard
The following section describes how to set the camera’s nickname using the virtual keyboard.
The nickname can be changed later from the [Wireless communication settings] screen.
| Changing the entry area | Press the <  > button to toggle between the top and bottom entry areas. > button to toggle between the top and bottom entry areas. |
| Moving the cursor | Press the <  > < > <  > keys in the top area to move the cursor. > keys in the top area to move the cursor. |
| Entering text | In the bottom area, press the <  > < > <  > or < > or <  > < > <  > keys to select a character, then press < > keys to select a character, then press <  > to enter it. > to enter it.
You can check how many characters you have entered and how many more can be entered by referring to [*/*] on the upper right of the screen. |
| Changing the entry mode* | Select [  ] at the bottom right of the bottom entry area. Each time you press < ] at the bottom right of the bottom entry area. Each time you press <  >, the entry mode will change as follows: Lower case > Numerals / Symbols 1 > Numerals / Symbols 2 > Upper case. >, the entry mode will change as follows: Lower case > Numerals / Symbols 1 > Numerals / Symbols 2 > Upper case.
* When [Touch control: Disable] is set, you can enter all characters on one screen. |
| Deleting a character | Press the <  > button to delete one character. > button to delete one character. |
| Finishing the text entry | Press the < MENU > button to confirm what you have entered and exit. If a confirmation dialog is displayed, select [OK] to exit. |
| Canceling the text entry | Press the < INFO > button to cancel text entry and exit. If a confirmation dialog is displayed, select [OK] to exit. |
 :
: 
 > or <
  :
: 


 > modes or when Multi Shot Noise Reduction is set, the camera cannot be connected to a printer via Wi-Fi.
 > button.


 >.
>.

 >.
>. > button is pressed, press the <MENU> button.

 ] (Print from Wi-Fi printer).

 ) and password (
  ) displayed on the camera’s LCD monitor.
 ) .
) . ).
). >.
>.
 > dial to select an image to print, then press <
  >.
>. 
 > button, you can switch to the index display and select an image.

 > button to display the confirmation dialog. Select [OK], then press <
  > to terminate the connection.
 > while [Stop] is displayed, then select [OK].
 > button to toggle between the top and bottom entry areas.
 > <
> <  > keys in the top area to move the cursor.
 > <
> <  > or <
  > <
> <  > keys to select a character, then press <
  > to enter it.
 ] at the bottom right of the bottom entry area. Each time you press <
  >, the entry mode will change as follows: Lower case > Numerals / Symbols 1 > Numerals / Symbols 2 > Upper case.
 > button to delete one character.