Solution
Raise the [ISO speed] to use a fast shutter speed when you wish to reduce the effects of camera shake or avoid blurry subjects, or to turn the flash off when shooting in a dark area.
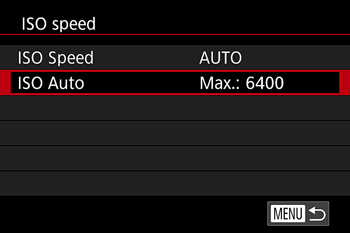
Also, with [ISO AUTO] selected, you can set the maximum ISO speed, or select the rate of change.
REFERENCE
Set a higher ISO speed for higher sensitivity, or a lower value for lower sensitivity.
IMPORTANT
- Instructions in this section apply to the camera with [Shooting mode] set to [Program AE] (
 ).
).
1. Set the camera's power switch to [ON].
2. To adjust the ISO Speed setting, turn the [

] dial.
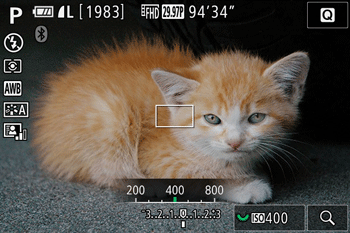
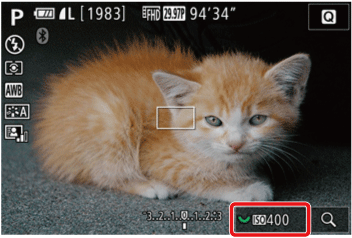
3. The option you configured is now displayed. (The [ISO Speed] has been set to 400 in the example image below.)
NOTE
- To view the automatically determined ISO speed when you have set the ISO speed to [AUTO], press the shutter button halfway.
- Although choosing a lower ISO speed may reduce image graininess, there may be a greater risk of subject and camera shake in some shooting conditions.
- Choosing a higher ISO speed will increase shutter speed, which may reduce subject and camera shake and increase the flash range. However, shots may look grainy.
- You can also set the ISO speed by accessing MENU > [
 5] tab > [ISO speed] > [ISO Speed].
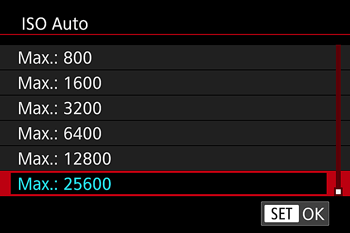
Adjusting ISO Auto Settings
You can limit the ISO speed when ISO speed is set to [AUTO].
- Follow the steps below to set the maximum ISO speed with [ISO AUTO] selected.
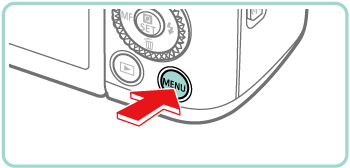
1. Press the [MENU] button.
2. Press the [

], [

] buttons or turn the [

] dial to choose the [
5 ] tab.
Press the [

], [

] buttons to choose [ISO speed] and then press [

].
3. Press the [
], [
] buttons to choose the [ISO Auto], and then press [
].
4. Press the [
], [
] buttons to choose the desired setting and then press the [
] button.
This concludes the procedures for changing the ISO Auto settings.

 : Available
 : Not available