Solution
Still photos shot at a set interval can be stitched together automatically to create a time-lapse movie. A time-lapse movie shows how a subject changes in a much shorter period of time than the actual time it took. It is effective for a fixed-point observation of changing scenery, growing plants, celestial motion, etc.
Shooting Time-lapse Movies
1. Turn on the camera.
- Set the camera’s power switch to <ON>.
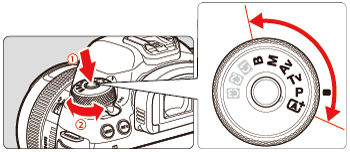
2. Set the shooting mode.
- Turn the Mode Dial to select the shooting mode.

Press the lock release button.

Turn the Mode Dial.
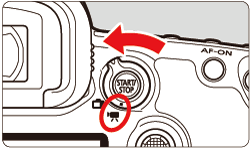
3. Set the Live View shooting/Movie shooting switch to <

>.
- The Live View image will appear on the LCD monitor.
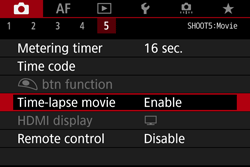
4. Select [Time-lapse movie].
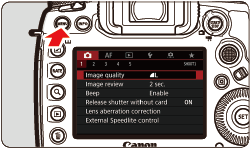
- Press the <MENU> button to display the menu screen.
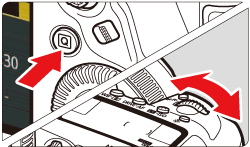
- Press the <
 > button and turn the <
 > dial to select the [
  ] or [
  ] tab.
| Movie |
Modes other than the  |  Tab Tab
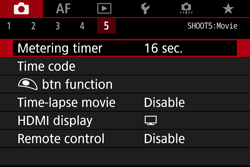 |
 Mode Mode |  tab tab
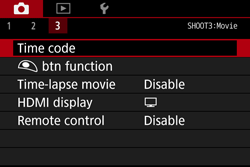 |
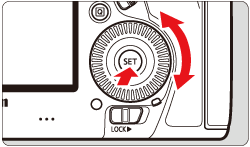
- Turn the <
 > dial to select [Time-lapse movie], then press <
 >.
>.
| Movie |
Modes other than the  | 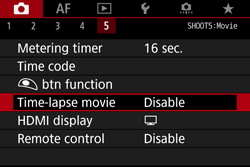 |
 Mode Mode | 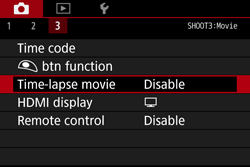 |
NOTE
If the [Only available when movie shooting is activated] message appears, press the <

> button, then repeat step 4.
5. Select [Enable].
- Turn the <
 > dial to select [Enable], then press the <INFO.> button.
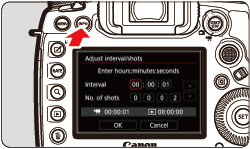
6. Set the shooting interval and number of shots.
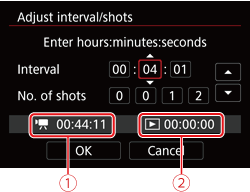
- Check the [
 : Time required] and [
  : Playback time] displayed at the bottom of the screen to set the shooting interval and number of shots.
- Select the item to be set (hours: minutes: seconds / number of shots), then press <
 > so [
  ] is displayed.
- Set the desired number, then press <
 >. (Returns to [
  ]).
]).

Time required

Playback time
NOTE
Settable from [00:00:01] to [99:59:59].
Settable from [0002] to [3600]. Set one digit at a time. If 3600 is set, the time-lapse movie will be approx. 2 min. for NTSC and approx. 2 min. 24 sec. for PAL.
- Select [ OK ] and press <
 >.
>.
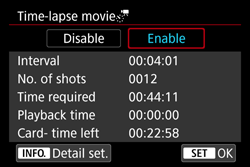
8. The current settings will be displayed.
Time required
Indicates the time required to shoot the set number of shots at the set interval. If it exceeds 24 hours, "*** days" will be displayed.
Playback time
Card- time left
The total length of a time-lapse movie that can be recorded on the card based on its remaining capacity.
9. Exit the menu.
Press the <MENU> button to turn off the menu screen.
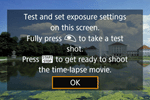
10. Read the message.
Read the message, select [OK], and press <

>.
11. Take test shots.
- Set the exposure and shooting functions, and press the shutter button halfway to focus as you do with Live View shooting.
- Press the shutter button completely to start taking test shots. The test images will be recorded to the card.
- If there are no problems with the test shots, go to the next step.
- To take test shots again, repeat this step.
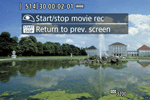
12. Press the <

> button.
- The camera will be ready to start shooting a time-lapse movie.
To return to step 10, press the <

> button again.
13. Shoot the time-lapse movie.
- Press the shutter button halfway to check the focus and exposure.
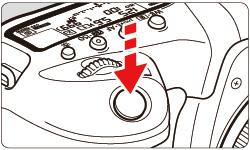
- Press the shutter button completely to start shooting the time-lapse movie.
- AF will not work during time-lapse movie shooting. The exposure setting for the first shot will be applied to subsequent shots.
- During time-lapse movie shooting, nothing will be displayed on the LCD monitor. [
 ] will blink on the LCD panel.
- Since the electronic shutter is used for shooting, the reflex mirror and shutter make no mechanical sound during time-lapse movie shooting.
- When the set number of shots are taken, the time-lapse movie shooting will stop and be automatically canceled.

Shots remaining

Time-lapse movie
IMPORTANT
- Do not point the camera toward an intense light source, such as the sun or an intense artificial light source. Doing so may damage the image sensor or the camera’s internal components.
- With time-lapse movie set to [Enable], you cannot set [
 : Movie recording quality ], [
  : Video system], or other settings.
- If the camera is connected to a computer or printer with the interface cable, or if an HDMI cable is connected to the camera, you cannot select [Enable].
- The maximum ISO speed will be ISO 12800 in the <P>, <Tv>, <Av>, and <B> modes, and in <M> mode with ISO Auto set.
- Bulb exposure cannot be performed. If the shooting mode is <B>, the operation will be the same as with the <P> mode.
- Movie Servo AF will not function.
- If the shutter speed is 1/30 sec. or slower, the exposure of the movie may not be displayed properly (may differ from that of the resulting movie).
- Do not zoom the lens during time-lapse movie shooting. Zooming the lens may cause the image to be out of focus, the exposure to change, or the lens aberration correction not to function properly.
- When shooting a time-lapse movie under a flickering light, noticeable image flickering, horizontal stripes (noise), or irregular exposures may be recorded.
- The image displayed during time-lapse movie shooting and the resulting movie may look different (in terms of flicker, depth of field, etc.).
- If you move the camera from left to right (panning) or shoot a moving subject during time-lapse movie shooting, the image may look extremely distorted.
- During time-lapse movie shooting, auto power off will not take effect. Also, you cannot adjust the shooting function and menu function settings, play back images, etc.
- Sound is not recorded for time-lapse movies.
- Single shooting setting is applied to time-lapse movie shooting regardless of the drive mode setting.
- The shooting function settings for the first shot will be applied to subsequent shots.
- If a shutter speed longer than the shooting interval, such as a long exposure, is set, the camera cannot shoot with the set interval. Also, shooting may not be performed when the shutter speed and the shooting interval are nearly the same.
- If the next scheduled shot is not possible, it will be skipped. This may shorten the recording time of the created time-lapse movie.
- If the time it takes to record to the card exceeds the interval between shots due to the shooting functions set or card performance, some of the shots may not be taken with the set intervals.
- The captured images are not recorded as still photos. Even if you cancel the time-lapse movie shooting after only one shot is taken, it will be recorded as a movie file.
- If the card does not have enough free space to record the set number of shots, [Playback time] will be displayed in red. Although the camera can continue shooting, the shooting will stop when the card becomes full.
- If you connect the camera to a computer with the interface cable provided with the camera and use EOS Utility (EOS software), set [
 : Time-lapse movie] to [Disable]. If it is set to [Enable], the camera cannot communicate with the computer.
- During time-lapse movie shooting, the lens’s Image Stabilizer will not operate.
- If the power switch is set to <OFF> or the Live View shooting/Movie shooting switch is operated, time-lapse movie shooting will be terminated and the setting is switched to [Disable].
- Even if a flash is used, it will not fire.
- Shooting-ready state of the time-lapse movie is canceled and the setting is switch to [Disable] with any of the following operations:
- Selecting [

: Dust Delete Data ], [

: Sensor cleaning ], [

: Clear all camera settings ], or [

:

Firmware ver].
- Selecting <C1>, <C2> or <C3> shooting modes.
- When time-lapse movie shooting ends, the settings are cleared automatically, and the camera returns to normal movie shooting. Note that if you have set the slow shutter speed for time-lapse movie shooting and the settings are automatically cleared, the shutter speed may be automatically changed to a speed within the settable range for normal movie shooting.
- If you start time-lapse movie shooting while the white [
 ] is displayed, the image quality of the time-lapse movie may deteriorate. It is recommended that you start time-lapse movie shooting after the white [
  ] disappears (camera’s internal temperature decreases).
NOTE
- Using a tripod is recommended.
- Taking test shots in advance is recommended.
- Regardless of the [
 : Movie recording quality] setting, the time-lapse movie will be recorded in

 (NTSC) or

 (PAL).
- To cancel the time-lapse movie shooting before it is completed, either press the shutter button completely or press the <
 > button ([Disable] is set). The time-lapse movie shot so far will be recorded on the card.
- You can play back the shot time-lapse movie with this camera the same way that you play back normal movies.
- If the time required for shooting is more than 24 hours but not more than 48, "2 days" will be indicated. If three or more days are required, the number of days will be indicated in 24-hour increments.
- Even if the time-lapse movie’s playback time is less than 1 sec., a movie file will still be created. For [Playback time], "00:00:00" will be displayed.
- If the shooting time is long, using DC Coupler DR-E6 and AC Adapter AC-E6N (sold separately) is recommended.
- In the [
 ] mode, the scene icon for the scene detected by the camera is displayed on the upper left of the screen.
Total Possible Time for Time-lapse Movie Shooting
You can shoot time-lapse movies with a fully-charged Battery Pack LP-E6N as shown in the table below (approx. time from start of shooting until the battery becomes exhausted). The possible shooting time will vary depending on the shooting conditions.
| Time-lapse Movie Shooting | Room Temperature (23°C / 73°F) | Low Temperatures (0°C / 32°F) |
| Shooting interval: 1 sec. | 3 hr. 50 min. | 3 hr. 40 min. |
| Shooting interval: 10 sec. | 5 hr. 20 min. | 5 hr. 10 min. |
When Using Remote Controller RC-6


 (NTSC) ] or [

 (PAL) ]. The frame rate will be switched automatically according to the [
  : Video system] setting.
 Press the lock release button.
 Turn the Mode Dial.
 >.
>.
 > button and turn the <
 > dial to select the [
  ] or [
  ] tab.

 Tab
Tab
 Mode
Mode tab
tab
 > dial to select [Time-lapse movie], then press <
 >.
>.


 Mode
Mode
 > button, then repeat step 4.
 > dial to select [Enable], then press the <INFO.> button.

 : Time required] and [
  : Playback time] displayed at the bottom of the screen to set the shooting interval and number of shots.
  > so [
  ] is displayed.
  >. (Returns to [
  ]).
]).
 Time required
  Playback time
  >.
>.
 >.
>.
 Mode
Mode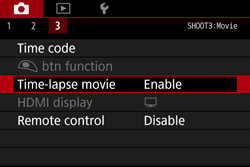


 (NTSC) or

 (PAL) from the still photos taken with the set intervals.
 >.
>.
 > button.
  > button again.
 ] will blink on the LCD panel.
 Shots remaining
 Time-lapse movie
 : Movie recording quality ], [
  : Video system], or other settings.
 : Time-lapse movie] to [Disable]. If it is set to [Enable], the camera cannot communicate with the computer.
 : Dust Delete Data ], [
  : Sensor cleaning ], [
  : Clear all camera settings ], or [
  :
:  Firmware ver].
 ] is displayed, the image quality of the time-lapse movie may deteriorate. It is recommended that you start time-lapse movie shooting after the white [
  ] disappears (camera’s internal temperature decreases).
 : Movie recording quality] setting, the time-lapse movie will be recorded in

 (NTSC) or

 (PAL).
 > button ([Disable] is set). The time-lapse movie shot so far will be recorded on the card.
 ] mode, the scene icon for the scene detected by the camera is displayed on the upper left of the screen.
 : Remote control] to [Enable].
 >(Immediate shooting)