Images are blurry or not in focus (PowerShot G7 X Mark II)
24-Feb-2016
8202873000
Solution
If images are blurry or not in focus, please confirm the information in the sections below.
IMPORTANT
- The following section explains the setting procedures when the camera’s shooting mode has been set to [ Program AE :
 ].
].
You can prevent camera shake by holding the camera firmly.
- Place the strap around your neck.
- When shooting, keep your arms close to your body and hold the camera securely to prevent it from moving. If you have raised the flash, do not rest your fingers on it.

When you press the [Shutter Button] halfway in low light conditions where camera shake is likely, a flashing  ] icon will appear.
 ] icon will appear.
In this case, please refer to the information below.
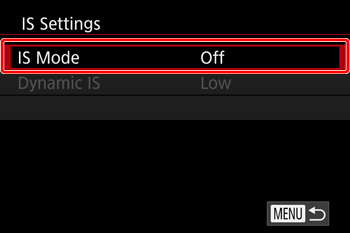
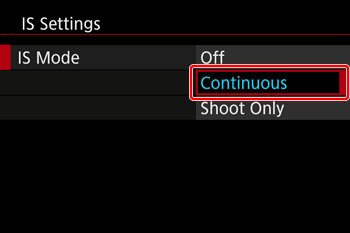
- Set the [IS mode] to [Continuous].
1. Press [MENU] button.

2. Choose the [  ] tab on the menu screen.
 ] tab on the menu screen.
 : Move the zoom lever to choose the [
  ] tab.
 : Press the [
  ] , [
] , [  ] buttons to choose [
  ].
].


3. Press the [  ] , [
] , [  ] buttons to choose [IS Settings], and then press the [
  ] button.
 ] , [
] , [  ] buttons to choose [IS Settings], and then press the [
  ] button.

4. Press the [  ] , [
] , [  ] buttons to choose [IS mode], and then press the [
  ] button.
 ] , [
] , [  ] buttons to choose [IS mode], and then press the [
  ] button.
5. Press the [  ] , [
] , [  ] buttons to choose [Continuous], and then press the [
  ] button.
 ] , [
] , [  ] buttons to choose [Continuous], and then press the [
  ] button.
- Set the flash to [On] (
 ).
).
1. Move the [  ] switch to raise the flash.
 ] switch to raise the flash.
2. Press the [  ] button to display the setting screen, press the [
  ] , [
] , [  ] buttons to choose [On], and then press the [
  ] button.
 ] button to display the setting screen, press the [
  ] , [
] , [  ] buttons to choose [On], and then press the [
  ] button.

IMPORTANT
- The flash cannot be set when lowered, even if you press the [
 ] button. Raise the flash with your finger, then configure the setting.
- Increase the [ISO speed].
1. Press the [  ] button to display the menu screen, press the [
  ] , [
] , [  ] buttons to align ISO speed with [
  ].
].
 ] button to display the menu screen, press the [
  ] , [
] , [  ] buttons to align ISO speed with [
  ].
].

2. Press the [  ] , [
] , [  ] buttons to choose the desired ISO speed, and then press the [
  ] button.
 ] , [
] , [  ] buttons to choose the desired ISO speed, and then press the [
  ] button.

IMPORTANT
- It is only possible to set the [ISO Speed] in [ C ]*, [ M ], [ Av ], [ Tv ], [ P ] or
 ] mode.
* : Options vary depending on the assigned shooting mode.
- Attach the camera to a tripod.
Additionally, you should set the [  : IS Mode] to [Off] when shooting with a tripod.
 : IS Mode] to [Off] when shooting with a tripod.
Please refer to the following example and be careful not to move the camera while shooting.
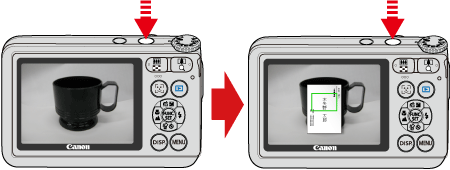
- Press the shutter button halfway to focus on the subject, then press fully to shoot.
Half-press the shutter button (press lightly to focus), and then press it fully (without releasing the shutter button, press it all the way down).

- Set the [AF assist beam] to [On].
1. Press the [MENU] button.

2. Choose the [  ] tab on the menu screen.
 ] tab on the menu screen.
 : Move the zoom lever to choose the [
  ] tab.
 : Press the [
  ] , [
] , [  ] buttons to choose [
  ].
].


3. Press the [  ] , [
] , [  ] buttons to choose [ AF assist beam ], and then press the [
  ] button.
 ] , [
] , [  ] buttons to choose [ AF assist beam ], and then press the [
  ] button.

4. Press the [  ] , [
] , [  ] buttons to choose [On], and then press the [
  ] button.
 ] , [
] , [  ] buttons to choose [On], and then press the [
  ] button.
- Confirm that functions which you do not intend to use (macro, etc.) are not set.
1. Confirm the [Focusing Range] setting.

2. Press the [  ] button to display the setting screen, and then press the [
  ] , [
] , [  ] buttons to choose a suitable [Focusing Range] for the shooting conditions.
 ] button to display the setting screen, and then press the [
  ] , [
] , [  ] buttons to choose a suitable [Focusing Range] for the shooting conditions.

- Please refer to the chart below for the focusing range.
| Shooting Mode | Focus Range | Maximum Wide Angle (  ) ) | Maximum Telephoto (  ) ) |
|---|---|---|---|
 | - | 5 cm - ∞ (2.0 in. - infinity) | 40 cm - ∞ (1.3 ft. - infinity) |
| Other modes | [  : Normal ] : Normal ] | 5 cm - ∞ (2.0 in. - infinity) | 40 cm - ∞ (1.3 ft. - infinity) |
[  : Macro ] / [ : Macro ] / [  : Underwater macro ] : Underwater macro ] | 5 cm - 50 cm (2.0 in. - 1.6 ft.) | - | |
[  : Quick ] : Quick ] | 1.5 m - 20 m (5.0 - 65.6 ft.) | 1.5 m - 20 m (5.0 - 65.6 ft.) |
- Shoot using the focus lock or AF lock
[Focus Lock]
As you continue to hold the shutter button halfway, recompose the shot as desired, and then press the shutter button all the way down.

[AF Lock]
The focus can be locked.
After you lock the focus, the focal position will not change even when you release your finger from the shutter button.
1. With the shutter button pressed halfway, press the [  ] button.
 ] button.

2. The focus is now locked, and [ MF ] (  ) and the MF indicator (
  ) are displayed.
 ) and the MF indicator (
  ) are displayed.
- To unlock the focus, after you release the shutter button, press the [
 ] button again.
3. Compose the shot, and shoot.
IMPORTANT
- Cannot be used with touch shutter.
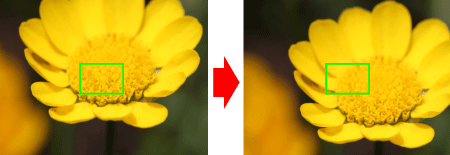
If you center on the light and dark contrasting area of the subject and push the [Shutter Button] halfway, or repeatedly push the [Shutter Button] halfway, the [AF frame] will appear and the camera will focus.

NOTE
The camera may not be able to focus in some conditions.