Solution
Dirt may adhere to the fixing assembly inside the machine and cause smudges and black streaks to appear on printouts. If this occurs, proceed as follows to clean the fixing assembly. Note that you cannot clean the fixing when the machine has documents waiting to be printed. To clean the fixing assembly, you need normal A4 size paper. Before starting, load A4 size paper in the paper drawer or multi-purpose tray. For details on the procedure for loading paper, see "e-Manual" (HTML manual) in the CD-ROM/DVD-ROM supplied with the printer.
1. Select the machine by clicking

in the system tray.
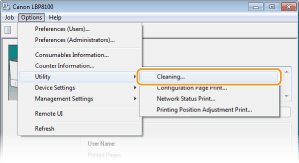
2. Select [Options]

[Utility]

[Cleaning].
3. Click [OK].

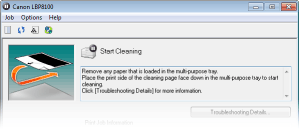
A cleaning pattern is printed on the loaded paper, and the message in the Printer Status Window changes to <Start Cleaning>.
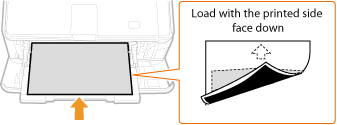
4. Load the printed cleaning paper in the multi-purpose tray with the printed side face down and the arrow toward the machine.

The paper is fed slowly into the machine, and cleaning starts. The cleaning is finished when the paper is completely ejected.
- Cleaning cannot be canceled once it starts. Wait until it finishes (approx. 110 seconds).
NOTE:
If paper remains in the multi-purpose tray
- Remove the loaded paper before loading the cleaning paper.
 in the system tray.
 [Utility]
  [Cleaning].

 A cleaning pattern is printed on the loaded paper, and the message in the Printer Status Window changes to <Start Cleaning>.

 The paper is fed slowly into the machine, and cleaning starts. The cleaning is finished when the paper is completely ejected.