Solution
You can connect two cameras via Wi-Fi and send images between them as follows.
NOTE
- Only Canon-brand cameras equipped with a Wi-Fi function can be connected to wirelessly. You cannot connect to a Canon-brand camera that does not have a Wi-Fi function, even if it supports Eye-Fi cards.
- Connections require that a memory card be in the camera.
- Keep your fingers or other objects off the Wi-Fi antenna area. Covering this may decrease the speed of your image transfers.
- Depending on the condition of the network you are using, it may take a long time to send movies. Be sure to keep an eye on the camera battery level.
- For movies that you do not compress, a separate, compressed file is sent instead of the original file. Note that this may delay transmission, and the file cannot be sent unless there is enough space for it on the memory card.
- On the screen, wireless signal strength is indicated by the following icons.
[

] high, [

] medium, [

] low, [

] weak
Connecting the cameras via Wi-Fi
Perform the following operations on both of the cameras to be connected.
1. Press the [Playback] (

) button to turn the camera on.
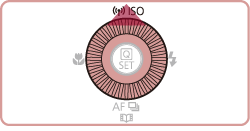
2. Press the [Wi-Fi] (

) button.
NOTE
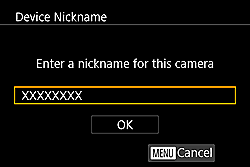
When making Wi-Fi settings for the first time, a screen will appear for you to register a nickname for the camera.
Press the [

], [

] buttons to choose [OK] and press the [

] button..
The nickname can also be changed from this screen. To change the nickname, press the [

] button, and enter a new nickname with the displayed keyboard.
This nickname will be displayed on the screen of target devices when connecting to other devices via Wi-Fi.
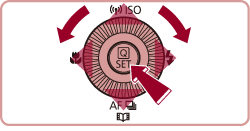
3. Press the [

], [

], [

], [

] buttons or turn the [

] dial to choose (

), and then press the [

] button.
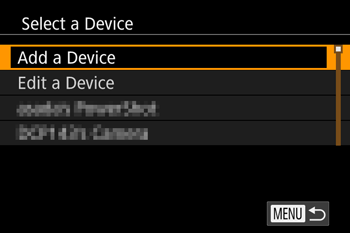
4. Press the [

], [

] buttons or turn the [

] dial to choose [Add a Device], and then press the [

] button.
NOTE
- If you register a camera, that camera's name will appear on the screen in step 4. From the second time onward, select the camera's name to make the connection.
5. The following screen appears.
Follow steps 1 – 4 on the target camera too.
Camera connection information will be added when [Start connection on target camera] is displayed on both camera screens.
Once the other camera is registered, the screen for sending images will appear. For instructions on how to send images, please refer to the explanations in step 7 and the subsequent steps.
Sending Images to a Camera Individually
7. Turn the [

] dial to choose an image to send, press the [

], [

] buttons to choose [Send this image], and then press the [

] button.
NOTE
- Choosing the Number of Recording Pixels (Image Size)
On the image transfer screen, choose [

] by pressing the [

], [

] buttons, and then press the [

] button. On the screen displayed, choose the recording pixel setting (image size) by pressing the [

], [

] buttons, and then press the [

] button.
- To send images at original size, select [No] as the resizing option.
- Choosing [ M2] will resize images that are larger than the selected size before sending.
- Movies cannot be resized.
8. A screen similar to the following one will be displayed.
[Transfer completed] is displayed after the image is sent, and the image transfer screen shown in step 7 is displayed again.
Sending Multiple Images to a Camera
9. Press the [

], [

] buttons or turn the [

] dial to choose [Select and send], and then press the [

] button.
10. Press the [

], [

] buttons or turn the [

] dial to choose a selection method, and then press the [

] button.
*[Select] has been chosen in the example image below.
11. A screen similar to the following one will be displayed.
Press the [

], [

], [

], [

] buttons to choose an image to send, and then press the [

] button. (

) will be displayed.
To cancel selection, press the [

] button again. (

) is no longer displayed.
You can also choose images in step 2 by moving the zoom lever twice toward (

) to access single-image display and then pressing the [

], [

] buttons.
After you finish choosing images, press the [MENU] button.
12. A screen similar to the following one will be displayed.
Press the [

], [

] buttons or turn the [

] dial to choose [OK].
13. A screen similar to the following one will be displayed.
Press the [

], [

] buttons or turn the [

] dial to choose [Send], and then press the [

] button.
After [Transfer completed] is displayed, the camera returns to the screen shown in step 7.
NOTE
- Choosing the Number of Recording Pixels (Image Size)
On the image transfer screen, choose [

] by pressing the [

], [

] buttons, and then press the [

] button. On the screen displayed, choose the recording pixel setting (image size) by pressing the [

], [

] buttons, and then press the [

] button.
- To send images at original size, select [No] as the resizing option.
- Choosing [ M2] will resize images that are larger than the selected size before sending.
- Movies cannot be resized.
 ] high, [
  ] medium, [
  ] low, [
  ] weak
 ) button to turn the camera on.
 ) button.

 ], [
], [  ] buttons to choose [OK] and press the [
  ] button..
 ] button, and enter a new nickname with the displayed keyboard.
 ], [
], [  ], [
], [  ], [
], [  ] buttons or turn the [
  ] dial to choose (
 ), and then press the [
  ] button.

 ], [
], [  ] buttons or turn the [
  ] dial to choose [Add a Device], and then press the [
  ] button.


 ], [
], [  ] buttons to choose the device and then pressing the [
  ] button. To add a new device, display the device selection screen by pressing the [
  ], [
], [  ] buttons, and then configure the setting. If you prefer not to display recent target devices, choose MENU > [
  4] tab > [Wi-Fi Settings] > [Target History] > [Off].
 ] dial to choose an image to send, press the [
  ], [
], [  ] buttons to choose [Send this image], and then press the [
  ] button.
 ] by pressing the [
  ], [
], [  ] buttons, and then press the [
  ] button. On the screen displayed, choose the recording pixel setting (image size) by pressing the [
  ], [
], [  ] buttons, and then press the [
  ] button.
 ], [
], [  ] buttons or turn the [
  ] dial to choose [Select and send], and then press the [
  ] button.
 ], [
], [  ] buttons or turn the [
  ] dial to choose a selection method, and then press the [
  ] button.

 ], [
], [  ], [
], [  ], [
], [  ] buttons to choose an image to send, and then press the [
  ] button. (
 ) will be displayed.
  ] button again. (
 ) is no longer displayed.
 ) to access single-image display and then pressing the [
  ], [
], [  ] buttons.
 ], [
], [  ] buttons or turn the [
  ] dial to choose [OK].
 ], [
], [  ] buttons or turn the [
  ] dial to choose [Send], and then press the [
  ] button.
 ] by pressing the [
  ], [
], [  ] buttons, and then press the [
  ] button. On the screen displayed, choose the recording pixel setting (image size) by pressing the [
  ], [
], [  ] buttons, and then press the [
  ] button.