


Can captured images be recorded separately to the cards selected? (EOS 5DS / EOS 5DS R)
Solution
If both a CF ( ) card and SD (
  ) card are inserted into the camera, you can set the recording method for the cards.
) card and SD ( ) card are inserted into the camera, you can set the recording method for the cards.This section explains how to record a captured image to both the CF and SD cards simultaneously with a different size selected for each.
1. Set the power switch to [ON].
2. Press the [MENU] button (  ) to display the menu screen. Next, press the [
  ] button (
  ) to select [
  ] tab (
  ).
).
) to display the menu screen. Next, press the [ ] button ( ) to select [ ] tab ( ).
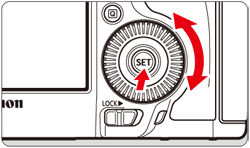
3. Turn the [  ] dial to select [Record func+card/folder sel.], then press [
  ].
].
] dial to select [Record func+card/folder sel.], then press [ ].
4. Select [Record func.] when the next screen is displayed, then press [ ].
].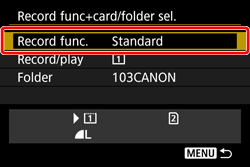
5. Select the recording method from [Record func.].
Turn the [ ] dial to choose [Rec. separately], then press [ ].
] dial to choose [Rec. separately], then press [ ].
REFERENCE
You can select the desired recording method from the four options listed below:
- Standard: Images will be recorded to the card selected with [Record/play].
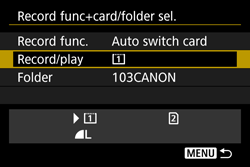
- Auto switch card: Same as with the [Standard] setting, but if the card becomes full, the camera will automatically switch to the other card to record images. When the card is automatically switched, a new folder will be created.
- Rec. separately: You can set the image-recording quality for each card. Each image is recorded to both the CF and SD cards at the imagerecording quality you set. You can freely set the image-recording quality, such as to
 and
and  , or
, or  and
and  .
. - Rec. to multiple: Each image is recorded to both the CF and SD cards simultaneously at the same image size. You can also select RAW+JPEG.
6. When you return to the [Record func+card/folder sel.] screen after completing the procedure, [Rec. separately] will be displayed for the recording method.
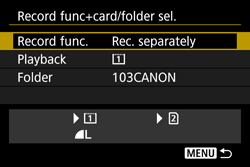
This concludes the steps for setting the recording method to [Rec. Separately].
IMPORTANT
- If [Rec. separately] is set and different recording qualities are set for the CF card and SD card, the maximum burst for continuous shooting will decrease.
- Even if [Record func.] is set to [Rec. to multiple], movies cannot be recorded to both the CF card and SD card at the same time. If [Rec. separately] or [Rec. to multiple] is set, the movie will be recorded to the card which is set for [Playback].
NOTE
[Rec. separately] and [Rec. to multiple]
- The same file number is used for recording to both the CF card and SD card.
- The LCD panel will display the number of possible shots of the card having the lower number.
- If one of the cards becomes full, [Card* full] will be displayed and shooting will be disabled. If this happens, either replace the card or set [Record func.] to [Standard] or [Auto switch card], and select the card with remaining capacity to continue shooting.
Selecting the CF or SD Card for Playback
7. Return to the [Record func+card/folder sel.] screen, then turn the [ ] dail to select [Playback] and press [ ].
] dail to select [Playback] and press [ ].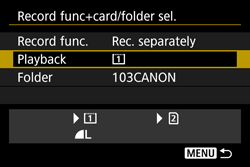
*When [Rec. separately] / [Rec. to multiple] is set.
REFERENCE
- If [Record func.] is set to [Rec. separately] or [Rec. to multiple], Select [Record/play].
8. Select [ : CF Card ] or [ : SD card ] and press [ ].
: CF Card ] or [ : SD card ] and press [ ].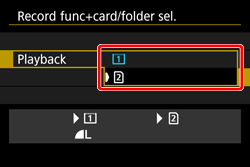
When you press the camera's [  ] button, images will be played back from the selected card.
] button, images will be played back from the selected card.Next, select the size (recorded pixels) and the type (JPEG or RAW) of the image you want to record to the card.
2. Press the [MENU] button ( ) to display the menu screen. Next, press the [ ] button ( ) to select [  ] tab ( ).
) to display the menu screen. Next, press the [ ] button ( ) to select [ ] tab ( ).
2. Turn the [ ] dial to select [Record func.] and press [ ].
] dial to select [Record func.] and press [ ].
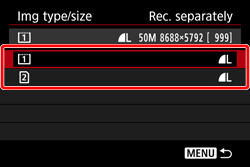
3. Turn the [ ] dial to select the desired card, then press [ ].
] dial to select the desired card, then press [ ].(The CF card has been selected in the example image.)
4. Turn the [ ] dial to select the image recording quality, then press [ ].
] dial to select the image recording quality, then press [ ].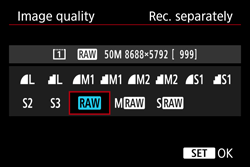
5. Confrim that the [ ] setting has been changed.
] setting has been changed.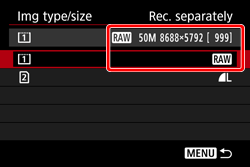
6. Repeat steps 3 through 4, select the other card, and make the settings.
NOTE
The image recording quality can also be set using the following procedure:
1. Press the [INFO.] button to display the [Quick Control] screen.
2. On the [Quick Control] screen, press the [ ] button to display the selection frame.
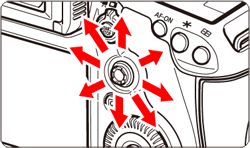
] button to display the selection frame.3. Operate [  ] to move the selection frame to the position indicated by in the example image.
] to move the selection frame to the position indicated by in the example image.
4. Turn the [ ] dial to select the desired setting, then press [ ].
] dial to select the desired setting, then press [ ].