Solution
This section explains how to install the MF Drivers so the machine is ready to print from a computer.
NOTE
The options to be displayed differ depending on your country or region.
You can choose to install standard software and the e-Manual with [Easy Installation], or specify the software and manuals to install with [Custom Installation].
Installing with [Easy Installation]
1. Log on to the computer with an administrator account.
2. Insert the User Software and Manuals CD-ROM/DVD-ROM into the drive on the computer.
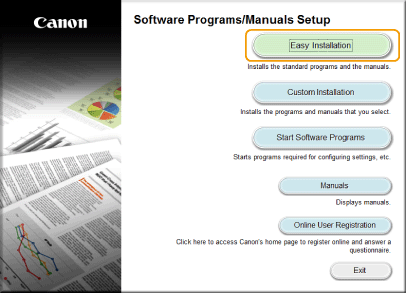
3. Click [Easy Installation].
- If the above screen does not appear
- Windows XP/Server 2003
[Start]

select [Run]

enter "D:\MInst.exe"

click [OK].
- Windows Vista/7/Server 2008/Server 2008 R2
[Start]

enter "D:\MInst.exe" in [Search programs and files] or [Start Search]

press the [ENTER] key on the keyboard.
- Windows 8/Server 2012
Right-click the lower-left corner of the screen

select [Run]

enter "D:\MInst.exe"

click [OK].
- Windows 8.1/Server 2012 R2
Right-click [Start]

select [Run]

enter "D:\MInst.exe"

click [OK].
* This following example uses "D:" as the name of the CD-ROM/DVD-ROM drive. The CD-ROM/DVD-ROM drive name may be different on your computer.
- If you do not want to install the e-Manual on your computer or want to customize installed software, click [Custom Installation].
- If [AutoPlay] is displayed, click [Run MInst.exe].
4. Select [Network Connection], and click [Next].
- In Server 2003/Server 2008/Server 2008 R2/Server 2012/Server 2012 R2, this screen is not displayed. Proceed to the following procedure.
6. Read the License Agreement, and click [Yes] to agree.
7. Click [Next].
When the following screen appears, click [Yes].
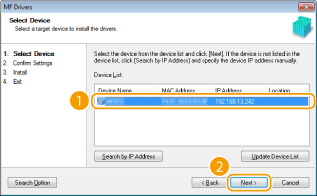
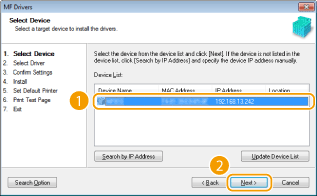
8. Select the machine, and click [Next].
If no machines are displayed in [Device List]
- Check the computer and machine connection and IP address settings (For details, see the "e-Manual" (HTML manual) in the CD-ROM/DVD-ROM supplied with the machine.), and click [Update Device List]. If the machine is still not displayed at all, click [Search by IP Address]
 enter the IP address set on the machine
  [OK].
[OK].
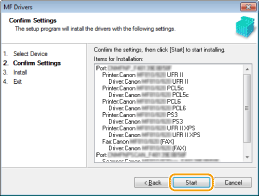
9. Check the settings, and click [Start].
11. Follow the on-screen instructions to install the e-Manual.
12. Read the information in the following screen carefully, select [Accept] or [Do Not Accept], and click [Next].
- The screen may not appear depending on the model you are using.
If you select [Accept], the Product Extended Survey Program is installed.
- The Product Extended Survey Program is a program to send basic information related to installation and usage of the machine to Canon every month for 10 years. It does not send any other information, including your personal information. You can uninstall the Product Extended Survey Program at any time.
14. Select the [Restart Computer Now (Recommended)] check box, and click [Restart] after removing the CD-ROM/DVD-ROM.
Installing with [Custom Installation]
1. Log on to the computer with an administrator account.
2. Insert the User Software and Manuals CD-ROM/DVD-ROM into the drive on the computer.
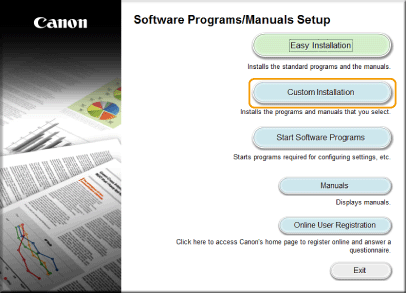
3. Click [Custom Installation].
- If the above screen does not appear
- Windows XP/Server 2003
[Start]

select [Run]

enter "D:\MInst.exe"

click [OK].
- Windows Vista/7/Server 2008/Server 2008 R2
[Start]

enter "D:\MInst.exe" in [Search programs and files] or [Start Search]

press the [ENTER] key on the keyboard.
- Windows 8/Server 2012
Right-click the lower-left corner of the screen

select [Run]

enter "D:\MInst.exe"

click [OK].
- Windows 8.1/Server 2012 R2
Right-click [Start]

select [Run]

enter "D:\MInst.exe"

click [OK].
* This following example uses "D:" as the name of the CD-ROM/DVD-ROM drive. The CD-ROM/DVD-ROM drive name may be different on your computer.
- If you want to install standard software and the e-Manual on your computer, click [Easy Installation].
- If [AutoPlay] is displayed, click [Run MInst.exe].
4. Select [Network Connection], and click [Next].
- In Server 2003/Server 2008/Server 2008 R2/Server 2012/Server 2012 R2, this screen is not displayed. Proceed to the following procedure.
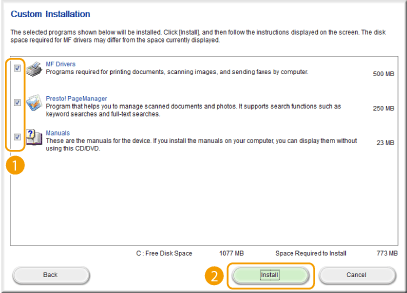
5. Select the check box next to the application you want to install, and click [Install].
6. Read the License Agreement, and click [Yes] to agree.
7. Click [Next].
When the following screen appears, click [Yes].
8. Select the machine, and click [Next].
If no machines are displayed in [Device List]:
- Check the computer and machine connection and IP address settings (For details, see the "e-Manual" (HTML manual) in the CD-ROM/DVD-ROM supplied with the machine), and click [Update Device List]. If the machine is still not displayed at all, click [Search by IP Address]
 enter the IP address set on the machine
  [OK].
[OK].
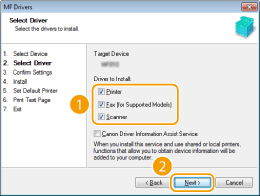
9. Select the drivers to install, and click [Next].
- If you did not select [Printer], proceed to step 11.
- If you did not select either [Printer] or [Fax], proceed to step 12.
To obtain device information for using a print server
- Select the [Canon Driver Information Assist Service] check box.
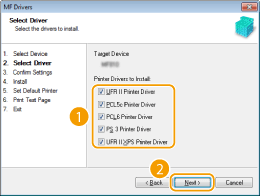
10. Select the printer drivers to install, and click [Next].
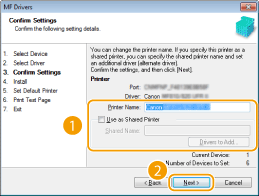
11. Specify details for each driver.
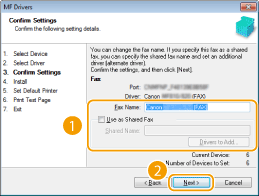
- The screen below does not appear if you are using the model without a fax function.
[Printer Name]/[Fax Name]
- Change the name as necessary.
[Use as Shared Printer]/[Use as Shared Fax]
- Select the check box if you want to share the machine (using the computer where you are performing the installation as a print server). For details, see the "e-Manual" (HTML manual) in the CD-ROM/DVD-ROM supplied with the machine.
[Shared Name]
- Change the shared name as necessary.
[Drivers to Add]
- If you have selected the [Use as Shared Printer]/[Use as Shared Fax] check box, install additional drivers as necessary. Select the operating system, and click [OK] to install additional drivers.
12. Check the displayed information, and click [Start].
13. Configure the machine normally used and make a test print.
- To configure the machine as the machine normally used, select the driver, and click [Next].
- To print a test page, select the driver, and click [Next].
15. Follow the on-screen instructions to install Presto! PageManager and the e-Manual.
16. Read the information in the following screen carefully, select [Accept] or [Do Not Accept], and click [Next].
- The screen may not appear depending on the model you are using.
If you select [Accept], the Product Extended Survey Program is installed.
- The Product Extended Survey Program is a program to send basic information related to installation and usage of the machine to Canon every month for 10 years. It does not send any other information, including your personal information. You can uninstall the Product Extended Survey Program at any time.
18. Select the [Restart Computer Now (Recommended)] check box, and click [Restart] after removing the CD-ROM/DVD-ROM.
Checking the Results of the Installation
NOTE
If the icon is not displayed
- Uninstall the drivers and repeat the setup from the beginning.
- You can install Presto! PageManager with [Custom Installation]. When Presto! PageManager is installed correctly, a Presto! PageManager icon appears on the desktop.
- The screen may not appear depending on the model you are using.

 select [Run]
  enter "D:\MInst.exe"
  click [OK].
 enter "D:\MInst.exe" in [Search programs and files] or [Start Search]
  press the [ENTER] key on the keyboard.
 select [Run]
  enter "D:\MInst.exe"
  click [OK].
 select [Run]
  enter "D:\MInst.exe"
  click [OK].



 enter the IP address set on the machine
  [OK].
[OK].



 select [Run]
  enter "D:\MInst.exe"
  click [OK].
 enter "D:\MInst.exe" in [Search programs and files] or [Start Search]
  press the [ENTER] key on the keyboard.
 select [Run]
  enter "D:\MInst.exe"
  click [OK].
 select [Run]
  enter "D:\MInst.exe"
  click [OK].



 enter the IP address set on the machine
  [OK].
[OK].
