Solution
Remote Live View Shooting
You can operate your camera remotely from EOS Utility and shoot still photos and movies while looking at the subject on the EOS Utility screen. Also, the captured still image is directly saved on your computer; therefore, you can check it with Digital Photo Professional.
After shooting a movie, you can download the image data from the camera's memory card to a computer and save them in a selected folder.
This page describes how to shoot still photos and movies remotely using the Remote Live View function in default settings.
For details on how to change settings to enable Remote Live View shooting, please refer to the instruction manuals (included on the CD-ROM) that came with your camera.
Remote Live View Shooting Preparations
1. Connect your camera to the computer, and then set the camera's power switch to <ON>.
For more information on connecting the camera to a computer, please refer to the 'Related information' section at the end of the page.
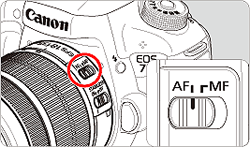
2. Set the lens’s focus mode switch to <AF>.
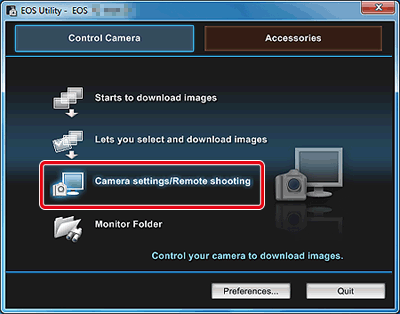
3. Once EOS Utility starts, click [Camera settings/Remote shooting].
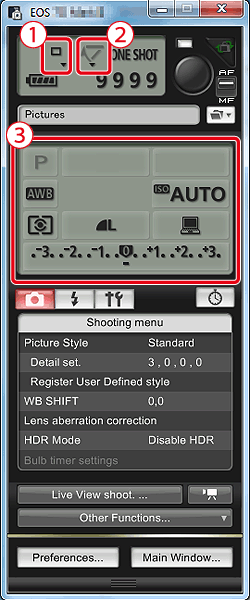
4. The capture window appears.
Next, perform settings for shooting.

Drive mode setting
Right-click

(click while holding down the
key for Macintosh) under the setting item and select settings from the menu*1 that appears
 Mirror lockup menu display and setting
Right-click (click while holding down the key for Macintosh) under the the setting item and select settings from the menu*1 that appears.
 Double-click or right-click (click while holding down the key for Macintosh) the setting item and select the setting*1*2
*1: You can also use the scroll-wheel on your mouse to select settings for items in the settings window and menus that appear. You cannot use the scroll-wheel in the mirror lockup menu.
*2: You can right-click the Exposure level/AEB level item and perform AEB setting using the key + scroll-wheel.
IMPORTANT
- You cannot perform RAW processing. If you connect the camera to your computer during in-camera RAW processing, the camera and computer will connect after you finish processing.
NOTE
- You can also use mirror lockup with remote shooting. (You cannot take test shots after setting mirror lockup.)
- Self-timer shooting is also possible.
For details on shooting still photos, proceed to the 'Shooting Still Photos' section; and for details on shooting movies, please refer to the 'Shooting Movies' section.
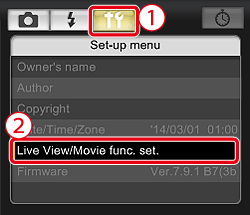
5. Once you have completed step 1-4 in 'Remote Live View Shooting Preparations', set the Live View function.
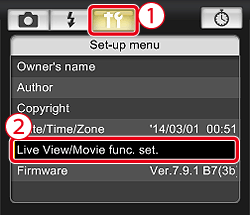
5-1. Click

to display the [Set-up menu], and then click [Live View/Movie func. set.](

).
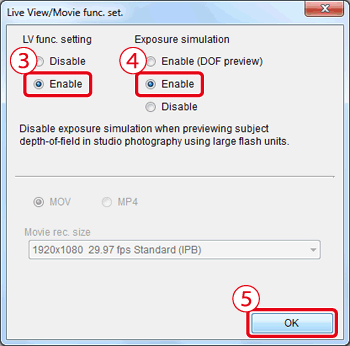
5-2. The [Live View/Movie func. set.] window appears, select [Enable] (

) for [LV func. setting], select [Enable] (

) for [Exposure simulation], and then click the [OK] (

).
6. Click the [Live View shoot.] button.
IMPORTANT
You cannot operate the camera when the [Remote Live View window] is displayed. Pressing the <

> (Live View shooting) button will also display the Live View image on the camera’s LCD monitor, allowing you to view the image while operating the camera.
NOTE
- You can shoot by operating the capture window, even if the [Remote Live View window] is not displayed.
- •To perform exposure simulation with [Remote Live View window] or enable display of histograms, set your camera’s Custom Function [Live View exposure simulation] to [Enable].
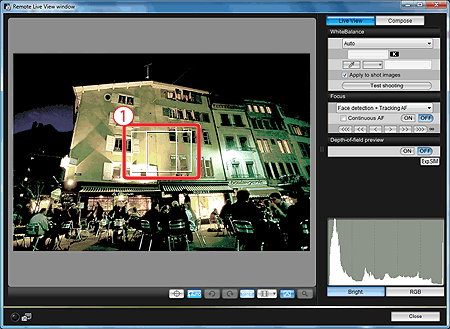
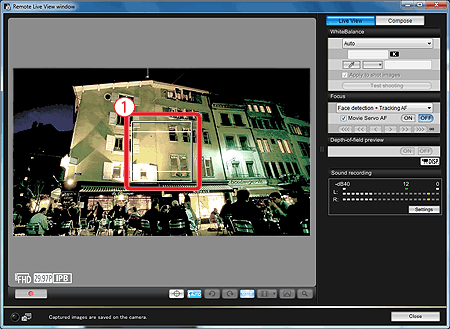
7. The [Remote Live View window] appears, so drag the enlargement display frame to move it to the position where you want to focus.
Drag
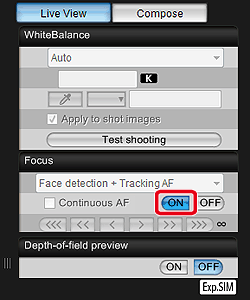
8. Click [ON].
- AF is executed.
- When focus is achieved, the camera makes a beeping sound and the AF point turns green.
- If focus is not achieved, the AF point turns red.
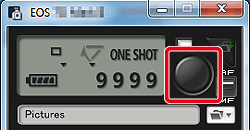
9. When focus is achieved and the camera is ready for shooting, click the camera release button to shoot.
10. The captured images are transferred to the computer, Digital Photo Professional starts automatically, and the captured images are displayed.
This completes the explanation of still photo shooting operations with Remote Live View.
NOTE
- You can also shoot using the <space> bar on the keyboard.
- The [Test Shooting] window appears when you click the [Test shooting] button. During flash shooting, you can take a test shot under the same conditions as an actual shot, and adjust the white balance based on the test shot image.
- You can save shot images to both your computer and a memory card by checkmarking [Save also on the camera’s memory card] in preferences ([Remote Shooting] tab sheet).
- You can change the software that starts up automatically when remotely shot images are transferred to your computer from Digital Photo Professional to ImageBrowser EX or other software in preferences ([Linked Software] tab sheet)
5. Once you have completed step 1-4 in 'Remote Live View Shooting Preparations', click [

].
Set your camera’s Live View shooting/Movie shooting switch to <

>.
IMPORTANT
- You cannot operate the camera when the [ ] button is clicked. To operate the camera, click the [ ] button again or close the [Remote Live View window].
- You cannot shoot movies using Remote Live View function when Eos Utility is wirelessly connected.
6. The [Remote Live View window] appears, so drag the enlargement display frame to move it to the position where you want to focus.
Drag
7. Click [ON].
- AF is executed.
- When focus is achieved, the camera makes a beeping sound and the AF point turns green.
- If focus is not achieved, the AF point turns red.
8. Set the movie functions on the capture window. Generally, the capture window appears behind the Remote Live View window.
8-1. Click
to display the [Set-up menu], and then click [Live View/Movie func. set.] (
).
8-2. The [Live View/Movie func. set.] window appears.
First, select the recording format (
).
Next, select the desired [Movie rec. size] (
) from the menu.
Click [OK] (
).
REFERENCE
The following movie compression formats can be selected.
- ALL-I (I-only): Compresses one frame at a time for recording. Although the file size will be larger than with IPB, the movie will be more suited for editing.
- IPB: Compresses multiple frames at a time efficiently for recording. Since the file size will be smaller than with ALL-I, you can shoot longer.
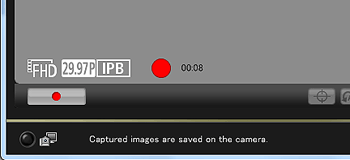
9. Click the [

] and begin shooting.
- At the bottom left of the [Remote Live View window], a [
 ] icon and the recording time are displayed.
- Click the [ ] again to end shooting.
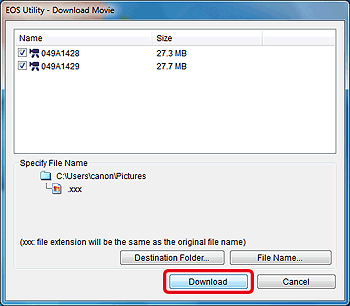
10. When the [Remote Live View window] closes, the following window appears if some image data remains to be downloaded to your computer. Select [Download].
11. After you click the [Download], the file names of the image data shot in movie mode (movie/still image) appear in a list.
After specifying [Destination Folder] and [File Name], click the [Download] in the window, and image data will be downloaded from the camera's memory card to your computer. Image data having a check mark removed from its file name are not downloaded. Afterward, when downloading image data to your computer from the camera's memory card, please refer to the instruction manuals (included on the CD-ROM) that came with your camera.
This completes the explanation of movie shooting operations with Remote Live View.