Customizing the operation buttons on the EOS 7D Mark II (assigning functions other than the default functions to the buttons)
Solution
You can assign often-used functions to camera buttons or dials according to your preferences.
1. Set the lens’s focus mode switch to <AF>.

2. Set the camera's power switch to <ON>.
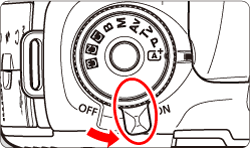
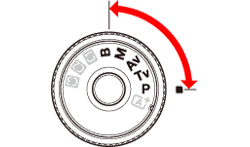
3. Set the Mode Dial to < P / Tv / Av / M / B>.
4. Press the <MENU> button to display the menu screen.

5. Press the < > button and select the [
  ] tab.
 > button and select the [
  ] tab.
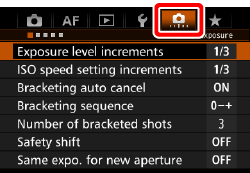

6. Turn the < > dial to select the [
  ] tab.
 > dial to select the [
  ] tab.

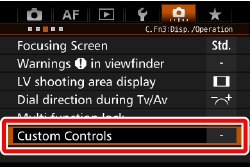
7. Turn the < > dial to select [Custom Controls], then press <
 >.
>.
 > dial to select [Custom Controls], then press <
 >.
>. 

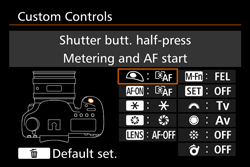
8. Turn the < > dial to select a camera button or dial, then press <
 >.
>.
 > dial to select a camera button or dial, then press <
 >.
>. 
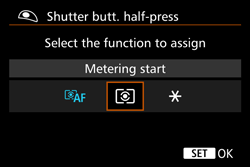
9. Turn the < > dial to select a camera function, then press <
 >.
>.
 > dial to select a camera function, then press <
 >.
>.
- If the [
 ] icon appears on the bottom left, you can press the <INFO.> button and set other related options.
10. Exit the setting.
● When you press < > to exit the setting, the screen in step 8 will reappear.
 > to exit the setting, the screen in step 8 will reappear.
● Press the <MENU> button to exit.
NOTE
With the screen in step 8 displayed, you can press the < > button to revert the Custom Control settings to their defaults. Note that the [
  : Custom Controls] settings will not be canceled even if you select [
  : Clear all Custom Func. (C.Fn)].
 > button to revert the Custom Control settings to their defaults. Note that the [
  : Custom Controls] settings will not be canceled even if you select [
  : Clear all Custom Func. (C.Fn)].
* The AF stop button ( ) is provided only on super telephoto IS lenses.
 ) is provided only on super telephoto IS lenses.
| Function |  |  |  |  |  * * |  |  |  |  |  |  | ||
|---|---|---|---|---|---|---|---|---|---|---|---|---|---|
| AF |  | Metering and AF start |  |  *1 *1 |  *1 *1 |  | |||||||
 | AF stop |  |  |  |  | ||||||||
 | Switch to registered AF function |  *2 *2 |  *2 *2 | ||||||||||
 | ONE SHOT <-> AI SERVO |  |  |  |  | ||||||||
 | Switch to registered AF point |  *3 *3 |  *3 *3 | ||||||||||
 | Selected AF point ↔ Center/Registered AF point |  *4 *4 | |||||||||||
 | AF point direct selection |  |  *5 *5 | ||||||||||
 | Direct AF point selection: Vertical |  | |||||||||||
 | Direct AF area selection |  | |||||||||||
| Exposure |  | Metering start |  | ||||||||||
 | AE lock |  |  |  |  |  |  | ||||||
 | AE lock (while button pressed) |  | |||||||||||
 | AE lock (hold) |  |  |  |  |  |  | ||||||
 | AE lock, AF stop |  |  | ||||||||||
 | FE lock |  |  |  |  | ||||||||
 | Set ISO speed (hold button, turn  ) ) |  | |||||||||||
 | ISO (hold down lever, turn  ) ) |  | |||||||||||
 | Set ISO speed (  during meter) during meter) |  | |||||||||||
 | Exposure compensation (hold button, turn  ) ) |  | |||||||||||
 | Exposure compensation (hold down lever, turn  ) ) |  | |||||||||||
 | Shutter speed setting in M mode |  |  | ||||||||||
 | Aperture setting in M mode |  |  | ||||||||||
| Function |  |  |  |  |  * * |  |  |  |  |  |  | ||
|---|---|---|---|---|---|---|---|---|---|---|---|---|---|
| Images |  | One-touch image quality setting |  *6 *6 |  *6 *6 | |||||||||
 | One-touch image quality (hold) |  *6 *6 |  *6 *6 | ||||||||||
 | Image quality |  | |||||||||||
 | Picture Style |  | |||||||||||
| Operation |  | Depth-of-field preview |  | ||||||||||
 | IS start |  |  | ||||||||||
 | Menu display |  | |||||||||||
 | Register/recall shooting function |  *7 *7 |  *7 *7 | ||||||||||
 | Image Playback |  | |||||||||||
 | Magnify/Reduce (press SET, turn  ) ) |  | |||||||||||
 | Cycle:  ・ ・  / DRIVE・AF / WB ・ / DRIVE・AF / WB ・  |  | |||||||||||
 | Unlock while button pressed |  | |||||||||||
 | Flash function settings |  | |||||||||||
 | No function (disabled) |  |  |  |  |  |  |  |  | ||||
*1: When assigned to the < AF-ON > or < > button, pressing the <INFO.> button while the setting screen is displayed will enable you to set the detailed AF settings. When shooting, pressing the < AF-ON > or <
 > button will execute AF as it was set.
 > button, pressing the <INFO.> button while the setting screen is displayed will enable you to set the detailed AF settings. When shooting, pressing the < AF-ON > or <
 > button will execute AF as it was set.
*2: On the setting screen, press the <INFO.> button to display the detailed settings screen. Turn the < > or <
 > dial to select the parameter to be registered, then press <
 > to append a checkmark [
  ]. When you select a parameter and press <
 >, you can adjust the parameter. By pressing the <
 > button, you can revert the settings to their defaults.
 > or <
 > dial to select the parameter to be registered, then press <
 > to append a checkmark [
  ]. When you select a parameter and press <
 >, you can adjust the parameter. By pressing the <
 > button, you can revert the settings to their defaults.
*3: On the setting screen, when you press the <INFO.> button, you can select [Switch only when btn is held] or [Switch each time btn is pressed].
*4: On the setting screen, when you press the <INFO.> button, you can select [Switch to center AF point] or [Switch to registered AF point].
*5: On the Multi-controller setting screen, when you press the <INFO.> button, you can press the center of < > to select [Switch to center AF point] or [Switch to registered AF point].
 > to select [Switch to center AF point] or [Switch to registered AF point].
*6: On the setting screen, by pressing the <INFO.> button, you can select the image recording quality for this function.
*7: On the setting screen, press the <INFO.> button to display the detailed settings. Turn the < > or <
 > dial to select the function to be registered, then press <
 > to append a checkmark [
  ] to it. When you select a parameter and press <
 >, you can adjust the parameter. By pressing the <
 > button, you can revert the settings to their defaults. By selecting [Register current settings], the camera’s current settings will be registered.
 > or <
 > dial to select the function to be registered, then press <
 > to append a checkmark [
  ] to it. When you select a parameter and press <
 >, you can adjust the parameter. By pressing the <
 > button, you can revert the settings to their defaults. By selecting [Register current settings], the camera’s current settings will be registered.
