Solution
Setting the video format to MXF+MP4, you can record simultaneously clips in MXF format and clips in MP4 format. When the video format is set to MXF+MP4, start and stop recording the MXF clip with the START/STOP button, as usual. You can select whether that action would automatically record also an MP4 clip (MXF+MP4 simultaneous recording) or whether to assign a separate control to start and stop recording MP4 clips (MP4 backup recording).
MXF+MP4 Simultaneous Recording: The camcorder will record the same scene in two different formats.
MP4 Backup Recording: The camcorder will keep recording continuously in MP4 format, ensuring that you never miss important shooting opportunities. You can set the [Bit Rate/Resolution] setting of MP4 clips to [3 Mbps 640x360] or link it to the video configuration of the MXF clips.
MP4 backup recording is explained in the following sections.
1. Hold down the button on the <POWER> switch and slide the switch to <CAMERA>.
2. Press the <MENU> button.
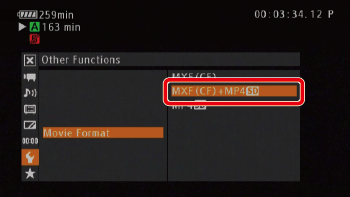
3. Set the video format to [MXF (CF)+MP4

].
Push the joystick up/down to select [

Other Functions] -> [Movie Format].
Select [MXF (CF)+MP4

] and press <SET>.

: Joystick

: In the following procedures, 'Press <SET>' refers to the action of pressing the joystick straight down to select the desired setting.
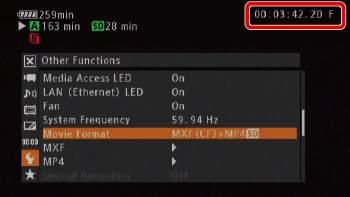
The time code running mode will change to [Free Run] and start advancing.
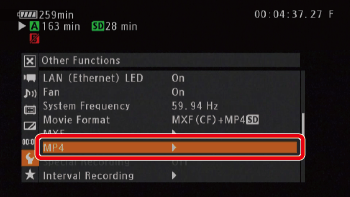
4. Open the MP4 [Bit Rate/resolution] submenu.
Select [

Other Functions] -> [MP4].
Select [Bit Rate/resolution].
Select one of the options below:
- [Linked to MXF]: Settings will be automatically determined according to the MXF bit rate and resolution.
- [3 Mbps 640x360]: Recording will be set to 3 Mbps 640×360.
Video configurations of MXF clips and MP4 clips are shown in the table below.
| MXF Clips | MP4 Clips |
|---|
| [Bit Rate/Resolution] in MXF+MP4 mode |
|---|
| [Bit Rate/Resolution] set to [Linked to MXF] | [Bit Rate/Resolution] set to [3 Mbps 640x360]
|
|---|
| Bit rate | Resolution | Frame rate | Bit rate | Resolution | Frame rate | Bit rate/ Resolution | Frame rate |
|---|
| 50 Mbps | 1920×1080 | 59.94i | 35 Mbps | 1920×1080 | 59.94P | 3 Mbps /
640×360 | 29.97P |
| 29.97P | 24 Mbps | 29.97P |
| 23.98P | 23.98P | 23.98P |
| 1280×720 | 59.94P | 17 Mbps | 1280×720 | 59.94P | 29.97P |
| 29.97P | 29.97P |
| 23.98P | 9 Mbps | 23.98P | 23.98P |
| 35 Mbps | 1920×1080 | 59.94i | 35 Mbps | 1920×1080 | 59.94P | 29.97P |
| 29.97P | 24 Mbps | 29.97P |
| 23.98P | 23.98P | 23.98P |
| 1440×1080 | 59.94i | 35 Mbps | 59.94P | 29.97P |
| 1280×720 | 59.94P | 17 Mbps | 1280×720 | 59.94P |
| 29.97P | 29.97P | 29.97P |
| 23.98P | 9 Mbps | 23.98P | 23.98P |
| 25 Mbps | 1440×1080 | 59.94i | 35 Mbps | 1920×1080 | 59.94P | 29.97P |
| 29.97P | 24 Mbps | 29.97P |
| 23.98P | 23.98P | 23.98P |
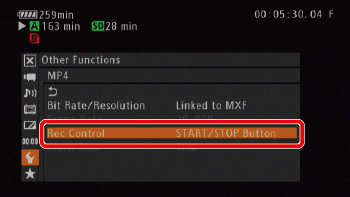
5. Open the MP4 [Rec Control] submenu.
Select [

Other Functions] -> [MP4] -> [Rec Control].
Select [Assignable Buttons] then press <SET>.
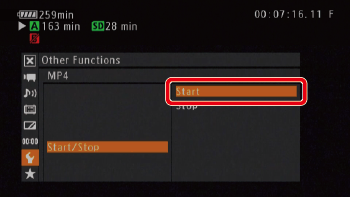
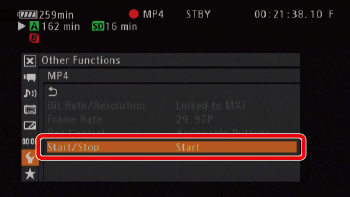
6. Open the MP4 [Start/Stop] menu.
- Select [
 Other Functions] -> [MP4] -> [Start/Stop].
- Select [Start] and then press SET to start recording the backup MP4 clip.
REFERENCE
You can also set an assignable button to [MP4 Start/Stop] and press the assignable button.
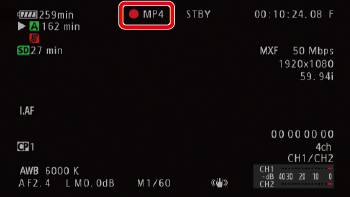
- The front and rear tally lamps will illuminate, [MP4] changes to
 MP4] and the recording of the MP4 clip will begin.
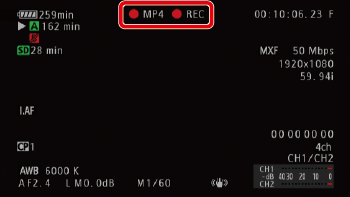
7. Press the <START/STOP> button to record an MXF clip simultaneously with the MP4 clip.
[STBY] changes to [

REC] and the recording of the MXF clip will begin.
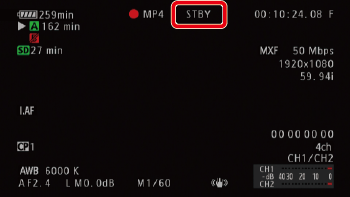
8. Press the <START/STOP> button again to stop recording the MXF clip.
[

REC] changes to [STBY] and the MXF clip is recorded on the CF card.
Repeat steps 7 and 8 as necessary to record additional MXF clips. All along, the recording of the backup MP4 clip will continue.
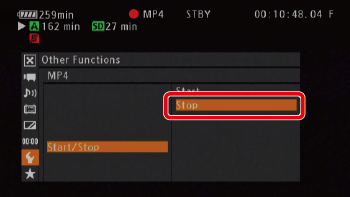
9. Stopping MP4 recording.
Select [

Other Functions] > [MP4].
Select [Start/Stop] then press <SET>.
10. Select [Stop] then press <SET>.
The front and rear tally lamps will go out,

MP4] will change back to [MP4] and the MP4 clip is recorded on the SD card.
REFERENCE
You can also set an assignable button to [MP4 Start/Stop] and press the assignable button.
NOTE
- If any memory card becomes full during MXF+MP4 simultaneous recording, recording will stop on all recording media. If a memory card becomes full during MP4 backup recording, recording will stop only on the memory card that is full and continue on other recording media.
- Simultaneous recording cannot be used together with other special recording modes or real-time proxy transfer mode.
- While recording, the [Free Run] time code will be recorded with the MXF clip.


 ].
].  Other Functions] -> [Movie Format].
  ] and press <SET>.
 : Joystick
 : In the following procedures, 'Press <SET>' refers to the action of pressing the joystick straight down to select the desired setting.
 Other Functions] -> [MP4].

 Other Functions] -> [MP4] -> [Rec Control].

 Other Functions] -> [MP4] -> [Start/Stop].
 MP4] and the recording of the MP4 clip will begin.

 REC] and the recording of the MXF clip will begin.
 REC] changes to [STBY] and the MXF clip is recorded on the CF card.
 Other Functions] > [MP4].
 MP4] will change back to [MP4] and the MP4 clip is recorded on the SD card.