


Assigning Commonly Used Functions to the Continuous Ring, Step Ring, Control Dial, Shortcut Button, and Movie Button (PowerShot G1 X Mark II)
Solution
You can assign commonly used functions to the <Continuous Ring> ( ), <Step Ring> (
 ), <Control Dial> (
 ), <Shortcut Button> (
 ), and <Movie Button> (
 ) as desired.
), <Step Ring> (), <Control Dial> (), <Shortcut Button> (), and <Movie Button> () as desired.You can also assign mode-specific functions to the continuous ring, step ring, and control dial for [  ], [
], [  ], [
], [  ], and [
  ] modes.
], [ ], [ ], and [ ] modes.IMPORTANT
- In the following example procedure, the camera's shooting mode has been set to [Program AE] (
 ).
).
1. Press the power button to turn the camera on.
2. Press the <MENU> button.
3. On the [  ] tab, press the <
 ><
>< > buttons or turn the <> dial to choose [Function Assignment] on the, and then press the <
 > button.
] tab, press the <><> buttons or turn the <> dial to choose [Function Assignment] on the, and then press the <> button.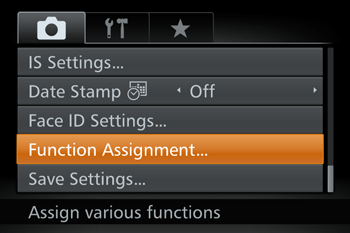

4. Press the <><> buttons or turn the <> dial to choose the ring or button for assignment.
><> buttons or turn the <> dial to choose the ring or button for assignment.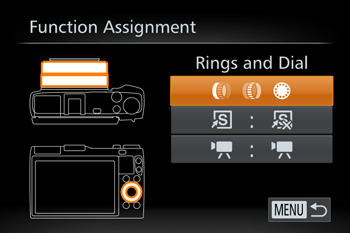
- To assign functions to the ring or dial, press the <> button, choose the ring or dial on the screen displayed (either press the <><> buttons or turn the <> dial), and then press the <
 ><
>< > buttons to choose the function.
 - To assign functions to the < > or < > button, press the < > button, choose the function on the screen displayed (either press the < ><><><> buttons or turn the < > dial), and then press the < > button.
5. Use the assigned function as needed.
- Turn < > < > <> to configure the assigned function.
- When multiple functions are assigned to the < > ring, press the < > button to switch between them.
- Press the < > or < > button to activate the assigned function.
NOTE
- When you assign [
 ] or [
  ] to the < > or < > button, each press of the assigned button records white balance data, and the white balance setting changes to [ ] or [ ].
 - When you assign [
 ] to the < > or <> button, each press of the assigned button adjusts and locks the focus. [ ] is then displayed.
 - When you assign [
 ] to the < > or <> button, pressing the assigned button deactivates screen display. To restore the display, do any of the following.
- Press any button other than the power button
- Hold the camera in another orientation
- Open or close the screen
- Raise or lower the flash
- You can still record movies in [
 ], [ ] and [
  ] modes even if you assign a function to the <> button.
You can quickly and easily activate functions that you assign to the < > button.
> button.1. Press the power button to turn the camera on.
2. Press the <MENU> button.
3. On the [  ] tab, press the ><> buttons or turn the <> dial to choose [Set Shortcut button], and then press the <> button.
] tab, press the ><> buttons or turn the <> dial to choose [Set Shortcut button], and then press the <> button.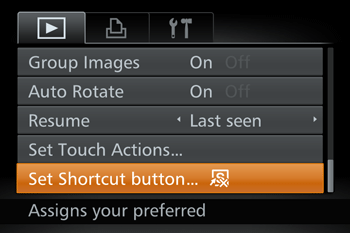
4. Press the <><> buttons or turn the <> dial to choose a function to assign, and then press the <> button. When you have completed all the desired settings, press the <MENU> button to return to the playback screen.
><> buttons or turn the <> dial to choose a function to assign, and then press the <> button. When you have completed all the desired settings, press the <MENU> button to return to the playback screen.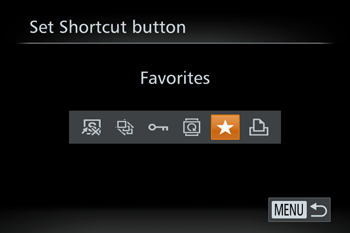
5. Press the <> button to activate the assigned function.
> button to activate the assigned function.REFERENCE
- To restore default settings, choose [
 ].
]. - When [
 ] is assigned and you press the < > button while the camera is not connected to the printer, the image is designated for printing and will be printed once the printer is connected.