


Specifying a portion of an image to save as a separate image file (Cropping) (PowerShot D30)
Solution
The procedure for specifying a portion of an image to save as a separate image file is explained below.
IMPORTANT
- Editing is not possible for images shot at a resolution of [
 ], or resized to [
  ].
].
1. Press the < > button to set the camera to Playback mode.
> button to set the camera to Playback mode.2. Press the <MENU> button, and then choose [Trimming] on the [  ] tab.
] tab.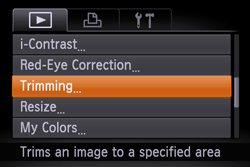
3. Press the < ><
>< > buttons to choose an image, and then press the <FUNC./SET> (
 ) button.
><> buttons to choose an image, and then press the <FUNC./SET> () button.

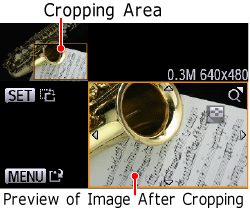
4. Adjust the cropping area.
A frame is displayed around the portion of the image to be cropped.
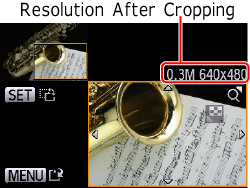
The original image is shown in the upper left, and a preview of the image as cropped is shown in the lower right.
- To resize the frame, press the zoom buttons.
- To move the frame, press the <
 ><
>< ><><> buttons.
 - To change the frame orientation, press the <FUNC./SET> () button.
- Press the <MENU> button.
5. Press the <><> buttons to choose [OK], and then press the <FUNC./SET> () button.
><> buttons to choose [OK], and then press the <FUNC./SET> () button.The image is now saved as a new file.

6. Press the <MENU> button. [Display new image?] is displayed.
Press the <><> buttons to choose [Yes], and then press the <FUNC./SET> () button.
><> buttons to choose [Yes], and then press the <FUNC./SET> () button.
The saved image is now displayed.
NOTE
- Images supported for cropping will have the same aspect ratio after cropping.
- Cropped images will have a lower resolution than uncropped images.
This completes the steps for specifying a portion of an image to save as a separate image file.