Solution
This section explains how to set the date and time of the camcorder.
The first time you turn on the camcorder, you will be guided by the camcorder’s basic setup screens to set the date and time.
1. Set the power switch to ON to turn on the camcorder.
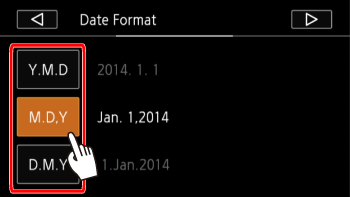
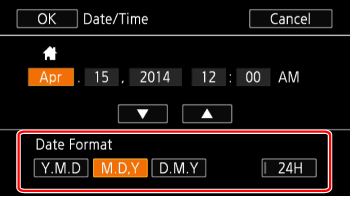
2. Touch [Y.M.D], [M.D,Y] or [D.M.Y] to select the date format you prefer.
3. Touch [

].
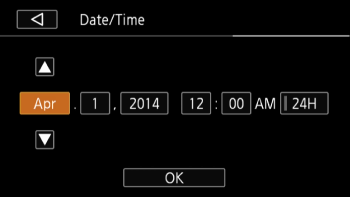
4. Touch a field you want to change (year, month, day, hours or minutes).
- Touch [
 ] or [
  ] to change the field as necessary.
Changing the Date/Time settings
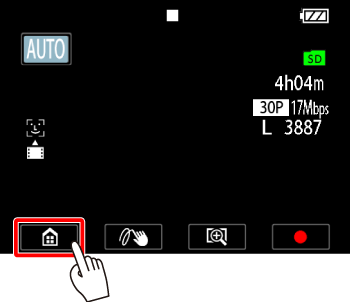
1. Set the power switch to ON to turn on the camcorder.
2. Touch [

].
3.

Drag your finger left/right to bring the [Other Settings] menu to the center, and then

touch the icon to open it.
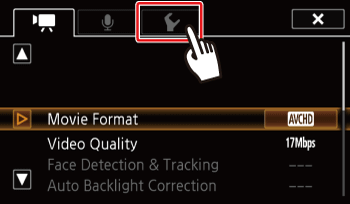
4. Touch the [

] tab.
5.

Drag your finger up/down to bring [Date/Time] into the orange selection bar, and then

touch the button.
6. Set the Date and Time.
6-1. Touch the field you want to change (year, month, day, hours or minutes).
- Touch [
 ] or [
  ] to change the field as necessary.
6-2. Touch [Y.M.D], [M.D,Y] or [D.M.Y] to select the date format you prefer.
Touch [24H] to use 24-hour clock or leave it unselected to use 12-hour clock (AM/PM).
7. Touch [OK] to complete the basic setup and close the setup screen.
8. Touch [

] to close the menu.
NOTE
When you do not use the camcorder for about 3 months, the built-in rechargeable lithium battery may discharge completely and the date and time setting may be lost. In such case, recharge the built-in lithium battery. The next time you turn on the camcorder, you will have to perform the basic setup again.
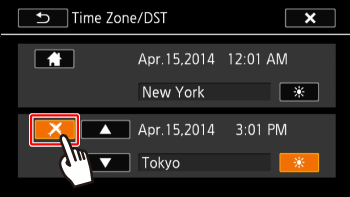
Change the time zone to match your location. The default setting is New York. In addition, the camcorder is able to retain the date and time of another location. This is convenient when you travel so that you can set the camcorder to match the time of your home location or that of your destination.
1. Set the power switch to ON to turn on the camcorder.
2. Touch [

].
3.

Drag your finger left/right to bring the [Other Settings] menu to the center, and then

touch the icon to open it.
4. Touch the [

] tab.
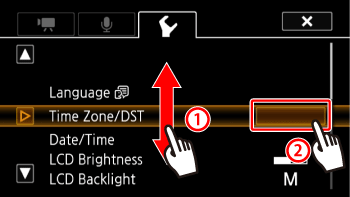
5.

Drag your finger up/down to bring [Time Zone/DST] into the orange selection bar, and then

touch the button.
6. Touch [

].
7. Touch [

] or

] to set the desired time zone. If necessary, touch [

] to adjust for daylight saving time.
8. Touch [

] to close the menu.
REFERENCE
When you return from your travels, touch [

] in the operations in Step 6, and then touch [

] to close the menu.
 ].
]. ] or [
  ] to change the field as necessary.
 ].
].
 Drag your finger left/right to bring the [Other Settings] menu to the center, and then
  touch the icon to open it.
 ] tab.
 Drag your finger up/down to bring [Date/Time] into the orange selection bar, and then
  touch the button.
 ] or [
  ] to change the field as necessary.
 ] to close the menu.
 ].
].
 Drag your finger left/right to bring the [Other Settings] menu to the center, and then
  touch the icon to open it.
 ] tab.
 Drag your finger up/down to bring [Time Zone/DST] into the orange selection bar, and then
  touch the button.
 ].
].
 ] or
] or  ] to set the desired time zone. If necessary, touch [
  ] to adjust for daylight saving time.
 ] to close the menu.
 ] in the operations in Step 6, and then touch [
  ] to close the menu.