How to set High-Speed Continuous Shooting (High-speed Burst) and Group Playback (PowerShot SX510 HS)
22-Aug-2013
8201895100
Solution
You can shoot a series of shots in rapid succession by holding the shutter button all the way down.
Approx. 10.5 shots/sec. can be taken.
NOTE
- The resolution is [
 ] (1984 x 1488) and cannot be changed.
 - Focus, image brightness, and color are determined by the first shot.
- Shooting may stop momentarily or continuous shooting may slow down depending on shooting conditions, camera settings, and the zoom position.
- As more shots are taken, shooting may slow down.
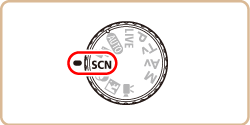
1. Set the mode dial to < > and turn the camera on.
 > and turn the camera on.
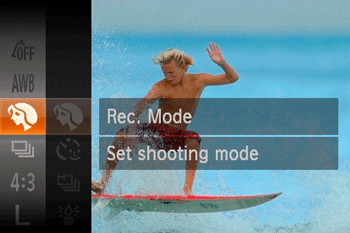
2. Press the < > button to display the menu items.
 > button to display the menu items.
3. Press the < ><
><  > buttons, or turn the <
 > dial to choose [Shooting Mode] (If no changes have been made to the settings so far, [Portrait] (
 ) will be displayed).
 ><
><  > buttons, or turn the <
 > dial to choose [Shooting Mode] (If no changes have been made to the settings so far, [Portrait] (
 ) will be displayed).
Press the < > button.
 > button.

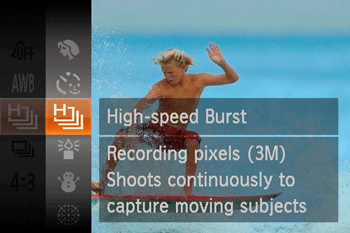
4. Press the < ><
><  > buttons to choose [High-Speed Burst] (
 ), and then press the <
 > button.
 ><
><  > buttons to choose [High-Speed Burst] (
 ), and then press the <
 > button.
5. If the [High-speed Burst] ( ) icon is displayed on the upper-right part of the screen, the setting is completed.
 ) icon is displayed on the upper-right part of the screen, the setting is completed.
Hold the shutter button all the way down to shoot continuously.
When playing back images, images taken in [High-speed Burst] ( )mode are displayed in a group with only the first image displayed, however, grouped images can also be viewed individually.
 )mode are displayed in a group with only the first image displayed, however, grouped images can also be viewed individually.
IMPORTANT
If you erase a grouped image, all the images in the group will also be erased. Be sure to exercise adequate caution.
REFERENCE
- To view images taken in [High-speed Burst] (
 ) mode as a group, press <MENU> (
 ), and then select [On] for [Group Images] in the [Playback Menu] (
  ) tab. (By default, [On] is selected.)

1. Press the < ><
><  > buttons or turn the <
 > dial to choose an image labeled with [
  ].
].
 ><
><  > buttons or turn the <
 > dial to choose an image labeled with [
  ].
].
2. Press the < ><
><  > buttons to choose [
  ], and then press the <
 > button.
 ><
><  > buttons to choose [
  ], and then press the <
 > button.
3. Pressing the < ><
><  > buttons or turning the <
 > dial will display only images in the group.
 ><
><  > buttons or turning the <
 > dial will display only images in the group.
To cancel group playback, press the < > button, choose [
  ] in the menu, and press the <
 > button again
 > button, choose [
  ] in the menu, and press the <
 > button again
NOTE
- During group playback, you can use the menu functions accessed by pressing the <
 > button. You can also browse through images quickly "Navigating through Images in an Index" and magnify them "Magnifying Images" . By choosing [All Images in Group] for "Protecting Images" , "Erasing Multiple Images at Once", "Adding Images to the Print List (DPOF)" , or "Adding Images to a Photobook" , all images in the group can be manipulated at once.
 - To ungroup images so that they are displayed only as single still images, press the <
 > button, choose [Group Images] on the [
  ] tab, and then choose [Off]. However, grouped images cannot be ungrouped during individual playback.