Solution
Photobooks can be set up on the camera by choosing up to 998 images on a memory card and importing them into the software on your computer, where they are stored in their own folder. This is convenient when ordering printed photobooks online or printing photobooks with your own printer.
IMPORTANT
- [
 ] may be displayed on the camera to warn you that the memory card has print settings that were configured on another camera. Changing the print settings using this camera may overwrite all previous settings.
- The procedure is shown on a PowerShot SX510 HS for the purposes of explanation. The position and shape of the operation buttons, screens displayed, and setting items may differ according to the model you use.
1. Press the camera's <Playback> button (

) to turn the camera on.
2. Press the <

> button.
3.

Press the <

><

> buttons to choose the [Playback] (

) tab, and then

Press the <

><

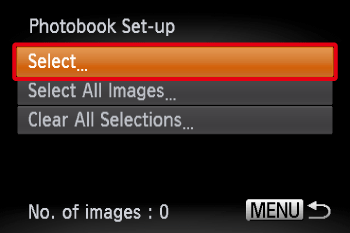
> buttons to choose [Photobook Set-up].
Press (

).
4. Press the <

><

> to choose [Select], and then press (

).
REFERENCE
- To select all images one at a time, choose [Select All Images].
- To clear all image selections, choose [Clear All Selections].
5. Press the <

><

> buttons or turn the <

> dial, and then press <

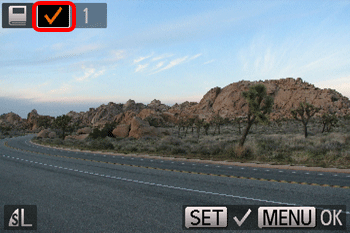
>.
(

) is displayed.
NOTE
- To remove the image from the photobook, press the (
 ) button again. (
 ) is no longer displayed.
- Repeat this process to specify other images.
6. When finished, press the <

> button to return to the menu screen.
NOTE
- After importing images to your computer, also refer to "Software Instruction Manual" and the printer manual for further information.
 ] may be displayed on the camera to warn you that the memory card has print settings that were configured on another camera. Changing the print settings using this camera may overwrite all previous settings.
 ) to turn the camera on.
  > button.
 Press the <
 ><
>< > buttons to choose the [Playback] (
 ) tab, and then
  Press the <
 ><
>< > buttons to choose [Photobook Set-up].
 ).
).

 ><
>< > to choose [Select], and then press (
 ).
).
 ><
>< > buttons or turn the <
 > dial, and then press <
 >.
>. ) is displayed.
 ) button again. (
 ) is no longer displayed.
  > button to return to the menu screen.