


Registering and Editing Destinations for Group Dialing (MF4890dw/MF4870dn/MF4750 Only)
Solution
NOTE
Before registering group addresses:
- Register group addresses in unused one-touch keys or coded dialing codes. Make sure that you leave some unused one-touch keys or coded dialing codes unused for group dialing.
- Destinations must be registered in one-touch keys or coded dialing codes before they are added to a group.
1. Press [  ] (FAX).
] (FAX).
2. Press [  ] (Address Book).
] (Address Book).
 To register a new group address:
(1) Press [  ].
].
].(2) Press [  ] or [
  ] to highlight <Register New Destination to Address Book>, and then press [OK].
] or [ ] to highlight <Register New Destination to Address Book>, and then press [OK].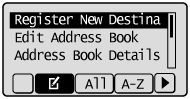
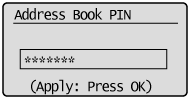
 If an address book PIN is specified:
Use the numeric keys to enter the PIN, and then press [OK].
(3) Press [ ] or [ ] to highlight <One-Touch> or <Coded Dial>, and then press [OK].
] or [ ] to highlight <One-Touch> or <Coded Dial>, and then press [OK].
(4) Press [ ] or [ ] to highlight <Group>, and then press [OK].
] or [ ] to highlight <Group>, and then press [OK].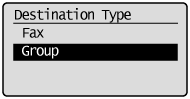
(5) If you selected <One-Touch> in step (3), press [ ] or [ ] to highlight an empty one-touch key, and then press [OK].
] or [ ] to highlight an empty one-touch key, and then press [OK].
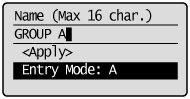
(6) Press [ ] or [ ] to highlight <Name>, and then press [OK].
] or [ ] to highlight <Name>, and then press [OK].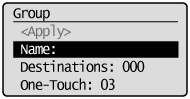
(7) Use the numeric keys to specify <Name>.
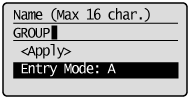
(8) Press [ ] or [ ] to highlight <Apply>, and then press [OK].
] or [ ] to highlight <Apply>, and then press [OK].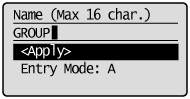
(9) Press [ ] or [ ] to highlight <Destinations>, and then press [OK].
] or [ ] to highlight <Destinations>, and then press [OK].
(10) Press [ ] or [ ] to highlight <Add>, and then press [OK].
] or [ ] to highlight <Add>, and then press [OK].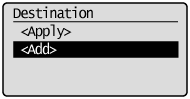
(11) Press [ ] or [ ] to highlight the destination that you want to add, and then press [OK].
] or [ ] to highlight the destination that you want to add, and then press [OK].
(12) Repeat steps (10) and (11) to select more destinations to be added.
(13) Press [ ] or [ ] to highlight <Apply>, and then press [OK].
] or [ ] to highlight <Apply>, and then press [OK].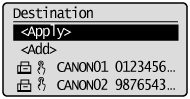
(14) Press [ ] or [ ] to highlight <Apply>, and then press [OK].
] or [ ] to highlight <Apply>, and then press [OK]. To add destinations to a group:
(1) Press [ ].
].(2) Press [ ] or [ ] to highlight <Edit Address Book>, and then press [OK].
] or [ ] to highlight <Edit Address Book>, and then press [OK].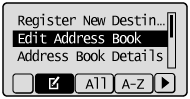 If an address book PIN is specified:
Use the numeric keys to enter the PIN, and then press [OK].
(3) Press [ ] or [ ] to highlight the group to be edited, and then press [OK].
] or [ ] to highlight the group to be edited, and then press [OK].
(4) Press [ ] or [ ] to highlight <Destinations>, and then press [OK].
] or [ ] to highlight <Destinations>, and then press [OK].
(5) Press [ ] or [ ] to highlight <Add>, and then press [OK].
] or [ ] to highlight <Add>, and then press [OK].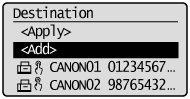
(6) Press [ ] or [ ] to highlight the destination you want to add to the group, and then press [OK].
] or [ ] to highlight the destination you want to add to the group, and then press [OK].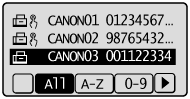
(7) Press [ ] or [ ] to highlight <Apply>, and then press [OK].
] or [ ] to highlight <Apply>, and then press [OK].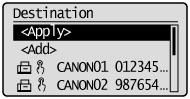
(8) Press [ ] or [ ] to highlight <Apply>, and then press [OK].
] or [ ] to highlight <Apply>, and then press [OK].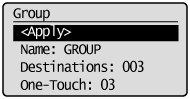 To delete a destination from a group:
(1) Press [ ].
].(2) Press [ ] or [ ] to highlight <Edit Address Book>, and then press [OK].
] or [ ] to highlight <Edit Address Book>, and then press [OK].
If an address book PIN is specified:Use the numeric keys to enter the PIN, and then press [OK].
(3) Press [ ] or [ ] to highlight the group to be edited, and then press [OK].
] or [ ] to highlight the group to be edited, and then press [OK].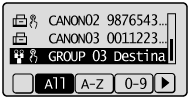
(4) Press [ ] or [ ] to highlight <Destinations>, and then press [OK].
] or [ ] to highlight <Destinations>, and then press [OK].
(5) Press [ ] or [ ] to highlight the destination that you want to delete, and then press [OK].
] or [ ] to highlight the destination that you want to delete, and then press [OK].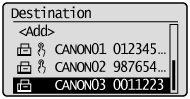
(6) Press [ ] or [ ] to highlight <Delete From Group>, and then press [OK].
] or [ ] to highlight <Delete From Group>, and then press [OK].
(7) Press [ ] to highlight <Yes>, and then press [OK].
] to highlight <Yes>, and then press [OK].
(8) Press [ ] or [ ] to highlight <Apply>, and then press [OK].
] or [ ] to highlight <Apply>, and then press [OK].(9) Press [ ] or [ ] to highlight <Apply>, and then press [OK].
] or [ ] to highlight <Apply>, and then press [OK]. To change the name of a group:(1) Press [ ].
].(2) Press [ ] or [ ] to highlight <Edit Address Book>, and then press [OK].
] or [ ] to highlight <Edit Address Book>, and then press [OK].
If an address book PIN is specified:Use the numeric keys to enter the PIN, and then press [OK].
(3) Press [ ] or [ ] to highlight the group to be edited, and then press [OK].
] or [ ] to highlight the group to be edited, and then press [OK].(4) Press [ ] or [ ] to highlight <Name>, and then press [OK].
] or [ ] to highlight <Name>, and then press [OK].
(5) Change the name of the group.
(6) Press [ ] or [ ] to highlight <Apply>, and then press [OK].
] or [ ] to highlight <Apply>, and then press [OK].
(7) Press [ ] or [ ] to highlight <Apply>, and then press [OK].
] or [ ] to highlight <Apply>, and then press [OK].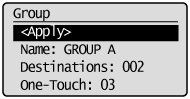 To delete a group:
(1) Press [ ].
].(2) Press [ ] or [ ] to highlight <Delete From Address Book>, and then press [OK].
] or [ ] to highlight <Delete From Address Book>, and then press [OK].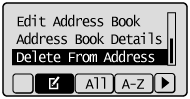 If an address book PIN is specified:
Use the numeric keys to enter the PIN, and then press [OK].
(3) Press [ ] or [ ] to highlight the group that you want to delete, and then press [OK].
] or [ ] to highlight the group that you want to delete, and then press [OK].(4) Press [ ] to highlight <Yes>, and then press [OK].
] to highlight <Yes>, and then press [OK].
3. Press [  ] (Back) to close the Address Book screen.
] (Back) to close the Address Book screen.1. Start the Remote UI and log on in System Manager Mode.
For details on the procedures for starting the Remote UI, see the "e-Manual" (HTML manual) in the CD-ROM supplied with the machine.
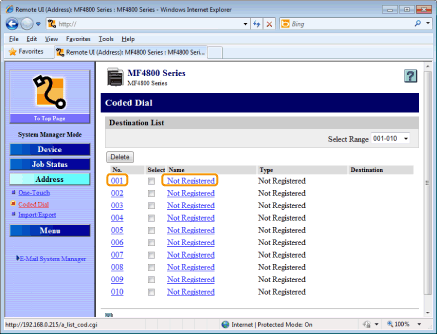
2. Click [Address] -> [One-Touch] or [Coded Dial].
 To register group addresses newly:
Proceed to step 3.
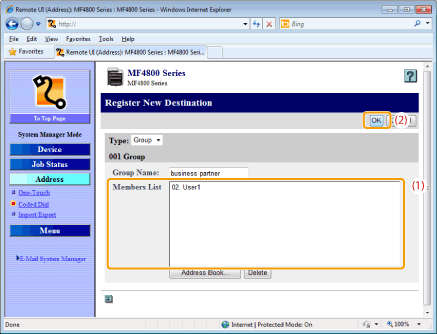
To add destinations to a group:(1) Click the number or name.
(2) Click [Edit].
(3) Click [Address Book].
(4) Click [One-Touch] or [Coded Dial] from the drop-down list, select the check box for the number to be added in a group, and then click [OK].
To delete a destination from a group:(1) Click the number or name.
(2) Click [Edit].
(3) Select the destination from [Members List] to be deleted, and then click [Delete].
(4) Click [OK].
To change the name of a group:(1) Click the number or name,
(2) Click [Edit].
(3) Change a name of [Group Name], and then click [OK].
To delete a destination from a group:Select the check box for which you want to delete the number, and then click [Delete].
3. Click [Not Registered] or the number which is not registered.
4. Select [Group] from the drop-down list.
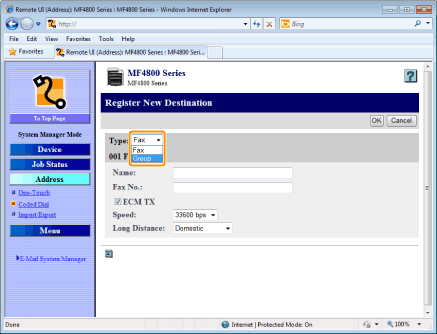
5. Enter a name in [Group Name], and then click [Address Book].

6. Click [One-Touch] or [Coded Dial] from the drop-down list, select the check box for the number to be registered in a group, and then click [OK].

7. Check if the registered destinations are displayed in [Members List], and then click [OK].