Solution
You can perform the protocol settings from the computer you are using, using either of the following software. This troubleshooting describes the procedure for performing the protocol settings using a web browser (Remote UI).
- Protocol Settings using a web browser (Remote UI):
Perform the protocol settings by accessing the printer from your web browser via the network.
- Protocol settings using FTP Client:
Perform the protocol settings by accessing the FTP server in the printer using Command Prompt (MS-DOS Prompt for Windows 98/Me).
IMPORTANT
Operational requirements and restrictions are indicated at the end of this page. Be sure to read these items carefully in order to operate the printer correctly, and to avoid damage to the printer.
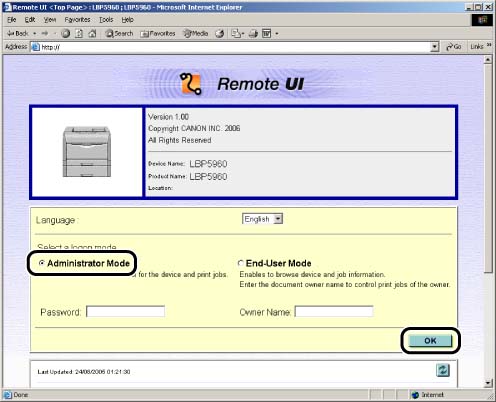
1. Run the web browser, enter the following URL in [Location] or [Address], and then press the [ENTER] key on your keyboard.
http://<the IP address or name of the printer>/
Input Example: http://192.168.0.215/
When you want to specify the settings with the Remote UI using SSL encrypted communication, enter "https://<the IP address or name of the printer>/". If the [Security Alert] dialog box or other dialog box appears, follow the directions in the message.
2. Select [Administrator Mode], then click [OK].
NOTE
If a password is specified for the printer, enter the password, and then click [OK]. If the password has not been specified yet, it is not required to enter the password.
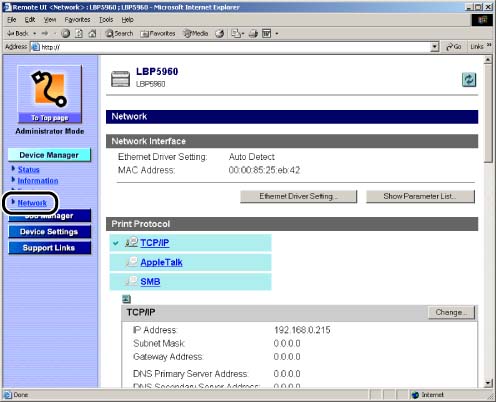
3. Click [Network] from the [Device Manager] menu on the left.
4. Click [Change] on the right of [TCP/IP].
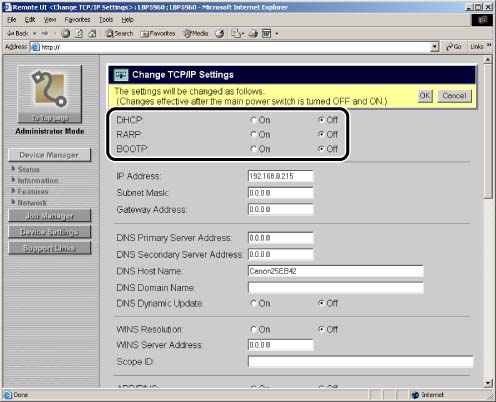
5. Specify the method for setting the IP address of the printer. Among [DHCP], [RARP], and [BOOTP], set any option that you want to use for the IP address setting to [On].
As well as by assigning the IP address to the printer directly, you can set the IP address by using any one of DHCP, RARP or BOOTP.
NOTE
You can select only one from RARP, DHCP, or BOOTP.
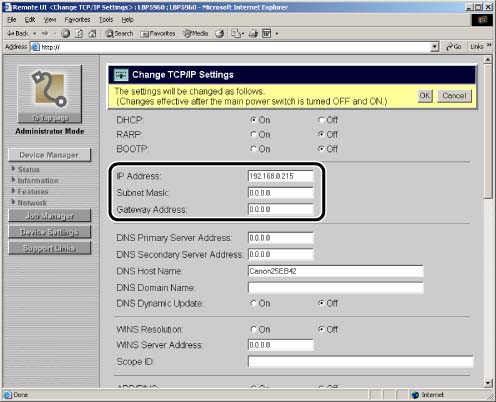
6. Specify [IP Address], [Subnet Mask], and [Gateway Address].
Enter the IP address of the printer in [IP Address]. Enter the addresses used in the TCP/IP network in [Subnet Mask] and [Gateway Address].
NOTE
a. Even if you are using any one of DHCP, BOOTP, or RARP, specify the settings for [IP Address], [Subnet Mask], and [Gateway Address]. If you cannot obtain information from the servers of DHCP, RARP, and BOOTP, the values specified here are used.
b. If you specify to use any one of DHCP, RARP, or BOOTP, the values obtained from those are displayed after restarting this printer (If the values have been specified previously, they overwrite the obtained ones).
7. When using the DNS server and DNS Dynamic Update function, specify the settings for DNS.
If you do not want to use them, proceed to Step 8.
- Enter the IP address of the primary DNS server in [DNS Primary Server Address].
- Enter the IP address of the secondary DNS server in [DNS Secondary Server Address].
- Specify the host name of this printer to be added to the DNS server in [DNS Host Name].
- Enter the name of the domain to which this printer belongs in [DNS Domain Name].
Input Example : sales_dept.xyz_company.com
- When using the DNS Dynamic Update function, set [DNS Dynamic Update] to [On].
If you do not want to use the DNS Dynamic Update function, set the option to [Off].
IMPORTANT
By specifying [DNS Host Name] and [DNS Domain Name] using this function, you can use this printer without fixing the IP address of the printer.
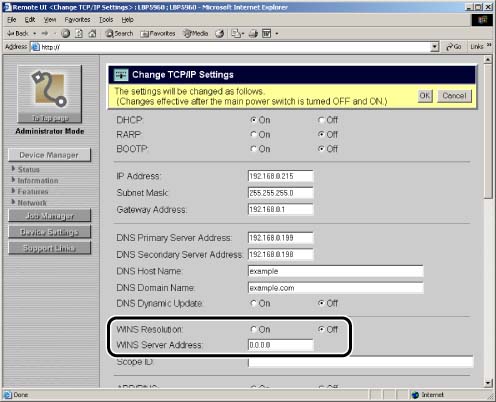
8. When using an SMB network, specify the settings for WINS.
If you do not want to use an SMB network, proceed to Step 10.
WINS (Windows Internet Name Service) is a service that maps NetBIOS names (names of computers or printers) to IP addresses. A WINS server is required to use WINS.
When using WINS Resolution:
- Set [WINS Resolution] to [On].
- Enter the IP address of the WINS server in [WINS Server Address].
IMPORTANT
If you are using DHCP to determine the IP address, and when an IP address for the WINS server is obtained from the DHCP server, the obtained IP address overwrites the entered IP address.
When not using WINS Resolution:
- Set [WINS Resolution] to [Off].
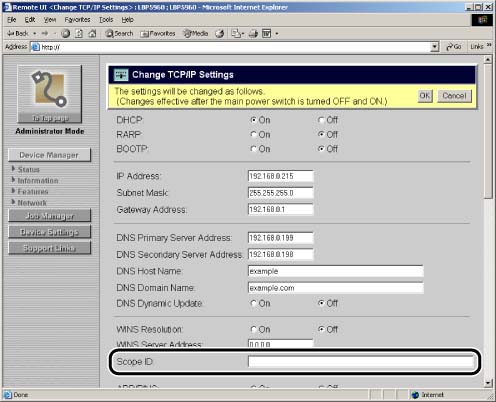
9. Enter the scope ID in [Scope ID].
Enter the scope ID as needed.
A scope ID is an identifier to specify the communication range of the printer and computer.
The computer browses the scope ID regardless of the name resolution settings by WINS.
IMPORTANT
a. If you have specified [Scope ID], the printer cannot communicate with the computers that have a different scope ID.
b. If you have not yet specified a scope ID on the computers in your network environment, leave the [Scope ID] field blank.
10. Specify the setting for ARP/PING.
- If you want to use the ARP/PING function, set [ARP/PING] to [On].
If you do not want to use the ARP/PING function, set [ARP/PING] to [Off].
IMPORTANT
If you set the option to [Off], you cannot set the IP address using the ARP/PING command.
11. Specify the settings for FTP Print.
When using FTP as a print application:
- Set [FTP Print] to [On].
- Enter the user name to log in to the FTP server in [FTP Print User Name].
- Enter the password to log in to the FTP server in [FTP Print Password].
When not using FTP as a print application:
- Set [FTP Print] to [Off].
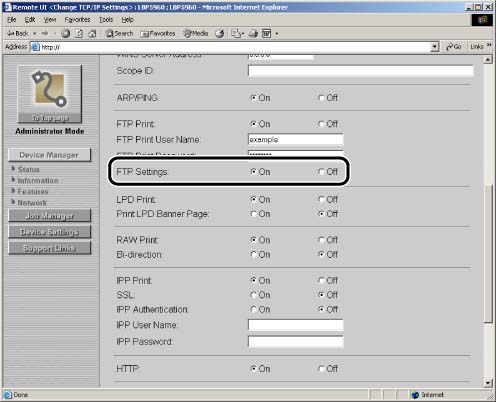
12. If you want to perform the settings using FTP Client, set [FTP Settings] to [On].
If you do not perform the settings using FTP Client, set [FTP Settings] to [Off].
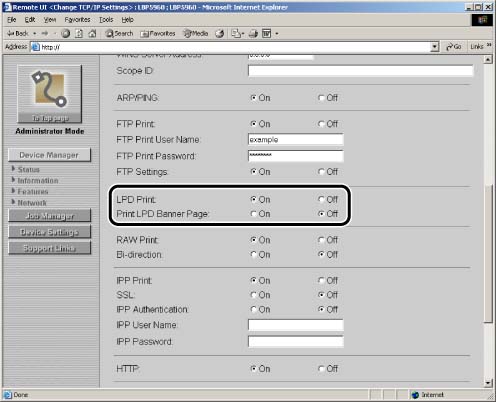
13. Specify the settings for LPD.
When using LPD as a print application:
- Set [LPD Print] to [On].
- When outputting the banner page, set [Print LPD Banner Page] to [On].
When not outputting the banner page, set [Print LPD Banner Page] to [Off].
When not using LPD as a print application:
- Set [LPD Print] to [Off].
14. Specify the setting for Raw.
When using Raw as a print application:
- Set [RAW Print] to [On].
- When the printer uses bi-directional communications, set [Bi-direction] to [On].
When the printer does not use bi-directional communications, set the option to [Off].
NOTE
Normally, you do not need to change the settings for this option.
When not using Raw as a print application:
- Set [RAW Print] to [Off].
15. Specify the settings for IPP/IPPS.
When using IPP/IPPS as a print application:
- Set [IPP Print] to [On].
- If you want to use IPPS (encryption of IPP data by SSL), set [SSL] to [On].
- If you want to use the IPP Authentication function, set [IPP Authentication] to [On], and then enter the user name used for the IPP authentication in [IPP User Name] and the password used for the IPP authentication in [IPP Password].
When not using IPP/IPPS as a print application:
- Set [IPP Print] to [Off].
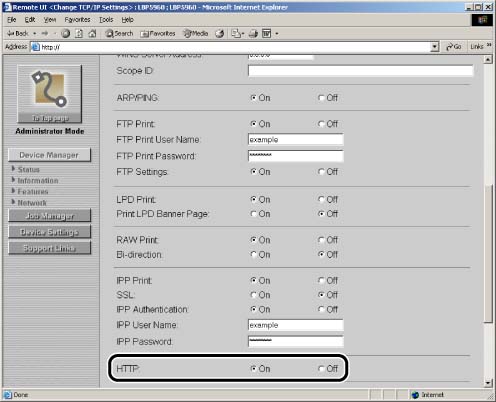
16. Specify the settings for HTTP.
- When using a web browser (Remote UI) or [IPP Print], set [HTTP] to [On].
When [HTTP] is set to [Off], [IPP Print] is set to [Off] automatically. [Remote UI] that can be specified only from the printer's control panel and FTP Client is also set to [Off] automatically, disabling the use of the Remote UI.
17. Specify the settings for the multicast discovery function.
When setting the printer so that it responds to searches that used the multicast discovery function:
- Set [Response to Multicast Discovery] to [On].
- In [Scope Name], enter the scope name to be used when searching for certain devices from utility software, such as NetSpot Device Installer, by multicast.
When setting the printer so that it does not respond to searches that used the multicast discovery function:
- Set [Response to Multicast Discovery] to [Off].
18. Specify the settings for SNTP.
When obtaining the time using the SNTP Client function:
- Set [SNTP] to [On].
- If you specified the settings for DNS in Step 7, enter the server name of the NTP server in [NTP Server Address]. If you did not specify the settings for DNS in Step 7, enter the IP address of the NTP server in [NTP Server Address].
- Specify the time interval to query the NTP server about time between [1] and [48] (hours) in [Polling Interval].
When not obtaining the time using the SNTP Client function:
- Set [SNTP] to [Off].
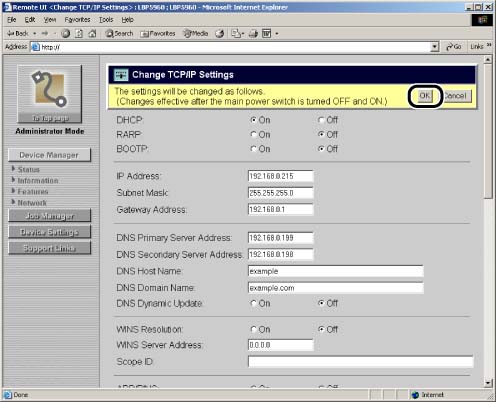
19. After completing the settings, click [OK].
20. Perform a hard reset or cycle the power of the printer.
After performing a hard reset or restarting the printer, the settings are effective.
IMPORTANT
a. Use Netscape Navigator/Communicator 6.0 or later or Internet Explorer 4.01SP1 or later as the web browser.
b. You cannot connect the computer to the printer via a proxy server. If you are using a proxy server, perform the following setting. (The setting varies depending on the network environment)
- On the settings for the proxy server of the web browser, add the IP address of this printer to [Exceptions] (The addresses that do not use the proxy server).
c. Configure the web browser so that you can use Cookie.
d. If multiple Remote UIs are running simultaneously, the latest setting is effective. It is recommended that only one Remote UI should be running at a time.
e. SSL encrypted communication can be used only when an optional hard disk is installed. To use SSL encrypted communication, a key and its certificate need to have been created and the key needs to have been registered as the default key. For details on the SSL encrypted communication function and the procedure for registering the default key, see "Remote UI Guide" (PDF manual) in the CD-ROM supplied with the printer.
f. DNS Dynamic Update is a function that adds the IP address of the device and the names specified as the host name and domain name to the DNS server automatically. This function can be used in the environment in which a Dynamic DNS server is used.
g. To use the DNS Dynamic Update function, you need to specify the IP address and host name of this printer, and domain name of the DNS server.
h. If you are using DHCP to determine the IP address, and when an IP address for the WINS server is obtained from the DHCP server, the obtained IP address overwrites the entered IP address.
i. The output setting for the banner page is specified for each print job. If [Print LPD Banner Page] is set to [On], the banner page is output when performing a print job that is specified to output the banner page. The banner page is not output when performing a print job that is specified not to output the banner page.
j. If [Print LPD Banner Page] is set to [Off], the banner page is always not output regardless of the banner page output setting for the print jobs.
k. IPPS can be used only when an optional hard disk is installed.
l. Even if a key and its certificate have been created, you cannot set [SSL] to [On] when the key is not registered as the default key. For details on the SSL encrypted communication function and the procedure for registering the default key, see "Remote UI Guide" (PDF manual) in the CD-ROM supplied with the printer.
NOTE
a. For details on the protocol settings using FTP Client, see "Network Guide" (PDF manual) in the CD-ROM supplied with the printer.
b. Because it takes one to two minutes to check whether DHCP, RARP, and BOOTP are available, it is recommended that you set the unused protocol(s) to [Off].
c. To assign the IP address using DHCP, RARP, or BOOTP, the DHCP server, RARP daemon, or BOOTP daemon needs to be started up.
d. If you want to use DHCP without using the DNS Dynamic Update function, specify the settings in the DHCP server so that the same IP address is always assigned to this printer. (If the IP address is different, this printer's host name and the IP address cannot correspond to each other.)
e. You can enter up to 47 characters for [DNS Host Name] and [DNS Domain Name].
f. In order to add a device to the WINS server, you need to configure the WINS server and SMB server. To configure the SMB server, specify the following options in [SMB] in the [Network] page.
g. You can enter a name of up to 63 characters for [Scope ID].
h. You can enter up to 24 characters for [FTP Print User Name] and [FTP Print Password]. You cannot specify "root" for [FTP Print User Name].
i. A print application is software that receives output print data sent via a network and outputs the data to the printer. A print application is required to print to the printer on a network. This printer supports print applications of LPD, Raw, IPP/IPPS, and FTP.
j. When [IPP Print] is set to [On], [HTTP] is set to [On] automatically.
k. You can enter up to 24 characters for [IPP User Name] and [IPP Password].
l. You can enter a name of up to 32 characters for [Scope Name].
m. If [SNTP] is set to [On], [Connect NTP Server] is displayed in the [Network] page. When [Connect NTP Server] is clicked, the printer communicates with the specified NTP server, and the result of the communication is displayed in [NTP Server Connection Result]. <OK> is displayed if the printer communicated with the NTP server successfully, and <Error> is displayed if the printer could not communicate with the NTP server due to any reason such as a setting mistake or communication error.
n. To perform a hard reset, click [Status] from the [Device Manager] menu on the left, and then click [Device Control]. Select [Hard Reset] in the [Device Control] page, and then click [Execute].
