How to load custom size paper in Cassette 2, 3, or 4
30-Jul-2012
8201638000
Issue
Cause and Solution
A paper cassette can be loaded with plain paper. When the paper cassette runs out of paper, 11 NO "size" PAPER appears in the display, or the Paper Source indicator blinks indicating the status. Refill the cassette.
This printer comes with a paper cassette (Cassette 1) as standard. By installing the optional paper feeders, Cassette 2, 3, and 4 are added, and plain paper of custom paper sizes can be loaded.
Different sizes of paper can be loaded in Cassette 1 supplied with the printer and in Cassette 2, 3, and 4 that are available when the optional paper feeders are installed. Then, you can switch among these paper sources automatically.
IMPORTANT
Operational requirements and restrictions are indicated at the end of this page. Be sure to read these items carefully in order to operate the printer correctly, and to avoid damage to the printer.
Precautions on loading paper:
Load paper when the printer status is in any of the following. When the Job indicator is blinking, the printer is printing. Do not pull out the paper cassette.
- When the Job indicator is off

- When a message that informs you of a paper-out condition or requests paper replacement is displayed

- When the printer is OFF

When loading custom size paper in Cassette 2, 3, or 4:
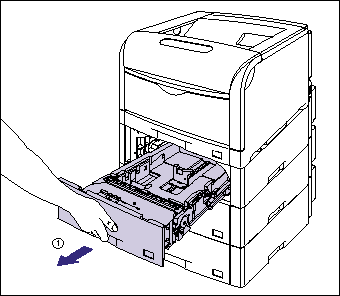
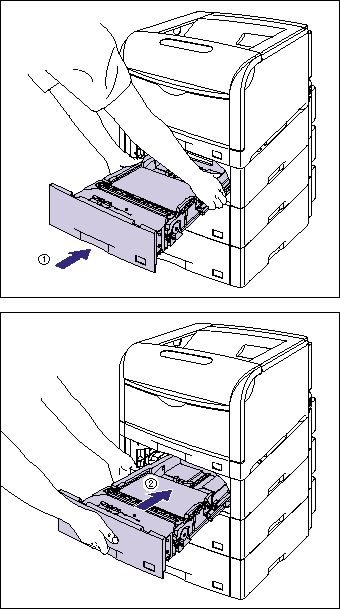
1. Pull out the paper cassette.
Pull the paper cassette out until it stops (1).
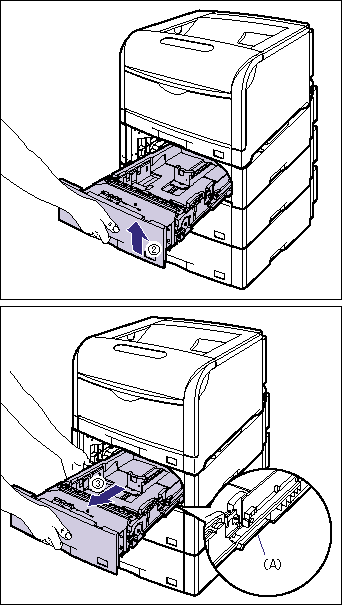
After lifting the front of the paper cassette up a little (2), pull it out while supporting the cassette with your left hand until the handle (A) on the right side of the paper cassette appears completely (3).
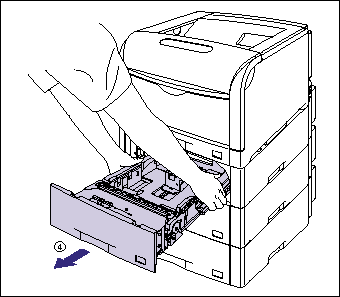
While holding the paper cassette with both hands, pull it out completely (4) as shown in the figure.
2. Load the paper so that the edge of the paper is aligned with the front side of the paper cassette.
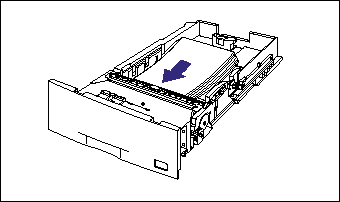
3. While holding the lock release lever of the rear paper guide, slide the guide to the mark for the size of the paper to be loaded.
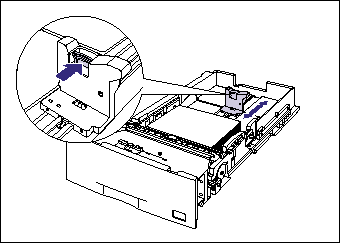
4. While holding the lock release lever of the side paper guides, slide the guides to the mark for the size of the paper to be loaded.
The side paper guides move together.

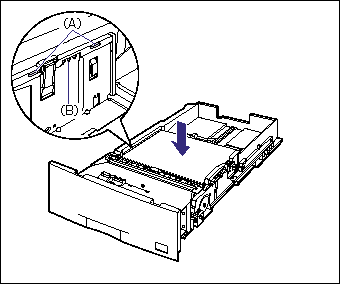
5. Press down the paper stack so that it is loaded under the hooks on the side paper guides (A).
Make sure that there is sufficient space between the hooks and paper stack. If there is no sufficient space, slightly reduce the amount of paper.
IMPORTANT
Up to approximately 550 sheets of plain paper (80 g/m2) can be loaded in a paper cassette. Be sure that the paper stack does not exceed the load limit marks (B) on the paper guides. If the paper stack exceeds the load limit marks, this may result in misfeeds.
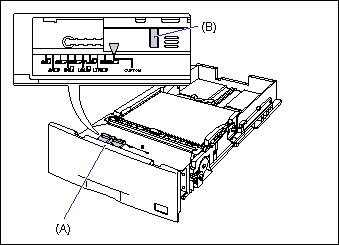
6. While holding the tab (B) on the paper size setting switch (A), align the triangular mark on the paper size setting switch with "CUSTOM".
The default value is "A3".
IMPORTANT
Make sure that the paper size setting switch is set to "CUSTOM" before setting the paper cassette in the printer. If the paper size setting switch is not set to the proper position, this may result in printer malfunction.
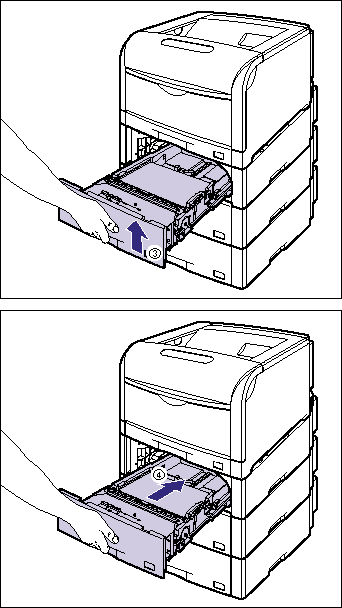
7. Set the paper cassette in the paper feeder.
While holding the paper cassette with both hands, push it to the position shown in the figure (1). Then, hold the front of the paper cassette with your right hand and push it until it stops (2).
After lifting the front of the paper cassette up a little (3), push the paper cassette into the printer firmly until the front side of the paper cassette is flush with the front surface of the paper feeder (4).
8. To specify the size of the loaded paper on the control panel, press  .
.
 .
. 
9. Select FEEDER MENU using  and
and  , then press
  .
.
 and
and  , then press
  .
. 
10. Select CASSETTE(n) SIZE (n = 2, 3, 4) using  and
and  , then press
  .
.
 and
and  , then press
  .
. 
11. Select the paper size using  and
and  , then press
  .
.
 and
and  , then press
  .
. 
"=" is displayed on the left of the paper size, and the paper size for the paper cassette is specified.
When printing from the printer driver, configure the printer driver next.
When printing from DOS or UNIX, specify the settings for STD PAPER SIZE and STD PAPER TYPE using the control panel. For more details on the settings for STD PAPER SIZE and STD PAPER TYPE, see "Chapter 5 Printing Environment Settings" of User's Guide (PDF manual) in the CD-ROM supplied with the printer.
12. Specify the following options in the printer driver.
| Sheet | Setting | Description |
| [Page Setup] Sheet | [Page Size] | Select the paper size of the document created by an application. |
| [Output Size] | Select the size of the loaded paper as needed. Leave the setting at [Match Page Size] when the page size and the size of the paper loaded in the paper cassette are the same, since there is no need to change the setting. | |
| [Custom Paper Size] | To use custom size paper for printing, click [Custom Paper Size] in the [Page Setup] sheet, and then specify the custom paper size. | |
| [Paper Source] Sheet | [Paper Source] | Select the paper source. When [Auto] is specified, if a paper size is specified by an application, the printer selects the paper source automatically and feeds paper from the paper source. Specify the same setting as the one for [Paper Source], although the setting for [Paper Source] changes to ones such as [First Page] or [Other Pages] when [Paper Selection] is set to other than [Same Paper for All Pages]. |
| [Paper Type] |
Select the type of the loaded paper. - [Plain Paper]: Plain paper (64 - 105 g/m2) | |
IMPORTANT
a. The print will be automatically reduced or enlarged to fit on the page when the settings for [Page Size] and [Output Size] are different.
b. When the paper curls excessively on printing plain paper (64 g/m2) with the paper type set to [Plain Paper] or when the printing speed drops on printing paper of 279.4 mm wide (Letter size) or less continuously, specify [Plain Paper L].
IMPORTANT
a. Be sure not to open the covers or paper cassette during printing. The printer may stop, disabling printing.
b. For more details on the usable paper, see "Usable paper" in Related Information at the end of this page.
c. For details on handling the paper cassette, see "Precautions for handling the multi-purpose tray or paper cassette" in Related Information at the end of this page.
d. You can load paper of the following custom sizes.
- When loading paper in portrait orientation: Width 210.0 to 297.0 mm; Length 210.0 to 431.8 mm
- When loading paper in landscape orientation (Only when UFR II Printer Driver is used): Width 210.0 to 297.0 mm; Length 148.0 to 297.0 mm
e. When non-standard size paper is loaded, specify the setting for CASSETTE(n) SIZE (n = 2, 3, 4) in the control panel as follows.
- When the paper is loaded in landscape orientation (Only when UFR II Printer Driver is used): CUSTOM SIZE
- When the paper is loaded in portrait orientation: CUSTOM SIZER
f. When you change the orientation of the custom size paper loaded in a paper cassette frequently, it is convenient if you set CASSETTE(n) SIZE (n = 2, 3, 4) in the control panel to MIXED SIZES. When CASSETTE(n) SIZE (n = 2, 3, 4) is set to MIXED SIZES, you do not need to specify the setting for CASSETTE(n) SIZE (n = 2, 3, 4) each time you change the paper orientation. However, when specifying MIXED SIZES, make sure that the size of the loaded paper matches the paper size specified in the printer driver before printing. If they do not match, the printer may stop printing, displaying the message <41 CHK PAPER SZE>, or a paper jam may occur. Be sure to check if the paper size specified in the printer driver matches the size of the paper loaded in the paper cassette before using the printer. However, if SPECIAL MODE J is set to ON, the printer prints without checking the paper size even when the paper size specified in the printer driver and the size of the paper loaded in the cassette do not match.
g. When printing custom size paper from UFR II Printer Driver, you can load the paper either in portrait or landscape orientation. However, if you want to print custom size paper of its long edges 297.0 mm or less when CASSETTE(n) SIZE (n=2, 3, 4) is set to MIXED SIZES, load the paper in landscape orientation. When you are not printing from UFR II Printer Driver, load the paper in portrait orientation.
h.The paper cassette cannot be pulled out horizontally. If you try to pull it out forcefully, this may result in damage to the paper cassette.
i. Because the paper cassette is heavy, hold it with your both hands securely.
j. Place the removed paper cassette on an even and stable surface.
k. If you use paper that has been poorly cut, multiple sheets of paper may be fed at once. In this case, align the edges of the stack on a hard, flat surface
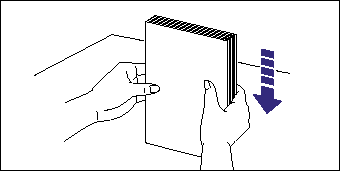
l. Specify the paper size as follows.
- When loading custom size paper in landscape orientation (Only when UFR II Printer Driver is used): CUSTOM SIZE
- When loading custom size paper in portrait orientation: CUSTOM SIZER
NOTE
a. If you want to print custom size paper of its long edges 297.0 mm or less when CASSETTE(n) SIZE (n = 2, 3, 4) in the FEEDER MENU options in the SETUP is set to MIXED SIZES, specify the settings according to the printer driver you are using as follows.
- When using UFR II Printer Driver: Load the paper in landscape orientation
- When not using UFR II Printer Driver: Load the paper in portrait orientation
b. To print letterhead paper or paper printed with a logo, load the paper in the proper orientation according to the following instructions:
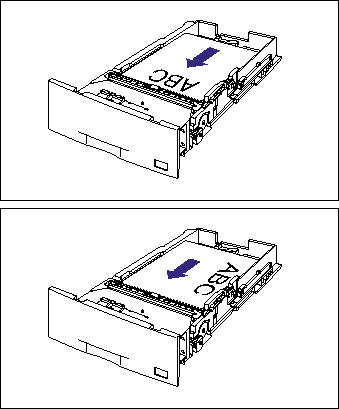
- When loading the paper in landscape orientation, load the paper so that the printing side is facing up as shown in the following figure.
(  : Feeding direction)
 : Feeding direction)
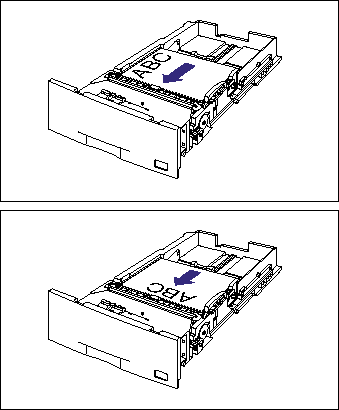
- When loading the paper in portrait orientation, load the paper so that the printing side is facing up as shown in the following figure.
(  : Feeding direction)
 : Feeding direction)