Specifying Images for a Photobook (EOS M)
23-Aug-2012
8201605000
Solution
When you select images to use in photobooks (up to 998 images) and use EOS Utility (provided software) to transfer them to a computer, the selected images will be copied into a dedicated folder. This function is useful for ordering photobooks online and for printing photobooks on a printer.
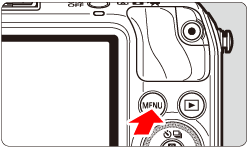
1. Press <MENU> button.

2. Under the [  ] tab, select [Photobook Set-up].
 ] tab, select [Photobook Set-up].
3. Select [Select images], then press < /SET>.
 /SET>.
 The images will be displayed.

By touching the LCD monitor with two fingers spread apart and then pinching the fingers, a three-image display will appear. You can then select images.
To return to the single screen, touch the LCD monitor with two pinched fingers, then spread the fingers.
4. Select the image to be specified.
Press the <Main Dial> to select the image to be specified, then
- press <
 /SET>.
 - Repeat this step. The number of images which have been specified will be displayed on the screen's upper left.

- To cancel the specified image, press <
 /SET> again.
 - Press the <MENU> button to return to the screen in step 3.
You can specify all the images in a folder or on a card at one time.
When [  : Photobook Set-up] is set to [All images in folder] or [All images on card], all the images in the folder or card will be specified.
 : Photobook Set-up] is set to [All images in folder] or [All images on card], all the images in the folder or card will be specified.
To cancel the image specification, select [Clear all in folder] or [Clear all on card].

CAUTION
Do not specify for a photobook with this camera images that were already specified for a different photobook using another camera. The photobook settings may be overwritten.
NOTE
- RAW images and movies cannot be specified.
- After downloading the specified images to your personal computer, also refer to EOS Utility’s Instruction Manual (CD-ROM) and your printer’s instruction manual.