


Customizing the operation buttons on the EOS M (assigning functions other than the default functions to the buttons)
Solution
You can customize various camera features to suit your picture-taking preferences with Custom Functions. Custom Functions can be set and used only in Creative Zone modes.
As a custom function of your camera, you can assign functions to the Shutter/AE lock button and the  (Erase) button other than the functions that are set by default.
(Erase) button other than the functions that are set by default.The functions that can be assigned to the Shutter/AE lock button are as follows.
| Number | Setting details |
|---|---|
| 0: AF/AE lock | This is the default setting when first purchased. |
| 1: AE lock/AF | This is convenient when you want to focus and meter separately. Press the <  > button to autofocus, and press the shutter button halfway to apply AE lock. > button to autofocus, and press the shutter button halfway to apply AE lock. |
| In the Servo AF operation, you can press the < > button to stop the AF operation momentarily. This prevents the AF from being thrown off by any obstacle passing between the camera and subject. The exposure is set at the moment the picture is taken. | |
| This is useful for subjects which keep moving and stopping repeatedly.
With Servo AF, pressing the < > button starts or stops the Servo AF. The exposure is set at the moment the picture is taken. Thus, the optimum focusing and exposure will always be achieved as you wait for the decisive moment. |
You can assign a frequently-used function to the <> button. While the camera is ready to shoot, press <>.
> button. While the camera is ready to shoot, press <>.The functions that can be assigned to the <> button are as follows.
> button are as follows.| Number | Setting details |
|---|---|
| 0: Normal (set center AF point) | This is the default setting when first purchased. |
| 1: Depth-of-field preview | The aperture opening (diaphragm) changes only at the moment when the picture is taken. Otherwise, the aperture remains fully open. Therefore, when you look at the scene on the LCD monitor, the depth of field will look narrow. Press the < > button to stop down the lens to the current aperture setting and check the depth of field (range of acceptable focus). |
| 2: ISO speed | The ISO speed setting screen will appear. Press the < > / <  > button or turn the < Main Dial > dial to set the ISO speed. > button or turn the < Main Dial > dial to set the ISO speed. |
| 3: Flash exposure compensation | Set flash exposure compensation if the flash exposure of the subject does not come out as desired. You can set the exposure compensation up to ±2 stops in 1/3-stop increments. |
| 4: Incr LCD brightness (temp) | Pressing the < > button will set the LCD monitor brightness to the same level as the menu's "7" setting. Press the button again and it will return to the previous brightness. If the power turns < OFF > or the brightness adjustment screen is displayed with the menu, the previous brightness will return. |
To change the functions of the Shutter/AE lock button and the Erase button, follow the steps below.
1. Set the power to <ON>.
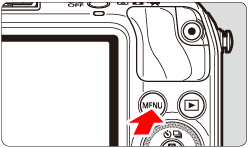
2. Press the <MENU> button to display the menu screen.
3. Select [Custom Functions (C.Fn)] under the [  ], then press the <
 /SET> button.
], then press the </SET> button.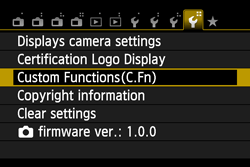
4. Press the < Main Dial > to select the Custom Function No., then press the </SET> button.
/SET> button.[C.Fn-5: Shutter/AE lock button] has been selected here as an example.
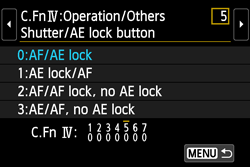
5. Press the < Main Dial > to select the setting (number), then press the </SET> button.
/SET> button.At the bottom of the screen, the current Custom Function settings are indicated below the respective function numbers.
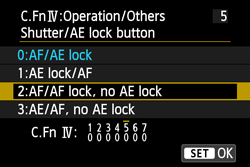
6. Press the <MENU> button. The screen for step 3 will reappear.
NOTE
Clearing All Custom Functions
Under [Clear settings] in step3, select [Clear all Custom Func. (C.Fn)] to clear all the Custom Function settings.