How to install the printer driver by downloading it from the print server (computer)
05-Jul-2012
8201583700
Solution
IMPORTANT
Operational requirements and restrictions are indicated at the end of this page. Be sure to read these items carefully in order to operate the printer correctly, and to avoid damage to the printer.
1. Display the [Printers and Faxes] folder or the [Printers] folder.
For Windows 98/Me/2000: From the [Start] menu, select [Settings] -> [Printers].
For Windows XP Professional/Server 2003: From the [Start] menu, select [Printers and Faxes].
For Windows XP Home Edition: From the [Start] menu, select [Control Panel], and then click [Printers and Other Hardware] -> [Printers and Faxes].
2. Display the [Add Printer Wizard] dialog box.
For Windows 98/Me/2000: Double-click [Add Printer].
For Windows XP Professional/Home Edition: Click [Add a printer].
For Windows Server 2003: Double-click [Add Printer].
3. Click [Next].
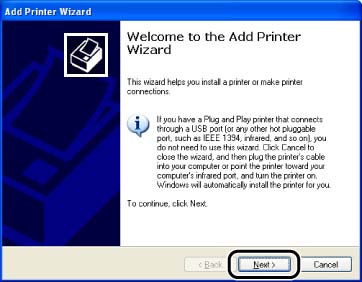
4. Select [A network printer, or a printer attached to another computer], then click [Next].
For Windows 98/Me/2000: Select [Network printer] then click [Next].
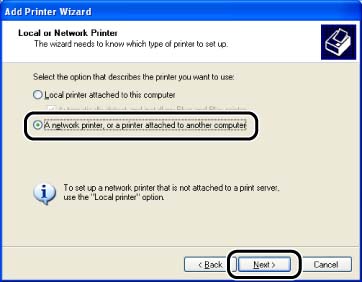
5. Select [Connect to this printer (or to browse for a printer, select this option and click Next)], then click [Next].
For Windows 98/Me, click [Browse].
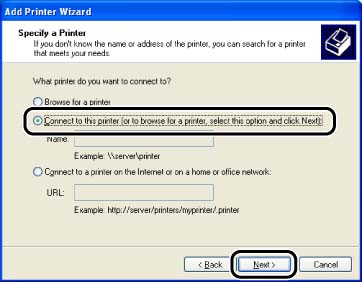
6. Select the directory of the print server, then click [Next].
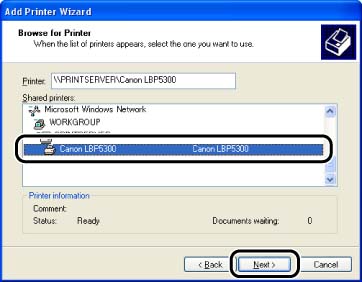
For Windows 98/Me: Proceed to Step 8.
NOTE
a. If you are using Windows XP/Server 2003 and the [Connect to Printer] dialog box appears, follow the directions in the message.
b. When specifying the path to the network using "\" directly, specify it as "\\the print sever name (the computer name of the print server)\the printer name".
7. Select whether or not to use this printer as the default printer, then click [Next].
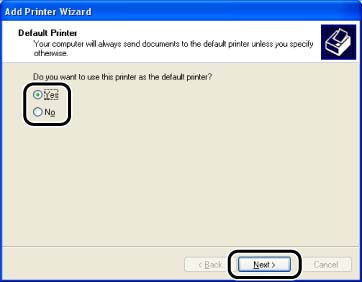
8. Click [Finish].

IMPORTANT
a. If you are using Windows 2000/XP/Server 2003, be sure to log on as a member of Administrators when starting up.
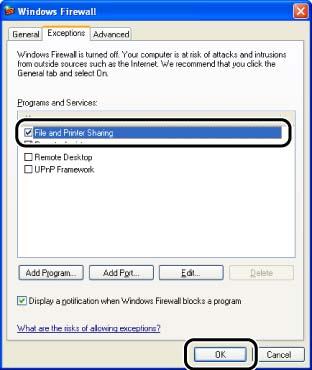
b. If you are using Windows XP Service Pack 2 or another operating system equipped with Windows Firewall on a client computer, configure the following settings. If you do not perform the following settings on the client computers, the printer status may not be displayed properly in the Printer Status Window, and some of the printer functions may not operate properly.
1. From the [Start] menu, select [Control Panel], and then click [Network and Internet Connections] -> [Windows Firewall].
2. In the [Exceptions] sheet in the [Windows Firewall] dialog box, select the [File and Printer Sharing] check box, and then click [OK].
c. If you are using Windows XP Service Pack 2 or another operating system equipped with Windows Firewall on the client computers, configure Windows Firewall to unblock communication with the print server. If you do not clear the block, the printer status may not be displayed properly in the Printer Status Window, and some of the printer functions may not operate properly. For details on the procedure for configuring Windows Firewall to unblock communication with the print server, see "Configuring Windows Firewall to unblock communication with the print server" in Related Information at the end of this page.
NOTE
a. Clients can use either Windows 98/Me or Windows 2000/XP/Server 2003.
b. If your print server is Windows 98/Me, you cannot download and install the driver on Windows 2000/XP/Server 2003.
c. The screen shots used in this section are from Windows XP Professional.