Issue
This section describes the procedure for specifying the paper size or page setup when printing from an application, taking Adobe Reader 6.0 as an example.
NOTE
The screen shots used in this section are from Windows XP Home Edition.
Cause and Solution
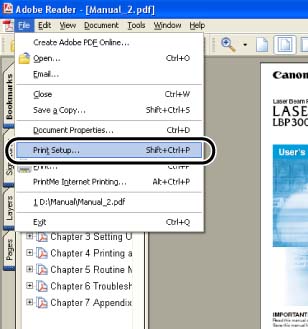
1. Open the PDF file to print with Adobe Reader, and then select [Print Setup] from the [File] menu.
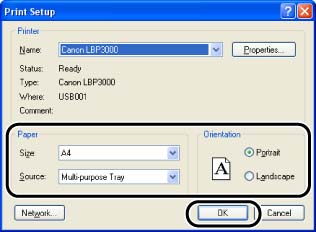
2. Specify the paper size of the document and the printing orientation, then click [OK].
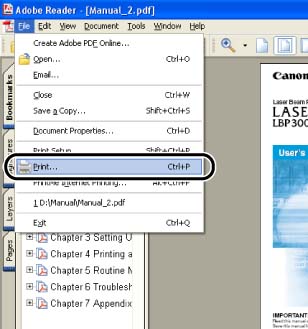
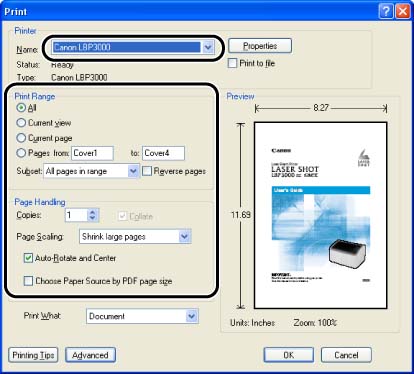
3. Select [Print] from the [File] menu.
4. Select this printer for [Name] or [Printer Name], and then specify the printing preferences.
NOTE
The printer name displayed in this dialog box can be changed in the [Printers and Faxes] folder (the [Printers] folder for Windows 98/Me/2000).
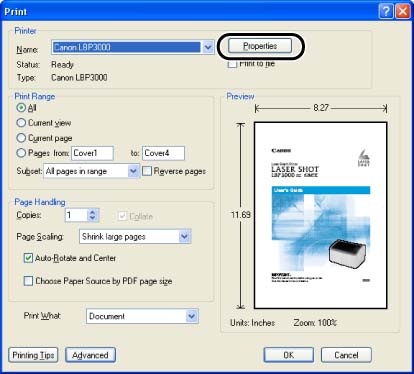
5. Click [Properties].
NOTE
The procedure for displaying the [Document Properties] dialog box may differ depending on the application you are using.
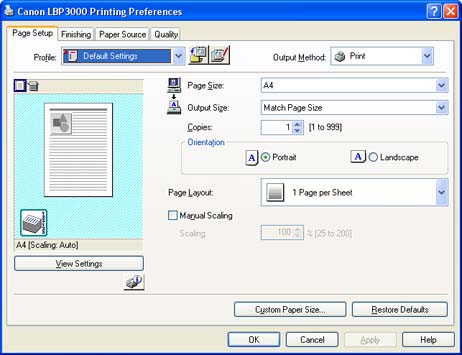
6. Display the [Page Setup] sheet and specify the paper size or page setup.
Page Size:
Display the [Page Size] pull-down menu, then select the desired page size by clicking it. The page sizes that can be selected are as follows:
- Standard Paper Sizes (Sizes from A3 to A5 and from Legal to Executive)
- Index Card
- Envelopes (Envelope C5, Envelope COM10, Envelope DL, and Envelope Monarch)
- Custom Paper Size
NOTE
When the paper size specified in [Page Size] is larger than the size that can be loaded in the printer and [Match Page Size] is selected for [Output Size], A3 and B4 sizes are reduced and printed on A4 size paper.
Output Size:
Display the [Output Size] pull-down menu, then select the desired paper size. The output paper sizes that can be selected are as follows:
- Match Page Size
- Standard Paper Sizes (Sizes from A4 to A5 and from Legal to Executive)
- Index Card
- Envelopes (Envelope C5, Envelope COM10, Envelope DL, and Envelope Monarch)
- Custom Paper Size
NOTE
a. When printing on paper that is of the same size as [Page Size], select [Match Page Size].
b. If you select a paper size that differs from [Page Size], the print will be automatically reduced or enlarged to fit on the page.
c. When printing data in which multiple paper sizes are specified in the application, you can print at the same size as you specified in [Output Size] in the printer driver.
d. If you can specify the page size, the number of print copies, and orientation in the application you are using, you do not have to specify the settings in the [Page Setup] sheet.
Copies:
Allows you to specify the number of copies to be printed. Select or enter the value in the [Copies] spin box or enter a number from the keypad. You can specify from 1 to 999 print copies.
Orientation:
Allows you to specify whether the document is to be printed either in portrait orientation or landscape orientation. Click either [Portrait] or [Landscape] for [Orientation].
Page Layout:
- N Pages per Sheet:
Multiple pages can be printed on one sheet of paper. The number of pages that can be selected is 1, 2, 4, 6, 8, 9, or 16 (Pages per Sheet). If you select 2, 4, 6, 8, 9, or 16 pages per sheet, the [Page Order] pull-down menu appears, allowing you to specify the page order.
- Poster:
Magnifies a single page image and print it out on multiple sheets of paper. The number of pages that can be selected is 2 x 2, 3 x 3, or 4 x 4.
Manual Scaling/Page Order:
When [1 Page per Sheet] is selected for [Page Layout], [Manual Scaling] appears. When 2, 4, 6, 8, 9, or 16 (Pages per Sheet) is selected for [Page Layout], [Page Order] appears.
- Manual Scaling:
The scale factor is adjusted automatically when the settings for [Page Size] and [Output Size] are different from each other. If you want to specify the scale factor manually, select [Manual Scaling], then specify the value in the spin box. You can specify from 25 to 200 %.
- Page Order:
You can specify how the pages are aligned when printing multiple pages on one sheet of paper.
Custom Paper Size:
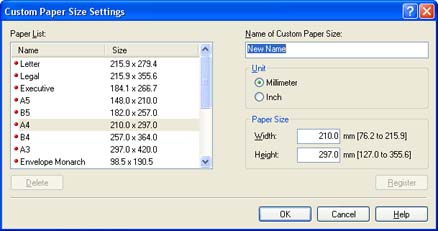
The following dialog box is displayed by clicking [Custom Paper Size]. This dialog box allows you to specify the height and width of custom paper size, which is different from the standard paper sizes. On Windows 98/Me, up to 30 custom paper sizes can be added. On Windows 2000/XP/Server 2003, the number depends on the system environment.
NOTE
a. The settings that are specified here only apply to the currently opened file. Check the contents of the [Document Properties] dialog box each time you print.
b. The default settings for all files can be specified using the following dialog boxes.
- For Windows 98/Me: Display the [Printer Properties] dialog box from the [Printers] folder.
- For Windows 2000/XP/Server 2003: Display the [Document Properties] dialog box from the [Printers and Faxes] folder or the [Printers] folder.
c. For more details on using these sheets, see Online Help. You can access the online help using the following procedure. To close any online help that is currently displayed, click somewhere inside the Online Help window.
- Press the [Tab] key on your keyboard to select the item of which you want to display Help, then press the [F1] key.
- Right-click the item of which you want to display Help, then click [What's This?] from the pop-up menu.
- Click [

] (Help) on [Titlebar], then move the mouse pointer with [?] attached over the item of which you want to display Help and click it.
7. Confirm the settings, then click [OK].
The [Print] dialog box reappears. Click [OK] in the [Print] dialog box. Then, the printer starts printing.
NOTE
"User's Guide" (PDF manual) on the CD-ROM supplied with the printer provides explanations on using the features of the printer and printer driver. By specifying the settings for the printer and printer driver for each job, you can make the best use of the printer and its functions.

 ] (Help) on [Titlebar], then move the mouse pointer with [?] attached over the item of which you want to display Help and click it.