How to register a custom paper size (non-standard paper)
Solution
When printing custom size paper, you need to register the custom paper size in the printer driver previously using the following procedure.
NOTE
To specify a custom paper size, you need to open the dialog box shown below.
- For Windows 2000/XP/Server 2003
Open the [Document Properties] dialog box from the [Printers and Faxes] folder (the [Printers] folder for Windows 2000/Vista).
- For Windows 98/Me
Open the [Printer Properties] dialog box from the [Printers] folder.
1. Display the [Page Setup] sheet, then click [Custom Paper Size].
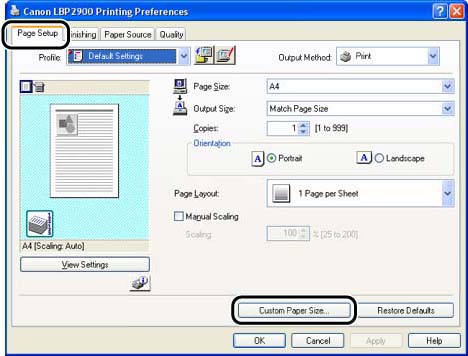
2. Specify the following options as needed.
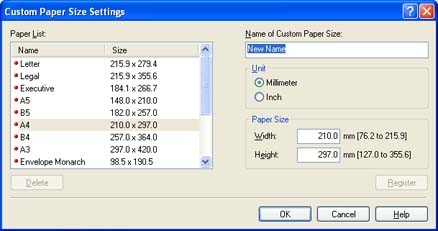
| Setting | Contents |
| [Paper List] | Displays the names and dimensions of the standard paper sizes and existing custom paper sizes. |
| [Name of Custom Paper Size] | Enter a name to use for the new custom paper size. You can enter up to 31 characters. |
| [Unit] | Specify the unit (Millimeter or Inch) to use when entering the dimensions of the custom paper size. |
| [Paper Size] | Specifies the length and width of the custom paper size (length greater than or equal to width). Paper sizes should be specified in portrait orientation (length greater than or equal to width) and within the user-definable limits. |
3. Click [Register].
NOTE
In Windows 98/Me, up to 30 custom paper sizes can be added. In Windows 2000/XP/Server 2003/Vista, the number depends on your system environment.
4. Confirm the settings, then click [OK].

