Solution
Printing the Address Book List
Specify to print the address book list.
The list includes the following information:

Coded dial
- No. (registered coded number)
- Address
- Name
One-touch
- No. (registered one-touch number)
- Address
- Name
Group
- No. (one-touch numbers or coded numbers registered as a group)
- Group name
- Address
- Name
1. Press [

] (Report).
2. Press [

] or [

] to highlight <Print Report Lists>, and then press [OK].
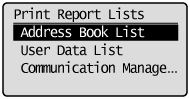
3. Press [
] or [
] to highlight <Address Book List>, and then press [OK].
4. Press [
] or [
] to highlight the item you want to print, and then press [OK].
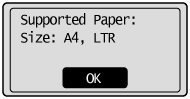
5. Make sure that paper is loaded in the paper source, and then press [OK].
Load the displayed paper size.
6. Press [

] to highlight <Yes>, and then press [OK].
Printing starts.
7. Press [
] (Report) to close <Address Book List> screen
Printing the User Data List
Specify to print the user data list.
The list includes the following information:
- Preferences
- Timer Settings
- Copy Settings
- Fax TX Settings
- Fax RX Settings
- Adjustment/Maintenance
- System Management Settings
- Reports
1. Press [
] (Report).
2. Press Press [
] or [
] to highlight <Print Report Lists>, and then press [OK].
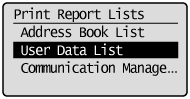
3. Press Press [
] or [
] to highlight <User Data List>, and then press [OK].
4. Make sure that paper is loaded in the paper source, and then press [OK].
Load the displayed paper size.
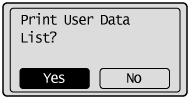
5. Press [
] to highlight <Yes>, and then press [OK].
Printing starts.
6. Press [
] (Report) to close <Print Report Lists> screen.
Printing a Communication Management Report
Specify to print the fax activity report.
You can also select to print the report automatically.
The list includes the following information:
- Start time
- Name/Address
- No.
- Mode
- Page
- Result
- OK
Transmission finished successfully.
- NG
Transmission failed.
If an error code is displayed, see the "e-Manual" (HTML manual) in the CD-ROM supplied with the machine.
1. Press [
] (Report).
2. Press [
] or [
] to highlight <Print Report Lists>, and then press [OK].
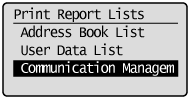
3. Press Press [
] or [
] to highlight <Communication Management Report>, and then press [OK].
4. Make sure that paper is loaded in the paper source, and then press [OK].
Load the displayed paper size.
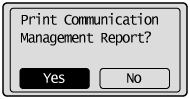
5. Press [
] to highlight <Yes>, and then press [OK].
Printing starts.
6. Press [
] (Report) to close the <Print Report Lists> screen.