Solution
Drum cartridges are consumable products. Replace the drum cartridge with a new one when [PREPARE NEW DRUM] or [REPLACE THE DRUM] appears in the LCD.
WARNING
Do not burn or throw used drum cartridges into open flames, as this may cause the toner remaining inside the cartridges to ignite resulting in burns or a fire.
CAUTION
a. If toner gets onto your hands or clothing, wash it off immediately with cold water. Do not use warm water as this may set the toner permanently, and you may not be able to remove the toner stains.
b. Do not touch the electrical contacts or gears in the cartridge cover, as this may result in an electric shock.
IMPORTANT
a. Use only a drum cartridge intended for use with this machine.
The lifetime of the Canon Genuine Drum Cartridge (Drum Cartridge 701) used in this printer is indicated as follows. The number of sheets may be reduced depending on the settings or conditions for printing.
- Color print: approx. 5,000 sheets for plain paper in size of A4 or Letter.
- B&W print: approx. 20,000* sheets for plain paper in size of A4 or Letter.
* It is the amount of pages for which a drum cartridge will last when printing Letter or A4 size plain paper continuously on Canon evaluation standard. The amount may be reduced to about half depending on paper type or paper size.
b. The inner portion of the machine must be cleaned when replacing the drum cartridge, therefore, have a soft, dry cloth available.
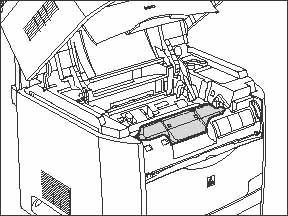
1. Lift the scanning platform and open the cartridge cover.
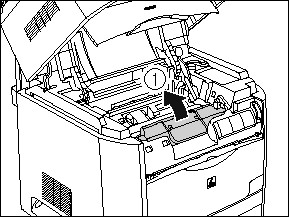
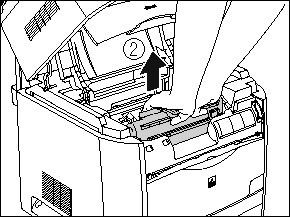
2. Remove the drum cartridge from the machine.
Pull up the green handle on the drum cartridge in the direction of the arrow (1), and lift the cartridge straight up (2).
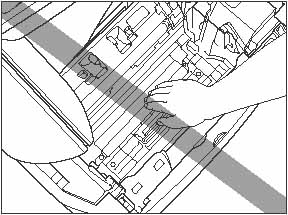
3. Use a soft, dry cloth and wipe off chipped paper and toner that are attached on the transparent sheet located at the front of the roller.
WARNING
Clean the machine using a soft, dry cloth. Do not use alcohol, benzene, paint thinner, or other flammable substances.
IMPORTANT
a. Be careful not to scratch the transparent sheet or peel it by force.
b.Do not wet the cloth with water or detergent.
c.Be careful not to touch unnecessary parts in the machine when cleaning.
4. Take the drum cartridge out of the protective bag.
Open the protective bag with scissors, so as not to damage the cartridge.
IMPORTANT
a. Keep the protective bag in which the cartridge came in. It may be required when taking out the drum cartridge for machine maintenance.
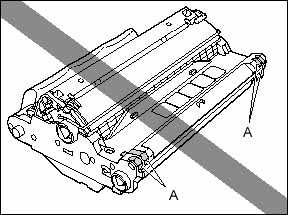
b. Print quality may deteriorate if you touch or damage the drum that is set inside. Be careful not to touch the drum or open the drum protective shutter (A). Be careful not to hold or touch the portions that are not described for this procedure such as the sensors (B). It may result in damage to the machine.
(A): Drum protective shutter
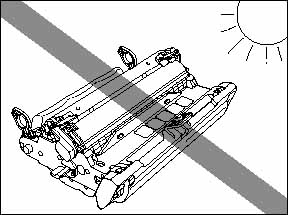
c. Do not expose the drum cartridge to direct sunlight or strong light.
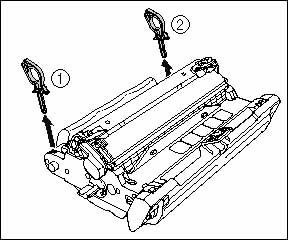
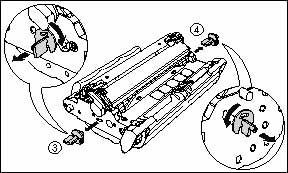
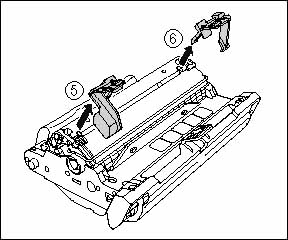
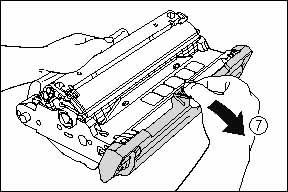
5. Remove the packing materials (7 pieces).
Remove the packing materials (1) and (2) by hooking your fingers into the tab and pulling them in the direction of the arrows.
Remove the packing materials (3) and (4) by turning them in the direction of the arrows until they stop and pulling them away.
Remove the packing materials (5) and (6) by holding the grips and pulling them in the direction of the arrows.
Hold the packing material (7) and remove it as shown in the figure.
IMPORTANT
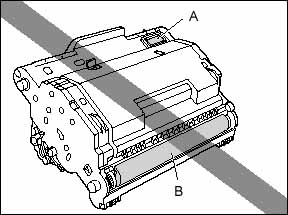
a. Do not hold or touch the electrical contacts (A). It may result in damage to the machine.
b. Do not hold or touch the imaging transfer belt (B). The image quality may deteriorate. Do not apply shock to the drum cartridge memory (A) or bring it near magnetic waves. It may result in damage to the machine.
(A): Drum cartridge memory
(B): Imaging transfer belt
c. After removing the packing materials, install the drum cartridge in the machine as soon as possible.
d. Dispose of the packing materials according to local regulations.
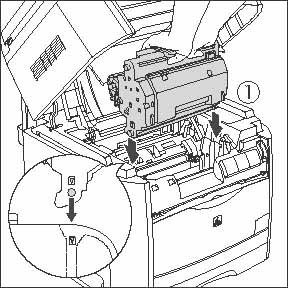
6. Hold the drum cartridge with both hands and install it in the machine.
Position the triangular mark on the drum cartridge with the triangular mark on the machine and install the drum cartridge (1).
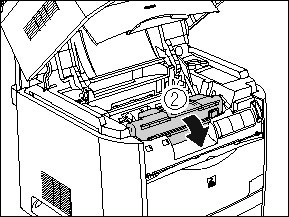
Lock the drum cartridge by pushing it down toward you (2).
IMPORTANT
Lock the drum cartridge securely so that it may be in the state shown in the figure.
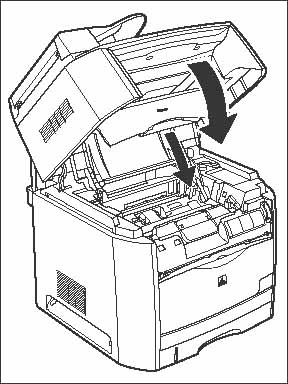
7. Close the cartridge cover and lower the scanning platform.
