Solution
You can wirelessly transfer recordings directly to a computer running the supplied software Network Utility (Windows only) or an FTP server. First, set where the files will be transferred to (file transfer destination) and then transfer the files. If you are transferring files to a computer running Network Utility, you also have the option of uploading the files to YouTube and Facebook.
IMPORTANT
For computers running Windows:
- A computer correctly connected to the same network as the camcorder with the supplied software Network Utility correctly installed, configured and running (
 appears in the notification area, depending on the OS). Network Utility will be installed automatically after you install VideoBrowser. For details about the software, refer to the "Network Utility Software Guide" (PDF file on the PIXELA disc in the folder \Network Utility\Manual\English).
- Correctly configured FTP server, such as a Macintosh computer or network-attached storage (NAS) drive. You will need to enter the IP address, port, user name, password, and file transfer destination as part of the manual setup.
Transferring Files to a Computer or Other Device
1. Power the camcorder using the compact power adapter.
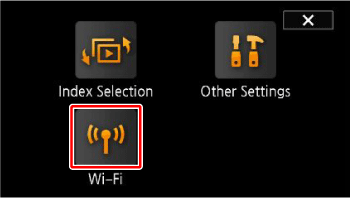
2. Set the camcorder to playback mode and then press <HOME>.
3. Connect the camcorder to the Wi-Fi network.
3-1. Touch [Wi-Fi].
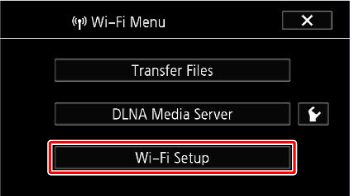
3-2. Touch [Wi-Fi Setup].
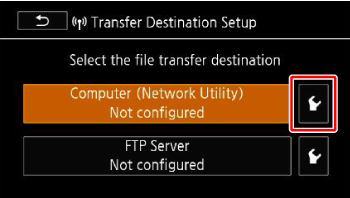
4. Select the file transfer destination.
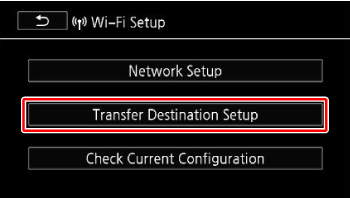
4-1. Touch [Transfer Destination Setup].
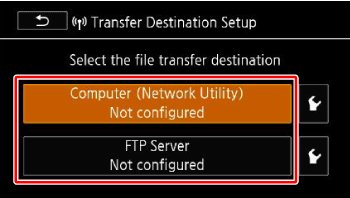
4-2. Touch [Computer (Network Utility)] or [FTP Server].
5. Select the transfer destination.
- If you select [Computer (Network Utility)]:
Touch [

].
- If there is only one connection point, the screen will show that the settings are complete after searching for a transfer destination.
- If there are multiple connection points, select the connection point you want and touch [OK].
- The screen will show that the settings are complete after searching for a transfer destination.
- If several computers connected to the network are running Network Utility, a selection screen will appear. Touch

or

to select the specific computer you want to use for transferring files wirelessly from the camcorder and then touch [OK].
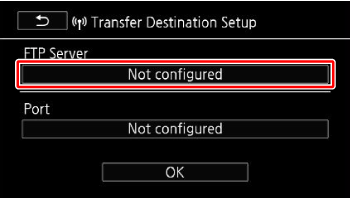
- If you select [FTP Server]:
i. Touch [

].
iii. Enter the IP adress and then touch [OK].
iv. Enter [21] for [Port] and then press [OK].
v. Enter the user name and password amd then touch [OK].
vi. Enter [/] for [Destination Folder] and then touch [OK].
- The destination folder may differ depending on the FTP server. Check the FTP server's settings.
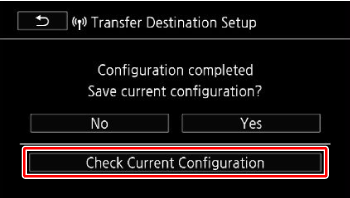
6. When the confirmation screen appears, save the settings of the connection point.
Touch [Yes] -> [OK] in that order.
REFERENCE
1. Touch [Check Current Configuration].
2. Touch either

or

to check the items.
3. Touch

] three times.
- The screen will return to the Wi-Fi menu.
7. Transfer files.
7-1. Touch [Transfer Files].
7-2. Select the memory that contains the recordings you wish to transfer wirelessly.
- You can select more than one memory.
7-3. Touch [All files] to transfer all the recordings, or [New files] to transfer only those recordings that have not been previously transferred, and then touch [OK].
REFERENCE
- If there are multiple connection points:
Touch a connection point -> Touch [OK].
- The file transfer will start.
You can touch [Stop] and then [

] to cancel the wireless transfer while it is in progress.
7-4. Touch [OK].
- The screen will return to the Wi-Fi menu.
8. Touch [

].
CAUTION
- Do not open the memory card slot cover during wireless transfer.
- Observe the following precautions when transferring files. Failing to do so may interrupt the transfer and incomplete files may remain at the transfer destination.
- Do not disconnect the power source or turn off the camcorder.
- Do not change the camera mode.
- Do not connect the optional WM-V1 Wireless Microphone.
- If the file transfer is interrupted, select [New Files] and perform the file transfer again.
- If incomplete files remain at the transfer destination, check the content and make sure they are safe to delete before deleting them.
NOTE
- AVCHD movies transferred using Network Utility will be saved in the Videos folder on the computer by default. If you start VideoBrowser after you transfer AVCHD movies, the destination folder will automatically be added to the software's Library.
- MP4 movies transferred using Network Utility will be saved in the same location as AVCHD movies. If you start ImageBrowser EX after you transfer MP4 movies, the same destination folder will automatically be added to ImageBrowser EX. If you change the destination folder in Network Utility before transferring files, make the same change in the ImageBrowser EX settings.
- Depending on the wireless router's settings and capability, it can take some time to upload video files.
 appears in the notification area, depending on the OS). Network Utility will be installed automatically after you install VideoBrowser. For details about the software, refer to the "Network Utility Software Guide" (PDF file on the PIXELA disc in the folder \Network Utility\Manual\English).
 ].
].
 or
or  to select the specific computer you want to use for transferring files wirelessly from the camcorder and then touch [OK].
 ].
].

 or
or  to check the items.
  ] three times.
 ] to cancel the wireless transfer while it is in progress.
 ].
].