Solution
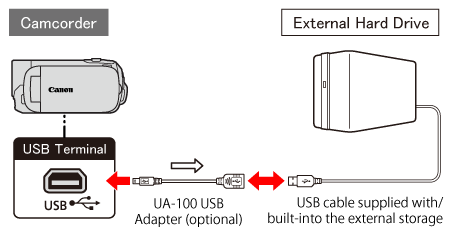
You can easily save all the movies and photos you recorded onto a commercially available external hard drive connected directly to the camcorder. Initialize the hard drive when you use it with this camcorder for the first time.
CAUTION
- Make sure you power the camcorder with the compact power adapter before you save a memory to the external hard drive. If the compact power adapter becomes disconnected, the connection between the camcorder and the hard drive will end, which may lead to the corruption of data in the hard drive.
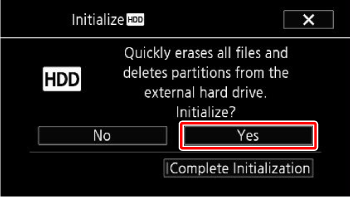
- Initializing the external hard drive will permanently erase all the data on the hard drive (including your recordings, previous data not saved with the camcorder, and partitioned drives). Make sure to copy in advance important data to a computer or other device.
NOTE
- If you have connected to an external hard drive using the USB cable IFC-300PCU/S that came with your camcorder, movies cannot be saved. If the USB cable you are using cannot be connected to the camcorder's USB terminal, please use either the USB adapter UA-100 (sold separately) or a commercially available USB adapter.
External hard drives that can be used
External hard drives that meet the following conditions can be used.
* This is not a guarantee that all devices that meet these conditions will operate as expected.
- Meets the requirements of the USB 2.0 specification
(General USB memory devices or card readers cannot be used.)
- Is a stationary device that runs on AC power
(Portable hard drives that run on USB power cannot be used.)
- Has 2 TB (terabytes) or less of space
- Has been initialized by the camcorder
(If using the external hard drive for the first time, it must be initialized by the camcorder. Initializing the external hard drive will permanently erase all of the data on the hard drive; it will not be possible to restore that data afterward. If there is data on the hard drive that you want to keep, make sure to back up the data by copying it to a computer or other device before initializing the hard drive. Also, please note that the entire external hard drive will be initialized, regardless of the existence of any partitions on the hard drive.
If the USB cable supplied with the external hard drive has a standard-A connector, you will need to use the optional UA-100 USB Adapter or a commercially available USB adapter.
Initializing the External Hard Drive
1. Power the camcorder using the compact power adapter.
2. Press <

> to set the camcorder to playback mode.
3. Connect the camcorder to the external hard drive using the optional UA-100 USB Adapter.
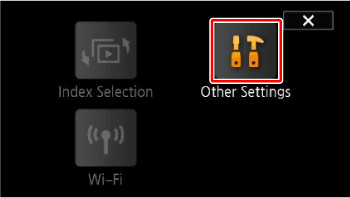
5. Touch [Other Settings].
6. Touch [

].
7.

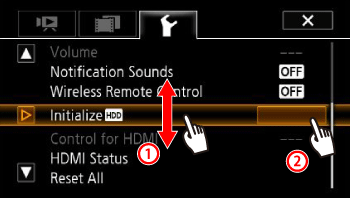
Drag your finger up or down to bring [Initialize HDD] into the orange selection bar, and then

touch the button.
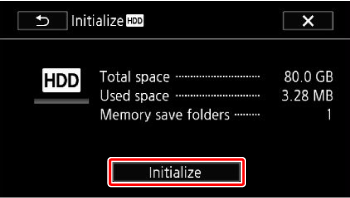
9. Touch [Yes] to start initialization.
REFERENCE
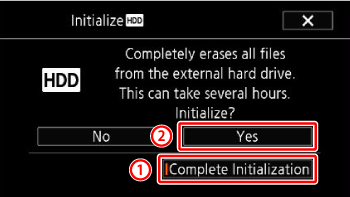
- Touch this option if you want to physically erase all the data rather than just clear the file allocation table of the hard drive. For large-capacity hard drives this operation can take several hours.
- If you selected the [Complete Initialization] option, you can touch [Cancel] > [OK] to cancel the initialization while it is in progress. All recordings will be erased and the hard drive can be used without any problem.
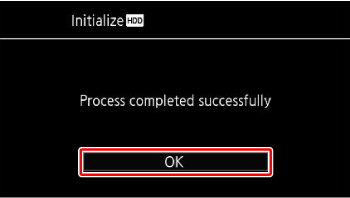
11. Safely end the connection to the external hard drive before physically disconnecting it.
REFERENCE
- Before disconnecting the external hard drive
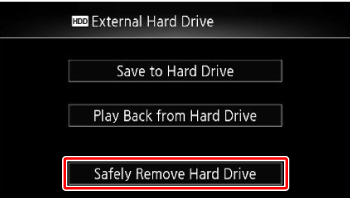
Before turning off or physically disconnecting the external hard drive, be sure to safely end the connection to the camcorder to avoid damage to your files. From the [External Hard Drive] screen:
1. Touch [Safely Remove Hard Drive].
2. Touch [Yes], and then remove the USB cable.
Saving a Memory onto an External Hard Drive
1. Power the camcorder using the compact power adapter.
2. Press <

> to set the camcorder to playback mode.
3. Connect the camcorder to the external hard drive using the optional UA-100 USB Adapter.
4. Save the entire contents of the desired memory.
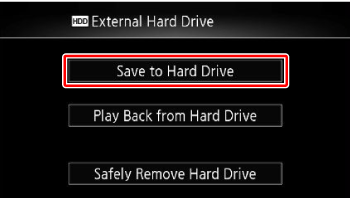
4-1. Touch [Save to Hard Drive].
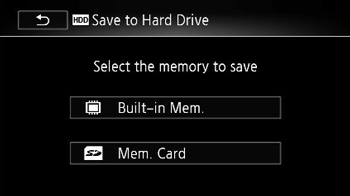
5. Touch [Built-in Mem.] or [Mem. Card].
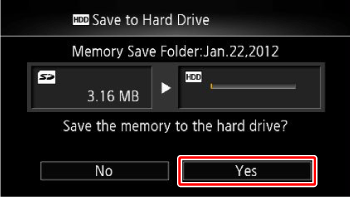
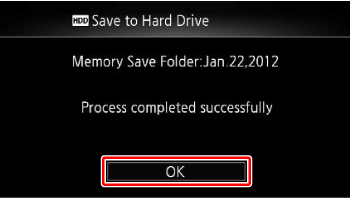
6. Touch [Yes].
NOTE
- After selecting the memory, you can check the name of the folder that will be created on the hard drive. Every memory save operation will create a separate memory save folder with the date (in numerical form) used as the folder name; up to 10 memory save folders can be created for any given date and up to 300 memory save folders can be saved on a single hard drive.
REFERENCE
- Before disconnecting the external hard drive
Before turning off or physically disconnecting the external hard drive, be sure to safely end the connection to the camcorder to avoid damage to your files. From the [External Hard Drive] screen:
1. Touch [Safely Remove Hard Drive].
2. Touch [Yes], and then remove the USB cable.
NOTE
- You cannot select both the built-in memory and memory card to save them simultaneously.
- Every memory save operation will create a separate memory save folder with the date (in numerical form) used as the folder name; up to 10 memory save folders can be created for any given date and up to 300 memory save folders can be saved on a single hard drive.
- If the external hard drive is partitioned, only the first partition will be recognized.
 > to set the camcorder to playback mode.
 ].
].
 Drag your finger up or down to bring [Initialize HDD] into the orange selection bar, and then
  touch the button.
 > to set the camcorder to playback mode.