Setting the Date and Time
28-Feb-2012
8201393900
Solution
This section describes how to make the date and time settings on the camera.
IMPORTANT
- The date and time settings are recorded on images captured with the camera.
When you turn on the camera for the first time after purchase, the [Date/time] settings screen appears.
1. Press the <Power> button on the camera.
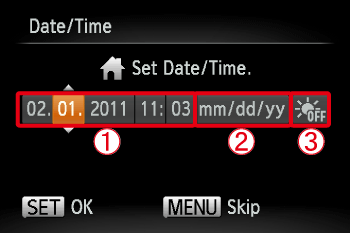
2. The following screen appears.

Operate the <directional buttons> left or right to select an option.
Next, operate the <directional buttons> up or down to make the following settings.
 Set the year, month, date, and time.
 Change the year, month, and date.
 Set the daylight saving time (one hour is added to the current time).
After the settings are completed, press the <FUNC./SET> ( ) button.
 ) button.
1. Press the <Power> button on the camera.
2. Press the <MENU> ( ) button.
 ) button.
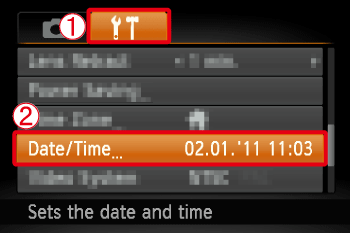
3. The following screen appears.

Operate the <directional buttons> left or right to select  [Set up] (
 ) tab.
 [Set up] (
 ) tab.
Operate the <directional buttons> up or down to select  [Date/time].
 [Date/time].
Press the <FUNC./SET> ( ) button.
 ) button.
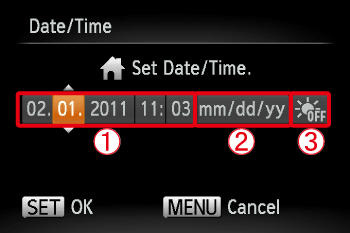
4. The following screen appears.

Operate the <directional buttons> left or right to select an option to change.
Next, operate the <directional buttons> up or down to make the following settings.
 Set the year, month, date, and time.
 Change the year, month, and date.
 Set the daylight saving time (one hour is added to the current time).
After the settings are completed, press the <FUNC./SET> ( ) button.
 ) button.
NOTE
- Unless you set the date and time, the [Date/Time] screen will be displayed each time you turn the camera on. Specify the correct information.
- Date/time settings can be retained for about 3 weeks by the camera’s built-in date/time battery (backup battery) after the battery pack is removed.
- Once the date/time battery is depleted, the [Date/Time] screen will be displayed when you turn the camera on. Follow the steps on p. 21 to set the date and time.
If you are using the PowerShot A4000 IS / A3400 IS / A2400 IS / A2300...
- The date/time battery will be charged in about 4 hours once you insert a charged battery or connect the camera to an AC adapter kit (sold separately), even if the camera is left off.
If you are using the PowerShot A1300 / A810...
- By inserting new batteries, or connecting an AC adapter kit (sold separately), the date/time battery can be charged in about 4 hours even if the camera is left off.