Solution
If you register a person ahead of time, the camera will detect that person’s face, and prioritize focus, brightness, and color for that person when shooting. In

mode, the camera can detect babies and children based on registered birthdays and optimize settings for them when shooting.
This function is also useful when searching for a specific registered person among a large number of images.
You can register information (face info, name, birthday) for up to 12 people to use with Face ID. (You can register up to five items of face info per person.)
Up to three people can be detected when shooting and up to five people can be detected during playback.
REFERENCE
- Information such as images of a face (face info) registered with Face ID, and personal information (name, birthday) will be saved on the camera. Additionally, when registered people are detected, their names will be recorded in still images. When using the Face ID function, be careful when sharing the camera or images with others, and when posting images online where many others can view them.
- When disposing of a camera or transferring it to another person after using Face ID, be sure to erase all information (registered faces, names, and birthdays) from the camera.
- Because faces of babies and children change quickly as they grow, you should update their face info regularly.
IMPORTANT
- When the camera is set to [Easy mode] (
 ), you cannot use Face ID.
- When using [Face ID] to shoot, names will not be displayed in [Movie Digest] (
 ), [Fish-eye Effect] (
 ), [Miniature Effect] (
 ), or [Stitch Assist] (
 ), but they will be recorded in still images.
- Setting available, but when using [Face ID] to shoot, names will not be displayed in [iFrame Movie] (
 ) or [Super Slow Motion Movie] (
 ), and they will not be recorded in movies.
- The position and shape of the operation buttons, screens displayed, and setting items may differ according to the model you use.
Registering Face ID Information
You can register information (face info, name, birthday) for up to 12 people to use with Face ID.
1. Press the < Power > button on the camera.
2. Press the <

> button.
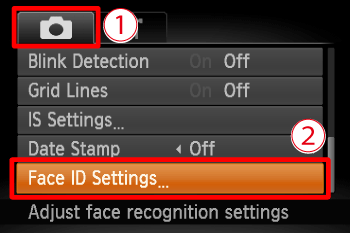
3.

Operate the <directional buttons> right or left to choose the (

) tab, then

operate the <directional buttons> up or down to choose [Face ID Settings].
Press the <FUNC./SET> (

) button.
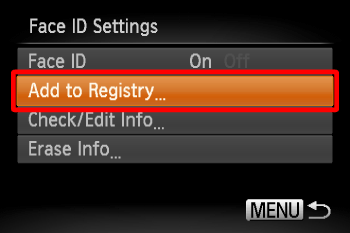
4. Move the <Directional buttons> right or left to set [Face ID] to [On].
5. Operate the <directional buttons> up or down to choose [Add to Registry].
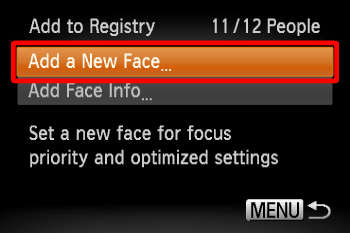
6. Choose [Add a New Face]
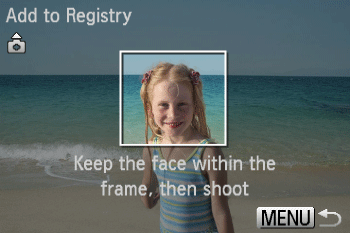
7. Aim the camera so that the face of the person you want to register is inside the gray frame at the center of the screen.
A white frame on the person’s face indicates that the face is recognized. Make sure a white frame is displayed on the face, and then shoot.
If the face is not recognized, you cannot register face information.
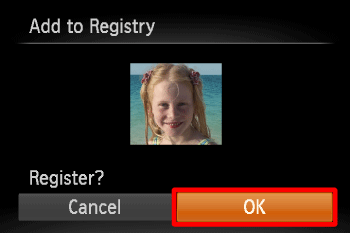
8. After [Register?] is displayed, operate the <directional buttons> right or left to choose [OK], and then press the <FUNC./SET> (

) button.
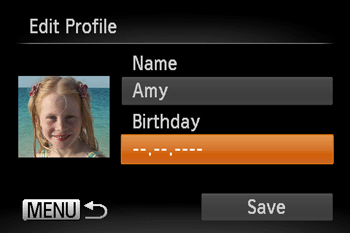
9. The [Edit Profile] screen is displayed.
Press the <FUNC./SET> (

) button.
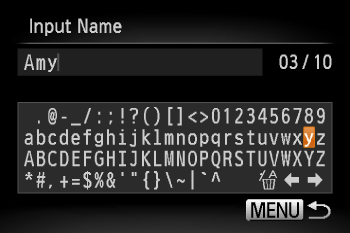
10. Operate the <directional buttons> to choose a character, and then press the <FUNC./SET> (

) button to enter it. (Up to 10 characters can be used.)
Press the <

> button to return to the edit profile screen.
11. Operate the <directional buttons> up or down to choose [Birthday], and then press the <FUNC./SET> (

) button.
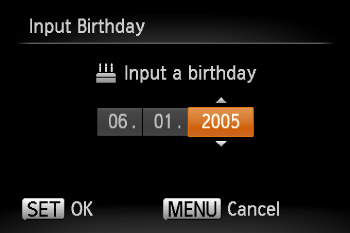
12. Operate the <directional buttons> left or right to choose an item, and then operate the <directional buttons> up or down to specify the date and time.
When finished, press the <FUNC./SET> (

) button.
13. Operate the <directional buttons> up or down to choose [Save], and then press the <FUNC./SET> (

) button.
14. After a message is displayed,Operate the <directional buttons> left or right to choose [Yes], and then press the <FUNC./SET> (

) button.
Registered faces are more easily recognized if you add a variety of face information. In addition to a head-on angle, add a slight side angle, a shot when smiling, and shots inside and outside.
To register up to 4 more points of face information (expressions or angles), repeat
steps 7 – 8.
REFERENCE
- The flash will not fire when following step 7.
- If you do not register a birthday in step 12, Babies or Children icons will not display in
 mode.
mode.
NOTE
You can overwrite registered face info, and add face info later if you have not filled all 5 face info slots.
Using Face ID when shooting
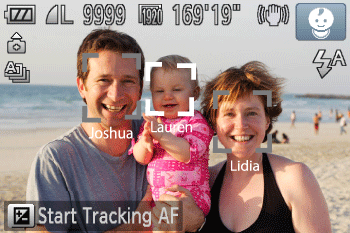
If you register a person ahead of time, the camera will prioritize that person as the main subject, and optimize focus, brightness, and color for that person when shooting.
REFERENCE
To use Face ID when shooting, <

> > (

) tab > [Face ID Settings] > [Face ID] must be set to [On]. (By default, [On] is selected.)
When you point the camera toward a subject, the names of up to 3 registered people will be displayed when they are detected.
Shoot.
Displayed names will be recorded in still images. Even if people are detected, but their names are not displayed, the names (up to 5 people) will be recorded in the image.
REFERENCE
- People other than those registered may be mistakenly detected as the registered person if they share similar facial features.
NOTE
- Registered people may not be correctly detected if the captured image or scene differs drastically from the registered face information.
- If a registered face is not detected, or not easily detected, overwrite registered information with new face info. Registering face info right before shooting will allow for easier detection of registered faces.
- If a person is mistakenly detected as another person and you continue shooting, you can edit or erase the name recorded in the image during playback.
- Because faces of babies and children change quickly as they grow, you should update their face info regularly.
- When information display is set to off, names will not display, but will be recorded in the image.
- If you don’t want names to be recorded in still images, choose [Face ID Settings] on the (
 ) tab, choose [Face ID], and then choose [Off].
- You can check names recorded in images in the playback screen (simple information display).
 mode, the camera can detect babies and children based on registered birthdays and optimize settings for them when shooting.
 ), you cannot use Face ID.
  ), [Fish-eye Effect] (
 ), [Miniature Effect] (
 ), or [Stitch Assist] (
 ), but they will be recorded in still images.
 ) or [Super Slow Motion Movie] (
 ), and they will not be recorded in movies.
 > button.
 Operate the <directional buttons> right or left to choose the (
 ) tab, then
  operate the <directional buttons> up or down to choose [Face ID Settings].
 ) button.

 ) button.
 ) button.
 ) button to enter it. (Up to 10 characters can be used.)
 > button to return to the edit profile screen.
 ] or [
  ] and press the
  ) button to move the cursor.
 ] and press the
  ) button to delete the previous character.
 ) button.
 ) button.
 ) button.
 ) button.
 mode.
mode. > > (
> > ( ) tab > [Face ID Settings] > [Face ID] must be set to [On]. (By default, [On] is selected.)
 ) tab, choose [Face ID], and then choose [Off].