The Printer Is Not Recognized Automatically (When Installing the Printer Driver)
17-Jun-2011
8201157200
Solution
<Cause 1>
The printer is not turned ON.
<Solution>
Turn the printer ON.
<Cause 2>
The USB cable is not connected properly.
<Solution>
Make sure that the printer and computer are properly connected with the USB cable.
1. Make sure that the printer and computer are OFF.
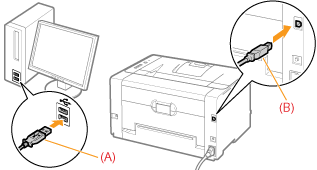
2. Connect the USB cable.
- Flat end (A): Connects to a USB port on your computer.
- Square end (B): Connects to the USB connector on this printer.
<Cause 3>
The USB cable was already connected and the printer was turned ON before the printer driver was installed.
<Solution>
Perform the following procedure.
1. Turn the printer OFF.
2. Disconnect the USB cable.
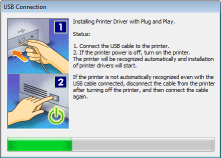
3. Connect the USB cable again.
4. While the following screen appears, turn the printer ON.
<Cause 4>
An inappropriate USB cable is being used.
<Solution>
Use a USB cable that is appropriate for the USB interface environment of the printer and has the following symbol.

* The following is the USB interface environment of this printer.
- Hi-Speed USB
- USB
<Cause 5>
The USB class driver is installed.
<Solution>
Uninstall the USB class driver.
1. Check the following.
- The printer and computer are connected using a USB cable.
- The printer is turned ON.
2. Perform the following procedure.

From the [Start] menu, select [Settings] → [Control Panel], and then double-click [Add/Remove Programs].

From the [Start] menu, select [Control Panel], and then click [Add or Remove Programs].


From the [Start] menu, select [Control Panel], and then click [Uninstall a program].

From the [Start] menu, select [Control Panel] → [Add or Remove Programs].

From the [Start] menu, select [Control Panel], and then double-click [Programs and Features].
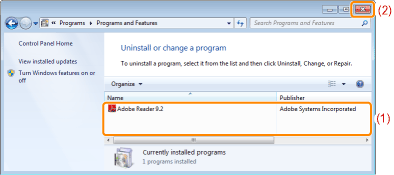
3. Make sure that [Canon LBP7010C/7018C] is not displayed.
(1) Make sure that [Canon LBP7010C/7018C] is not displayed in the dialog box.
(2) Click [  ] to close the dialog box.
 ] to close the dialog box.
NOTE
If [Canon LBP7010C/7018C] is displayed
- Delete [Canon LBP7010C/7018C] in the dialog box. (Uninstall the printer driver.)For details on the procedure for deleting [Canon LBP7010C/7018C], see "e-Manual" (HTML manual) in the CD-ROM supplied with the printer.
4. Display [Device Manager].

4-A-1. From the [Start]menu, select [Settings] → [Control Panel].
4-A-2. Double-click the [System] icon.
4-A-3. Click the [Hardware] tab → [Device Manager].

4-B-1. From the [Start] menu, select [Control Panel].
4-B-2. Click [Performance and Maintenance] → [System].
4-B-3. Click the [Hardware] tab → [Device Manager].


4-C-1. From the [Start] menu, select [Control Panel].
4-C-2. Click [Hardware and Sound] or [Hardware] → [Device Manager].

4-D-1. From the [Start] menu, select [Control Panel] → [System].
4-D-2. Click the [Hardware] tab → [Device Manager].

4-E-1. From the [Start] menu, select [Control Panel].
4-E-2. Double-click [Device Manager].
5. Double-click [Universal Serial Bus controllers].
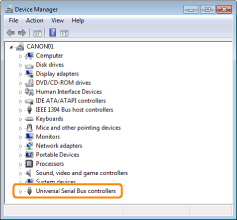
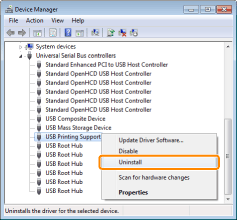
6. Right-click [USB Printing Support], then select [Uninstall] from the pop-up menu.
* Do not uninstall any drivers for other devices. If you uninstall them by mistake, Windows may not operate properly.
* If the USB class driver is not installed properly, [USB Printing Support] is not displayed. Then, click [  ] to close the [Device Manager] dialog box.
 ] to close the [Device Manager] dialog box.
NOTE
If the USB class driver is under [Other Devices]
- Select the USB class driver which is displayed as [Unknown device], and then uninstall it.
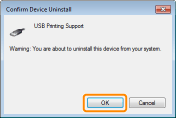
7. Click [OK].
8. Click [  ] to close the [Device Manager] dialog box.
 ] to close the [Device Manager] dialog box.
9. Disconnect the USB cable from the computer, then restart Windows.