Connecting EOS REBEL T3/EOS 1100D to a TV to view (play back) still images and movies on the TV
10-Feb-2011
8201014700
Solution
With this camera, you can also view still photos and movies on a TV set. To view images on the camera's memory card, it is necessary to connect the camera and television using an HDMI cable.
Viewing images by connecting the camera with HD (high-definition) TV sets is explained below.
CAUTION
Before connecting or disconnecting the cable between the camera and television, turn off the camera and television.
IMPORTANT
- The camera does not have an audio/video OUT terminal. Therefore, the camera cannot be connected to a TV set with an analog AV cable.
- Movies on a card can be played only by devices compatible with MOV files.
- Since hard disk recorders do not have an HDMI IN terminal, the camera cannot be connected to a hard disk recorder with an HDMI cable.
- Even if the camera is connected to a hard disk recorder with a USB cable, movies and still photos cannot be played nor saved.
NOTE
- Adjust the movie's sound volume with the TV set.
- Depending on the TV set, part of the image displayed might be cut off.
The HDMI Cable HTC-100 (sold separately) is required to connect with HD TVs.
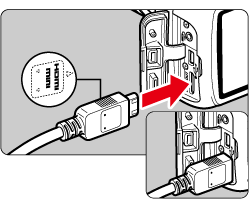
1. Connect the HDMI cable to the camera.
With the plug’s <  HDMI MINI> logo facing the front of the camera, insert it into the <HDMI OUT> terminal.
 HDMI MINI> logo facing the front of the camera, insert it into the <HDMI OUT> terminal.
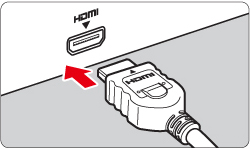
2. Connect the HDMI cable to the TV's HDMI IN port.

3. Turn on the TV and switch the TV's video input to select the connected port.
4. Set the power switch to <ON>.
5. If the <  > (Playback) button is pressed, the image will appear on the TV screen. (Nothing will be displayed on the camera's LCD monitor.)
 > (Playback) button is pressed, the image will appear on the TV screen. (Nothing will be displayed on the camera's LCD monitor.)
- The images will be displayed automatically at the TV's optimum resolution.
- By pressing the <DISP.> button, you can change the display format.
- To playback the movie, follow the procedure below.

IMPORTANT
Do not connect any other device's output to the camera's <HDMI OUT> terminal. Doing so may cause a malfunction.
REFERENCE
For HDMI CEC TV sets
When a TV set compatible with HDMI CEC is connected to the camera with the HDMI cable, you can use the TV set's remote control for playback operations. For more information, please refer to the instruction manuals that came with your camera.
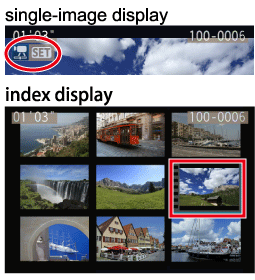
6. Press the <Cross Keys> to select a movie.
- On the single-image display, the [
 ] icon displayed on the upper left indicates a movie.
 - On the index display, the perforation on the left edge of the image indicates a movie. As movies cannot be played on the index display, press the <SET> button to switch to the single-image display.

7. On the single-image display, press the <SET> button.
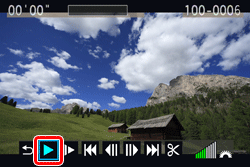
The movie playback panel will appear on the bottom.

8. Press the <Cross keys> to select [  ], and then press the <SET> button to start playing the movie.
 ], and then press the <SET> button to start playing the movie.
You can pause the movie playback by pressing the <SET> button.
During movie play back, adjust the sound volume with the TV set. (Turning the <Main Dial> will not adjust the sound volume.)

| Icon | Item | Playback Description |
 |
Exit | Returns to the single-image display. |
 |
Play | Pressing <SET> button between play and pause. |
 |
Slow motion | Adjust the slow motion speed by pressing the <Cross keys>. The slow-motion speed is indicated on the upper right. |
 |
First frame | Displays the movie's first frame. |
 |
Previous frame | Each time you press <SET> button, a single previous frame is displayed. If you hold down <SET> button, it will rewind the movie. |
 | Next frame | Each time you press <SET> button, the movie will play frame-byframe. If you hold down <SET> button, it will fast forward the movie. |
 |
Last frame | Displays the movie's last scene. |
 |
Edit | Displays the editing screen. |
 |
Playback position | |
| mm' SS" | Playback time | |
 |
Volume | When you connect the camera to a TV set to playback a movie, adjust the sound volume with the TV set. (Turning the <Main Dial> will not adjust the sound volume.) |
REFERENCE
Shooting movies with the camera connected to a TV
- When the camera is connected to a TV set via HDMI cable, the camera will read the information on the TV set's compatible video input signals. The camera then selects the optimum video output signal (1080/60i, 1080/50i, 480/60p, or 576/50p) and the video is displayed.
- The video image displayed on an HDMI-connected TV set while no movie is being shot (movie Live View) is displayed on the camera's LCD monitor. It cannot be displayed in 16:9 on the LCD monitor.
- When movie shooting starts while the camera is connected to a TV set via HDMI, the video signal will automatically switch to 480/60p or 576/50p due to the imaging engine's compatible limits, resulting in a smaller image size. However, many HD TV sets will automatically try and fit the image to 16:9, so it will look unnatural with the image stretched horizontally.
- If you connect the camera to a TV set and shoot a movie, the TV will not output any sound during the shooting. However, the sound will be properly recorded.