Solution
Recorded movies can be copied to other devices such as Blu-ray disc recorders or DVD recorders.
Connect the camcorder to Blu-ray Disc recorders and other AVCHDcompatible digital video recorders using the supplied USB cable to make perfect copies of your movies in high definition. If the external digital video recorder has an SD memory card slot*, you can use the memory card to copy your movies without connecting the camcorder.
* Make sure the external device is compatible with the type of memory card used.
2. Power the camcorder using the compact power adapter.
3. Press <

> to open the playback mode.
If the [Photos] index screen appears, touch <

> to select the [Date] index screen or the [Gallery] screen.
4. Connect the camcorder to the digital video recorder using the supplied USB cable.
- Select an option other than [All (for PC only)].
- Camcorder: When the connection is successfully established, [USB Connection] appears on the screen.
5. Details will vary depending on the device used so be sure to refer to the instruction manual of the digital video recorder.
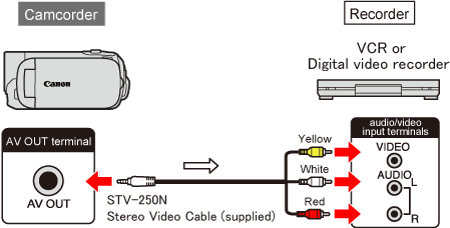
You can copy your movies by connecting the camcorder to a VCR or a digital video recorder with analog audio/video inputs. Video output will be in standard definition, although the original scenes are in high definition.
1. Connect the camcorder and the video recorder with the supplied stereo video cable.
2. Power the camcorder using the compact power adapter.
3. Press <

> to open the playback mode.
If the [Photos] index screen appears, touch <

> to select the [Date] index screen or the [Gallery] screen.
4. Check the menu settings.
Be sure that the [AV/Headphones] setting is set to [AV].
6. On the camcorder’s LCD screen, touch the scene or movie to play back.
REFERENCE
- You may change the date/time display on the screen from the [Data Code] setting in the menu.
- If you do not wish to display the shooting information, turn off the [Output Onscreen Displays] setting.
7. Start recording the scene you wish to record with the recorder.
8. Stop the recording on the recorder.
9. Touch <

> on the camcorder’s LCD screen to stop the playback.
 > to open the playback mode.
 > to select the [Date] index screen or the [Gallery] screen.
 > to open the playback mode.
 > to select the [Date] index screen or the [Gallery] screen.
 > on the camcorder’s LCD screen to stop the playback.