Solution
Use Adjust Length to ensure that lines in CAD drawings are printed at exactly the right length.
In the Adjust Length menu, choose the mode of length adjustment ( A:High or B:Standard/Draft ) that suits your particular printing application.
- A:High : This setting is applied when Highest or High is selected in Print Quality in the printer driver.
- B:Standard/Draft : This setting is applied when Standard or Draft is selected in Print Quality in the printer driver.
Check the Feed Priority setting before using Adjust Length.
NOTE
- Use paper of the same type and size for adjustment as you will use for printing.
- If you have selected Easy Settings on the printer, follow these steps to confirm the Print Quality setting.
-Windows: Click View Settings on the Main tab to display the View Settings dialog box.
-Mac OS X: Click View set. on the Main pane to display the View settings dialog box.
Paper to Prepare
<Rolls>
An unused roll at least 10 inches wide
<Sheets>
One sheet of unused paper of at least A4/Letter size
Follow these steps to change the Adjust Length setting.
1.Load paper.
NOTE
- Always make sure the loaded paper matches the type of paper specified in the settings. Adjustment cannot be completed correctly unless the loaded paper matches the settings.
2.Press the Menu button to display MAIN MENU.
3.Press

or

to select Adjust Printer, and then press the

button.
4.Press

or

to select Adjust Length, and then press the

button.
5.Press

or

to select A:High or B:Standard/Draft, and then press the

button.
6.Press

or

to select Yes, and then press the OK button.
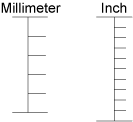
A test pattern is printed for adjustment based on the amount of paper stretching or shrinkage. The scale bar shows Millimeter in 50 mm units and Inch in 1 inch units.
NOTE
- A test pattern is printed in black when you choose A:High or in magenta if you choose B:Standard/Draft.
- To cancel printing the test pattern for adjustment, hold down the Stop button for a second or more, and then go to step 7.
7.Measure the length of the adjustment pattern. Calculate the difference between the measured length and actual length. Enter it as a percentage and press the OK button.
You can adjust the value in 0.02% increments. Press

to increase the value or

to decrease it.
If the scale is printed shorter than actual size, set the value toward the positive side; if it is printed longer, set the value toward the negative side.
NOTE
- You can also specify the adjustment value in Adjust Length in the Paper Details menu. In this case, no test pattern for adjustment is printed.

 or
or  to select Adjust Printer, and then press the
  button.
 or
or  to select Adjust Length, and then press the
  button.
  or
or  to select A:High or B:Standard/Draft, and then press the
  button.
 or
or  to select Yes, and then press the OK button.
 to increase the value or
  to decrease it.