Solution
NOTE
- Ensure that the machine is connected in network and the power of the machine is turned ON.
When using DHCP, BOOTP, or RARP
- You can select only one of these protocols: DHCP, BOOTP, or RARP.
- When the machine is restarted, the values obtained from DHCP, BOOTP, and RARP will be displayed. (Previously-specified address will be overwritten by the automatically-obtained addresses.)
- Because it takes 2 minutes to check whether DHCP, BOOTP, and RARP are available, it is recommended that you set to <Off> when you do not use them.
- If you switch OFF then ON the power of the machine, you may not be able to print. This is because a different IP address from the one that has been used is assigned. When using DHCP, consult your network administrator and perform either of the following settings.
- Specifying the DNS Dynamic Update function
- Specifying the settings so that the same IP address is always assigned when the machine starts up
The IP address obtained by DHCP, BOOTP, or RARP
- Even if <Auto IP> is set to <On>, the settings are specified by priority.
By default, the IPv4 address is obtained automatically.
The procedure below describes how to manually specify this IP address.
1. Press [

] (Menu).
2. Press [

] or [

] to select <System Management Settings>, and then press [OK].

When the system manager PIN is specified
Enter the system manager PIN.
When you are finished entering, press [
] or [
] to select <Apply>, and then press [OK].
3. Press [
] or [
] to select <Network Settings>, and then press [OK].
4. Press [
] or [
] to select <TCP/IP Settings>, and then press [OK].
5. Press [
] or [
] to select <IPv4 Settings>, and then press [OK].
6. Press [
] or [
] to select <IP Address Settings>, and then press [OK].
7. Press [
] or [
] to select the method for setting the IP address.
| <Auto Obtain> | Set the IP address using any of DHCP, BOOTP, RARP, or Auto IP. |
| <Manual Obtain> | Manually assign an IP address for the machine.
This setting can be specified only when <Select Protocol> and <Auto IP> in <Auto Obtain> are set to <Off>. |
8. Change the IP address settings.
For <Auto Obtain>
8-A-1. Change <Auto Obtain> settings.
- <Off>
Set the IP address settings not to obtain the IP address automatically.
- <DHCP>
Obtains the IP address using DHCP. (The DHCP server needs to be running.)
- <BOOTP>
Obtains the IP address using BOOTP. (The BOOTP daemon needs to be running.)
- <RARP>
Obtains the IP address using RARP. (The RARP daemon needs to be running.)
- <Off>
Set the IP address settings not to obtain the IP address automatically.
- <On>
The machine obtains the IP address automatically.
8-A-2. Press [
] or [
] to select <Apply>, and then press [OK].
For <Manual Obtain>
This setting can be specified only when <Select Protocol> and <Auto IP> in <Auto Obtain> are set to <Off>.
8-B-1. Enter the IP address.
When you are finished entering, press [
] or [
] to select <Apply>, and then press [OK].
8-B-2. Enter the subnet mask.
When you are finished entering, press [
] or [
] to select <Apply>, and then press [OK].
8-B-3. Enter the gateway address.
When you are finished entering, press [
] or [
] to select <Apply>, and then press [OK].
9. Press [
] (Menu) to close the menu screen.
10. Restart the machine.
Turn OFF the machine and wait for at least 10 seconds before turning it ON again.
IMPORTANT
- You cannot only use IPv6 without using IPv4.
- Encryption by IPsec (Security Architecture for Internet Protocol) is not supported.
Addresses that you cannot enter in [IP Address] and [Default Router Address].
- Addresses that start with the sequence "ff" (Multicast Address)
- Addresses that start with the sequence "0:0:"
NOTE
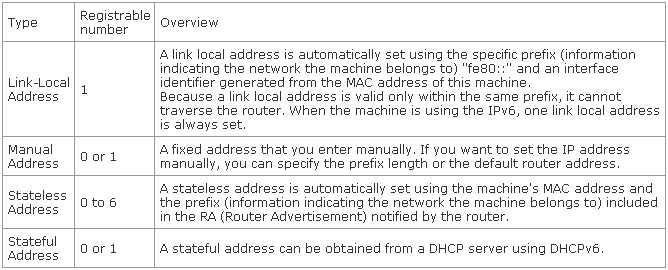
- This machine can have up to nine of the following IPv6 addresses (only one address can be registered manually). In IPv6 communication, multiple IPv6 addresses can be used at the same time.
- When restarting the machine (when the power is turned on), the stateless address is erased.
Specify the IPv6 settings using the Remote UI after specifying the IPv4 settings.
1. Start the Remote UI and then log on in system manager mode.
2. Click [Menu] -> [Network Settings].
3. Click [Edit] at the right side of [TCP/IP Settings].
4. Select the [Use IPv6] check box.
5. Specify the stateless address.
Clear the [Use Stateless Address] check box when not using the stateless address.
6. When using the manual address, perform the following settings.
When not using the manual address, proceed to Step 7.
(1) Select the [Manual Address] check box.
(2) Enter [IP Address].
(3) Enter [Prefix Length].
(4) Enter [Default Router Address] as needed.
7. Set DHCPv6.
When using the stateful address, select the [Use DHCPv6] check box.
9. Restart the machine.
Turn OFF the machine and wait for at least 10 seconds before turning it ON again.
Confirming IP Address Settings
NOTE
If the machine is not connected to the network properly
- The IP address will not be displayed.
When the startup time setting is specified
- The IP address, subnet mask, and gateway address will be displayed when the specified time has elapsed.
When the machine is connected to a switching hub
- The machine may not be able to connect to a network even though your network settings are appropriate. In this case, the startup time of the machine needs to be set to a waiting state.
Confirming IPv4 address settings
1. Press [
] (Status Monitor/Cancel).
2. Press [

] or [

] to select <Network Information>, and then press [OK].
3. Press [
] or [
] to select <IPv4>, and then press [OK].
4. Press [
] or [
] to select the options you want to confirm, and then press [OK].
6. Press [
] (Status Monitor/Cancel) to close the screen.
Confirming IPv6 address settings
1. Press [
] (Status Monitor/Cancel).
2. Press [
] or [
] to select <Network Information>, and then press [OK].
3. Press [
] or [
] to select <IPv6>, and then press [OK].
4. Press [
] or [
] to select the options you want to confirm, and then press [OK].
6. Press [
] (Status Monitor/Cancel) to close the screen.
Checking the Network Connection
IMPORTANT
If the network startup time setting for the machine is specified
- When you turn on the machine, wait until the time specified in <Startup Settings> has elapsed before executing a ping command.
If the machine is connected to a switching hub
- You may not be able to connect the machine to a network even though your network settings are appropriate. Extending the machine's startup time for the network may solve the problem.
Check the network connection by verifying your settings.
1. Press [
] (Menu).
2. Press [
] or [
] to select <System Management Settings>, and then press [OK].
When the system manager PIN is specified
Enter the system manager PIN.
When you are finished entering, press [
] or [
] to select <Apply>, and then press [OK].
3. Press [
] or [
] to select <Network Settings>, and then press [OK].
4. Press [
] or [
] to select <TCP/IP Settings>, and then press [OK].
5. Press [
] or [
] to select <IPv4 Settings>, and then press [OK].
6. Press [
] or [
] to select <PING Command>, and then press [OK].
7. Enter an arbitrary IPv4 address existing on the network.
When you are finished entering, press [
] or [
] to select <Apply>, and then press [OK].
If the network connection is confirmed
The message <Received response from host.> will be displayed.
If the network connection is not confirmed
The message <No response from host.> will be displayed. Recheck your network settings.
9. Press [
] (Menu) to close the menu screen.