Solution
The following items are needed to print onto the printable disc:
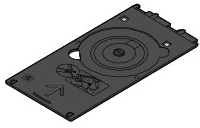
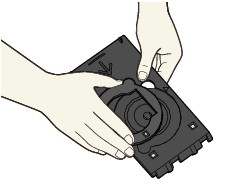
"G" is on the upper side.
- 3.15 inches / 8 cm Disc Adapter
Needed only when printing on 3.15 inches / 8 cm printable discs.
Attached to the Disc Tray when shipped.
Obtain a 4.72 inches / 12 cm or 3.15 inches / 8 cm printable disc with a label surface compatible with inkjet printing.
A "printable disc" differs from regular BD/DVD/CDs in that its label surface has been specially processed to be printed on by an inkjet printer.
IMPORTANT
Do not attach the Disc Tray until the message asking you to load the printable disc is displayed. Doing so can damage the printer.
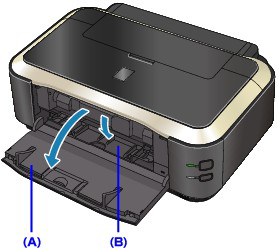
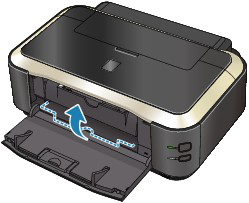
1. Open the Paper Output Tray (A).
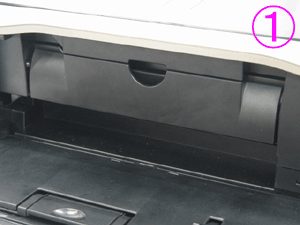
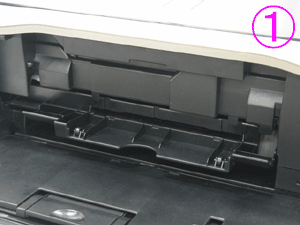
2. Make sure that the message asking you to load the printable disc is displayed, then open the Inner Cover (B).
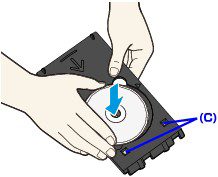
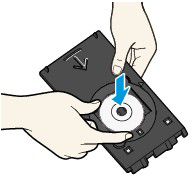
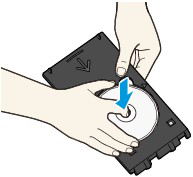
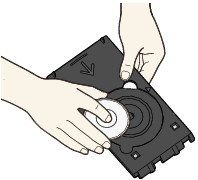
3. Place the printable disc on the Disc Tray.
IMPORTANT
- Make sure that there is no dirt on the Disc Tray before placing a printable disc on the Disc Tray.
- When placing a printable disc on the Disc Tray, do not touch the printing surface of the disc or the reflectors (C) on the Disc Tray.
- 4.72 inches / 12 cm printable disc:
(1) Place the printable disc on the Disc Tray with the printable surface facing up.
- 3.15 inches / 8 cm printable disc:
(1) Align the protrusions on both edges of the 3.15 inches / 8 cm Disc Adapter with indentations on the Disc Tray.
(2) Place the 3.15 inches / 8 cm printable disc on the Disc Tray with the printing surface facing up.
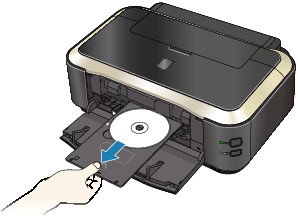
4. Attach the Disc Tray to the printer.
NOTE
The Disc Tray may be ejected after a specified period of time has elapsed. In this case, follow the on-screen instructions to attach the Disc Tray.
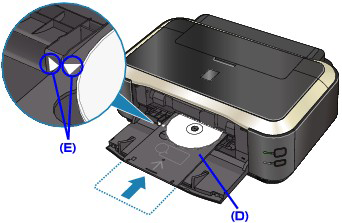
5. Insert the Disc Tray straight until the arrow (

) on the Inner Cover is almost aligned with the arrow (

) on the Disc Tray.
(D) Keep the Disc Tray level when inserting it.
(E) Align the arrow (
) on the Disc Tray with the arrow (
) on the Inner Cover.
IMPORTANT
Do not insert the Disc Tray beyond the arrow (
) on the Inner Cover.
1. Pull out the Disc Tray.
2. Close the Inner Cover.
IMPORTANT
If the Inner Cover is opened, you cannot print on paper as it will not feed properly. Make sure that the Inner Cover is closed.
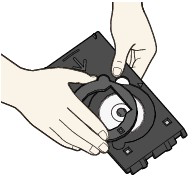
3. Remove the printable disc from the Disc Tray.
IMPORTANT
Do not touch the printing surface when removing the disc from the Disc Tray.
NOTE
Dry the printing surface sufficiently before removing the disc. If you see printing on the Disc Tray or the transparent parts on inner or outer diameter of the printable disc, wipe them off after the printing surface has dried.
- 4.72 inches / 12 cm printable disc:
(1)Remove the printable disc from the Disc Tray.
- 3.15 inches / 8 cm printable disc:
(1) Remove the 3.15 inches / 8 cm Disc Adapter from the Disc Tray.
(2) Remove the 3.15 inches / 8 cm printable disc from the Disc Tray.
IMPORTANT
The Disc Tray cannot be used if it becomes warped. Be sure to keep the Disc Tray on a flat place.
Cautions When Printing on the Disc Label
- Be sure to use the Disc Tray supplied with this printer. It has an "G" on the upper side.
- Do not print on printable discs that are not compatible with inkjet printing. The ink will not dry and may cause problems with the disc itself or devices which the disc is loaded onto.
- Do not print on the printable discs' recording surface. Doing so will make data recorded on discs unreadable.
- Hold the printable discs by their edges. Do not touch either the label surface (printing surface) or recording surface.
- Remove any dirt from the Disc Tray before placing printable discs on the Disc Tray. Loading discs in a dirty Disc Tray may scratch the recording surface of the discs.
- After printing, allow the printing surface of the disc to dry naturally. Do not use hairdryers or expose the disc to direct sunlight to dry the ink. Do not touch the printing surface until the ink has dried.
- Do not attach the Disc Tray while the printer is in operation.
- Do not remove the Disc Tray while printing on printable discs. Doing so may damage the printer, the Disc Tray, or the disc.
- Do not get dirt or scratches on the reflectors of the Disc Tray. The printer may not be able to recognize loading of the printable disc, or printing may become misaligned. If the reflectors on the Disc Tray become dirty, wipe the reflector clean with a soft, dry cloth, taking care not to scratch the plate.
- The Disc Tray may become dirty if software other than CD-LabelPrint or Easy-PhotoPrint EX is used.
- Always use the supplied 3.15 inches / 8 cm Disc Adapter when printing on 3.15 inches / 8 cm printable discs.
- Always close the Inner Cover after printing on printable discs.
- To keep the print quality at an optimal level, it is recommended to stop printing discs once every ten discs when printing more than ten discs continuously. To stop the printing operation, detach the Disc Tray from the printer, then close the Inner Cover. After approximately three minutes have elapsed, open the Inner Cover, attach the Disc Tray to the printer, then resume printing.
Printing on the Disc Label
The Disc Tray (supplied) allows the printing of images on printable discs (BD/DVD/CD etc.).
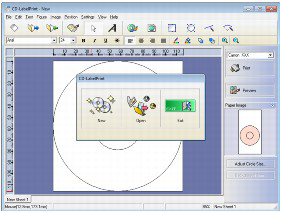
CD-LabelPrint is bundled application software that allows you to edit and modify data before printing. Install it on your computer to use it.
->Printing with CD-LabelPrint from the Computer
NOTE
We recommend that you test print on an unneeded printable disc first.
Printing with CD-LabelPrint from the Computer
- CD-LabelPrint is bundled application software that allows you to edit and modify data before printing. Install it on your computer to use it. To install this software, insert the Setup CD-ROM into the computer's disc drive, then perform Custom Install and select CD-LabelPrint.
- For details on how to print with CD-LabelPrint, refer to its manual. Click Start > All Programs > CD-LabelPrint > Manual.