Solution
To begin with, if both the driver preinstalled in Windows (hereinafter called preinstalled driver) and the Canon-made driver have already been installed in your computer, let's uninstall both of them. Follow the procedures below to uninstall them.
1. In Devices and Printers, right-click the icon of the applicable model, then select Remove device.
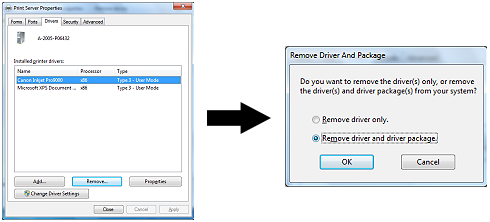
2. Open Print server properties, then select the Drivers tab. ''Print server properties'' will be displayed at the top of the dialog as shown below by clicking any device icon in Printers and Faxes.
3. Select the applicable model, then click Remove.
4. In the Remove Driver And Package window, click Remove driver and driver package.
HOW TO INSTALL XPS PRINTER DRIVER
PIXMA Pro9000 is used as an example for the XPS printer driver installation in the Windows 7 environment.
1. Download the printer driver from our download page and install it.
2. Download the XPS printer driver from our download page and install it.

