


Setting File Server (FTP) (Windows 2000/XP/Server 2003/Vista)
Solution
For the settings before using the Scan to File Server function (FTP) (related information), setting the IP address (related information) and setting up the computer as a file server are required.
This section describes how to set up the computer as a file server after the IP address is set.
NOTE
- It is recommended that the FTP server be configured by the network administrator.
- The use of Windows 2000 Server as an FTP server requires the installation of Microsoft Internet Information Services 5.0 (IIS 5.0). If IIS is not installed in the computer you are using, you will need to install IIS before entering these settings. For installation procedures, see the documentation provided with your operating system.
- The use of Windows XP Professional as an FTP server requires the installation of Microsoft Internet Information Services 5.1 (IIS 5.1). If IIS is not installed in the computer you are using, you will need to install IIS before entering these settings. For installation procedures, see the documentation provided with your operating system.
- Windows XP Home Edition cannot be used as an FTP server.
- The use of Windows Server 2003 as an FTP server requires the installation of Microsoft Internet Information Services 6.0 (IIS 6.0). If IIS is not installed in the computer you are using, you will need to install IIS before entering these settings. For installation procedures, see the documentation provided with your operating system.
- The use of Windows Vista as an FTP server requires the installation of Microsoft Internet Information Services 7.0 (IIS 7.0). If IIS is not installed in the computer you are using, you will need to install IIS before entering these settings. For installation procedures, see the documentation provided with your operating system.
- Verification of users for access to FTP servers is done by referencing the local account database Windows 2000 Server/XP Professional/Server 2003/Vista that is used as the FTP server. Therefore, it is not possible to use the account of a domain user registered in Windows 2000 Server/XP Professional/Server 2003/Vista to send data directly from the machine to FTP servers in other domains.
- This section describes the procedures for using the default home directory under [Default FTP Site]. To use other settings, enter the FTP site and home directory by referring to the documentation for IIS.
- In the following procedures, items displayed on the screen for Windows XP are used; items might differ depending on your operating system.
1. Log on to Windows as a member of the group with access rights to the directory to be designated as the FTP site directory.
NOTE
The access rights settings for a drive or directory may vary depending on your system environment. For details, see the Windows documentation.
2. Start IIS.
For Windows 2000, click [Start] on the Windows taskbar -> [Settings] -> [Control Panel] -> [Administrative Tools] -> [Internet Services Manager].
For Windows XP, click [start] on the Windows taskbar -> [Control Panel] -> [Performance and Maintenance] -> [Administrative Tools] -> [Internet Information Services].
For Windows Server 2003, click [Start] on the Windows taskbar -> [Administrative Tools] -> [Internet Information Services Manager].
For Windows Vista, click [start] on the Windows taskbar -> [Control Panel] -> [Performance and Maintenance] -> [Administrative Tools] -> [Internet Information Services].
3. Enter the FTP site settings.
For Windows 2000, right-click the [Default FTP Site] icon -> click [Properties].
For Windows XP/Server 2003, double-click the [FTP Sites] icon -> right-click the [Default FTP Site] icon -> click [Properties].
For Windows Vista, double-click the [FTP Sites] icon -> right-click the [Default FTP Site] icon -> click [Properties].
In the [Default FTP Site Properties] dialog box, click the [Security Accounts] tab to display the [Security Accounts] sheet.
For Windows 2000, deselect [Allow Anonymous Connections]. For Windows XP/Server 2003/Vista, deselect [Allow only anonymous connection].
Click the [Home Directory] tab to display the [Home Directory] sheet -> select both [Read] and [Write].
Click [OK] to close the [Default FTP Site Properties] dialog box.
4. Confirm [Full computer name].
Click the [Network Identification] tab to display the [Network Identification] sheet -> confirm [Full computer name].
Click [Cancel] to close the [System Properties] dialog box.
For Windows XP/Server 2003:
Click [start] or [Start] on the Windows taskbar, right-click [My Computer] -> click [Properties].
Click the [Computer Name] tab to display the [Computer Name] sheet -> confirm [Full computer name].
Click [Cancel] to close the dialog box.
For Windows Vista:
Click [start] or [Start] on the Windows taskbar, right-click [My Computer] -> click [Properties].
Click the [Computer Name] tab to display the [Computer Name] sheet -> confirm [Full computer name].
Click [Cancel] to close the dialog box.
5. Set up the users and passwords for access to the FTP server.
For Windows 2000, right-click the [My Computer] icon on the desktop -> click [Manage] to open the [Computer Management] window.
For Windows XP/Server 2003, click [start] or [Start] on the Windows taskbar, right-click [My Computer] -> click [Manage] to open the [Computer Management] window.
For Windows Vista, click [start] or [Start] on the Windows taskbar, right-click [My Computer] -> click [Manage] to open the [Computer Management] window.
Under [System Tools], double-click [Local Users and Groups] -> right-click the [Users] folder -> click [New User].
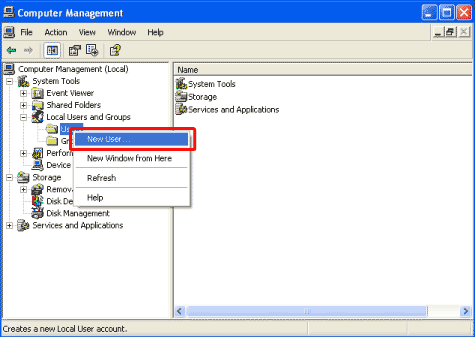
In the [New User] dialog box, enter the user name in [User name] -> enter the password in [Password] -> re-enter the password in [Confirm password].
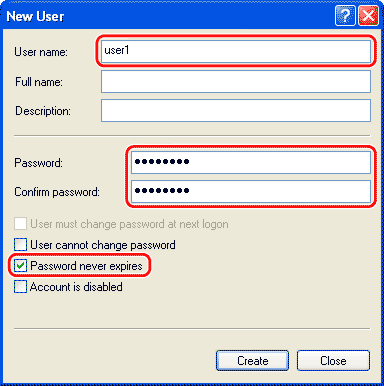
Enter a user name not longer than 20 alphanumeric characters, and a password not longer than 24 (14 for Windows 2000) alphanumeric characters.
Deselect [User must change password at next logon].
Select [Password never expires].
Confirm the settings -> click [Create].
Close the [Computer Management] dialog box.
To send documents to a file server, specifying address is required.
As well as entering a file server address directly, you can specify the file server address using the Address Book or One-touch registered beforehand. This section describes how to register file server addresses in the Address Book or One-touch.
NOTE
- If <Language Switch> in Common Settings is set to <On>, the Host Name and File Path of the file server destination may not be displayed correctly, so you may not be able to refer to them.
- This section describes how to register destinations from the Additional Functions screen. You can also register destinations from the Select Send Type screen, as follows:
- In the Select Send Type screen, use [  ] , [
] , [  ] or
] or  (Scroll Wheel) to select <Address Book>, then press [OK].
] , [ ] or (Scroll Wheel) to select <Address Book>, then press [OK].- Press the left Any key to select <Reg/Edit/Erase>.
- Use [ ] , [ ] or (Scroll Wheel) to select <Register New Dest. to Add. Book>, then press [OK].
] , [ ] or (Scroll Wheel) to select <Register New Dest. to Add. Book>, then press [OK].- Follow the procedure described in this section from step 6.
- Registering destinations in the Address Book is available only for the imageCLASS MF9170C.
- If you use the imageCLASS MF8450C, register destinations in One-touch.
 Storing in the Address Book
1. Press  (Main Menu).
(Main Menu).2. Press the right Any key to select <Additional Func.>.
3. Use [ ] , [ ] or (Scroll Wheel) to select <Address Book Settings>, then press [OK].
] , [ ] or (Scroll Wheel) to select <Address Book Settings>, then press [OK].If a password has been set for the Address Book, enter the password to enter Address Book Settings menu. Enter the password using  -
-  (numeric keys), then press [OK].
- (numeric keys), then press [OK].4. Use [ ] , [ ] or (Scroll Wheel) to select <Register Address>, then press [OK].
] , [ ] or (Scroll Wheel) to select <Register Address>, then press [OK].5. Press the right Any key to select <Register New>.
6. Use [ ] , [ ] or (Scroll Wheel) to select <File>, then press [OK].
] , [ ] or (Scroll Wheel) to select <File>, then press [OK].7. Use [ ] , [ ] or (Scroll Wheel) to select <Register Name>, then press [OK].
] , [ ] or (Scroll Wheel) to select <Register Name>, then press [OK].8. Use the software keyboard to enter the recipient's name.
You can enter up to 16 characters for the recipient's name.
9. If you are finished, press the right Any key to select <Set>.
10. Use [ ] , [ ] or (Scroll Wheel) to select <Destination Registration>, then press [OK].
] , [ ] or (Scroll Wheel) to select <Destination Registration>, then press [OK].11. Use [ ] , [ ] or (Scroll Wheel) to select a server protocol, then press [OK].
] , [ ] or (Scroll Wheel) to select a server protocol, then press [OK].- <FTP>: Select this protocol if you are sending documents to a computer running Sun Solaris 2.6 or later, Mac OS X, Internet Information Services5.0 on Windows 2000 Server, Internet Information Services 5.1 on Windows XP Professional, Internet Information Services 6.0 on Windows Server 2003, Internet Information Services 7.0 on Windows Vista, or Red Hat Linux 7.2.
- <Windows (SMB)>: Select this protocol if you are sending documents to a computer running UNIX/Linux (Samba 2.2.8a or later) or Windows 98/Me/2000/XP/Server 2003/Vista.
- <Windows (SMB): Browse>: Select this protocol if you want to specify a file server connected to a specific network.
12. Use [ ] , [ ] or (Scroll Wheel) to select <Host Name>, then press [OK].
] , [ ] or (Scroll Wheel) to select <Host Name>, then press [OK].13. Use the software keyboard to enter the host name.
You can enter up to 120 characters for the host name.
NOTE
A host name is a unique name assigned to identify each host computer that provides services on the Internet. In this entry box, enter the name of the file server on the network as the destination of the send job.
14. If you are finished, press the right Any key to select <Set>.
15. Use [ ] , [ ] or (Scroll Wheel) to select <Folder>, then press [OK].
] , [ ] or (Scroll Wheel) to select <Folder>, then press [OK].16. Use the software keyboard to enter the path to the folder.
You can enter up to 120 characters for the folder path.
NOTE
- A folder path is a series of characters that signify the location of the folder. Specify a folder in the file server as the destination of the send job.
- If you are sending to an imageWARE Document Manager folder, enter the folder name set in imageWARE Gateway.
17. If you are finished, press the right Any key to select <Set>.
18. Use [ ] , [ ] or (Scroll Wheel) to select <User Name>, then press [OK].
] , [ ] or (Scroll Wheel) to select <User Name>, then press [OK].19. Use the software keyboard to enter the user name.
You can enter up to 24 characters for the user name.
NOTE
If you are sending to an imageWARE Document Manager folder, enter the user name set in imageWARE Gateway.
20. If you are finished, press the right Any key to select <Set>.
21. Use [ ] , [ ] or (Scroll Wheel) to select <Password>, then press [OK].
] , [ ] or (Scroll Wheel) to select <Password>, then press [OK].22. Use the software keyboard to enter the password.
You can enter up to 24 characters when <FTP> is selected as the server protocol.
NOTE
If you are sending to an imageWARE Document Manager folder, enter the password set in imageWARE Gateway.
23. If you are finished, press the right Any key to select <Set>.
24. Press the right Any key to select <Done>.
25. Press the right Any key to select <Register>.
26. Press (Main Menu) to return to the Main Menu screen.
(Main Menu) to return to the Main Menu screen. Storing in One-touch
1. Press (Main Menu).
(Main Menu).2. Press the right Any key to select <Additional Func.>.
3. Use [ ] , [ ] or (Scroll Wheel) to select <Address Book Settings>, then press [OK].
] , [ ] or (Scroll Wheel) to select <Address Book Settings>, then press [OK].If a password has been set for the Address Book, enter the password to enter Address Book Settings menu. Enter the password using - (numeric keys), then press [OK].
- (numeric keys), then press [OK].4. Use [ ] , [ ] or (Scroll Wheel) to select <Register One-touch>, then press [OK].
] , [ ] or (Scroll Wheel) to select <Register One-touch>, then press [OK].5. Use [ ] , [ ] or (Scroll Wheel) to select the One-touch you want to register, then press [OK].
] , [ ] or (Scroll Wheel) to select the One-touch you want to register, then press [OK].6. Use [ ] , [ ] or (Scroll Wheel) to select <File>, then press [OK].
] , [ ] or (Scroll Wheel) to select <File>, then press [OK].7. Use [ ] , [ ] or (Scroll Wheel) to select <Register Name>, then press [OK].
] , [ ] or (Scroll Wheel) to select <Register Name>, then press [OK].8. Use the software keyboard to enter the file server name.
You can enter up to 16 characters for the file server name.
NOTE
Registered destinations are sorted in the Address Book by name, in the alphabetical order.
9. If you are finished, press the right Any key to select <Set>.
10. Use [ ] , [ ] or (Scroll Wheel) to select <Register One-touch Name>, then press [OK].
] , [ ] or (Scroll Wheel) to select <Register One-touch Name>, then press [OK].11. Use the software keyboard to enter the One-touch name.
You can enter up to 12 characters for the One-touch name.
12. If you are finished, press the right Any key to select <Set>.
13. Use [ ] , [ ] or (Scroll Wheel) to select <Destination Registration>, then press [OK].
] , [ ] or (Scroll Wheel) to select <Destination Registration>, then press [OK].14. Use [ ] , [ ] or (Scroll Wheel) to select a server protocol, then press [OK].
] , [ ] or (Scroll Wheel) to select a server protocol, then press [OK].- <FTP>: Select this protocol if you are sending documents to a computer running Sun Solaris 2.6 or later, Mac OS X, Internet Information Services 5.0 on Windows 2000 Server, Internet Information Service 5.1 on Windows XP Professional, Internet Information Services 6.0 on Windows Server 2003, Internet Information Services 7.0 on Windows Vista, or Red Hat Linux 7.2.
- <Windows (SMB)>: Select this protocol if you are sending documents to a computer running UNIX/Linux (Samba 2.2.8a or later) or Windows 98/Me/2000/XP/Server 2003/Vista.
- <Windows (SMB): Browse>: Select this protocol if you want to specify a file server connected to a specific network.
15. If you select <FTP> or <Windows (SMB)>, use [ ] , [ ] or (Scroll Wheel) to select <Host Name>, then press [OK].
] , [ ] or (Scroll Wheel) to select <Host Name>, then press [OK].16. Use the software keyboard to enter the host name.
You can enter up to 120 characters for the host name.
NOTE
A host name is a unique name assigned to identify each host computer that provides services on the Internet. In this entry box, enter the name of the file server on the network as the destination of the send job.
17. If you are finished, press the right Any key to select <Set>.
18. Use [ ] , [ ] or (Scroll Wheel) to select <Folder>, then press [OK].
] , [ ] or (Scroll Wheel) to select <Folder>, then press [OK].19. Use the software keyboard to enter the path to the folder.
You can enter up to 120 characters for the folder path.
NOTE
- A file path is a series of characters that signify the location of the folder. Specify a folder in the file server as the destination of the send job.
- If you are sending to an imageWARE Document Manager folder, enter the folder name set in imageWARE Gateway.
20. If you are finished, press the right Any key to select <Set>.
21. Use [ ] , [ ] or (Scroll Wheel)) to select <User Name>, then press [OK].
] , [ ] or (Scroll Wheel)) to select <User Name>, then press [OK].22. Use the software keyboard to enter the user name.
You can enter up to 24 characters for the user name.
NOTE
If you are sending to an imageWARE Document Manager folder, enter the user name set in imageWARE Gateway.
23. If you are finished, press the right Any key to select <Set>.
24. Use [ ] , [ ] or (Scroll Wheel) to select <Password>, then press [OK].
] , [ ] or (Scroll Wheel) to select <Password>, then press [OK].25. Use the software keyboard to enter the password.
You can enter up to 24 characters when <FTP> is selected as the server protocol.
NOTE
If you are sending to an imageWARE Document Manager folder, enter the password set in imageWARE Gateway.
26. If you are finished, press the right Any key to select <Set>.
27. Press the right Any key to select <Done>.
28. Press the right Any key to select <Register>.
29. Press (Main Menu) to return to the Main Menu screen.
(Main Menu) to return to the Main Menu screen.