


Print Head Deep Cleaning
Solution
If print quality does not improve by standard Print Head Cleaning, try Print Head Deep Cleaning, which is a more powerful process. Note that cleaning the Print Head causes ink used for cleaning to be absorbed in the ink absorber. Print Head Deep Cleaning consumes more ink than standard Print Head Cleaning, so perform this procedure only when necessary.
IMPORTANT
Before performing Print Head Deep Cleaning, open the Top Cover and ensure that all of the ink lamps are lit. If any one of the ink lamps flashes red fast or unlit, this tank has run out of ink. Be sure to replace the ink tank before performing Print Head Deep Cleaning. To perform Print Head Deep Cleaning under the ink out condition may cause the printing trouble such as the mixing of inks, or a printer malfunction. See "Replacing Ink Tanks".
NOTE
Ensure that the Inner Cover is closed.

1. Ensure that the printer is on.
2. Open the printer properties dialog box.
3. Start Print Head Deep Cleaning.
(1) Click the Maintenance tab.
(2) Click Deep Cleaning.
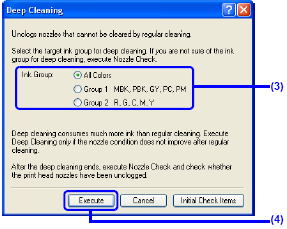
(3) Select the ink group to be deeply cleaned.
NOTE
Clicking Initial Check Items displays the items to be checked before deep cleaning.
(4) Click Execute.
(5) When the confirmation message is displayed, click OK.
Print Head Deep Cleaning starts when the POWER lamp starts blinking blue.
IMPORTANT
Do not perform any other operations until the Print Head Deep Cleaning finishes. (This takes about 180 seconds.)
4. Print the nozzle check pattern to check the Print Head condition. See "Printing the Nozzle Check Pattern".
If a particular color is not printed properly, replace the ink tank of that color. See "Replacing Ink Tanks ".
NOTE
- If the print head nozzles are still not clean, turn off the printer. Be sure to perform another Print Head Deep Cleaning 24 hours after turning off the printer.
- If this does not solve the problem, the print head may be damaged. Contact a Canon service representative.

1. Ensure that the printer is on.
2. Open the Canon IJ Printer Utility dialog box.
3. Start Print Head Deep Cleaning.
(1) Ensure that Cleaning is selected from the pop-up menu.
(2) Click Deep Cleaning.
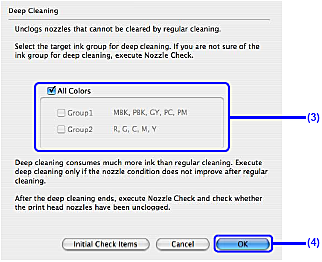
(3) Select the ink group to be deeply cleaned.
NOTE
Clicking Initial Check Items displays the items to be checked before deep cleaning.
(4) Click OK.
Print Head Deep Cleaning starts when the POWER lamp starts blinking blue.
IMPORTANT
Do not perform any other operations until the Print Head Deep Cleaning finishes. (This takes about 180 seconds.)
4. Print the nozzle check pattern to check the Print Head condition.
If a particular color is not printed properly, replace the ink tank of that color.
See "Replacing Ink Tanks ".
NOTE
- If the print head nozzles are still not clean, turn off the printer. Be sure to perform another Print Head Deep Cleaning 24 hours after turning off the printer.
- If this does not solve the problem, the print head may be damaged. Contact a Canon service representative.