Solution
NOTE
- The menu screens and dialog boxes that appear may vary, depending on the software application you are using.
- The steps described in this section are for printing in Windows XP Service Pack 2 (hereafter, called Windows XP SP2).
1. Create a document or open a file to print.
2. Open the Printer Properties dialog box.
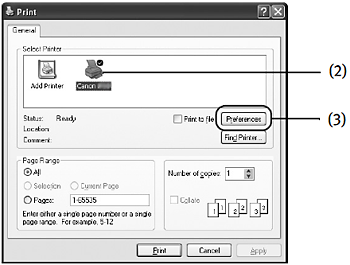
(1) Select Print from the application's File menu.
(2) Ensure that Canon iP90v is selected.
(3) Click Preferences or Properties.
NOTE
In Windows 2000, click the Main tab in the Print dialog box.
3. Specify the required settings.
(1) Click Media Type to select the media loaded in the printer.
(2) Click OK.
NOTE
- From the Page Setup tab select the correct document size to be printed.
- To adjust Print Quality settings, select Custom and click Set on the Main tab. You can control the quality in the Set Print Quality dialog box.
- Select Preview before printing by clicking the check box. This displays a preview screen that allows you to confirm the selected printing effects and how your document will look when printed. Some applications do not contain the function to display the preview.
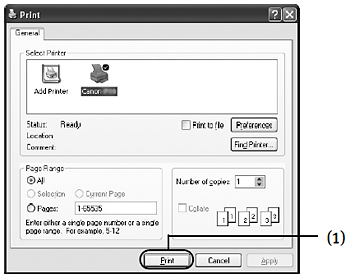
(1) Click Print Print.
NOTE
You can cancel a print job in progress by simply pressing the RESUME/CANCEL button on the printer.
NOTE
- The menu screens and dialog boxes that appear may vary, depending on the software application you are using.
- The steps described in this section are for printing in Mac OS X v.10.3.x.
1. Create a document or open a file to print.
2. Select Paper Size.
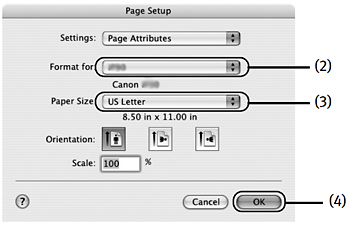
(1) Select Page Setup from the application's File menu.
The Page Setup dialog box opens.
(2) Select iP90v from Format for.
(3) Select the desired paper size from the Paper Size pop-up menu.
(4) Click OK.
3. Specify the required settings.
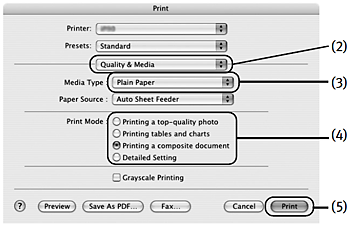
(1) Select Print from the application's File menu.
(2) Select Quality & Media from the pop-up menu.
(3) Select the Media Type from the pop-up menu.
(4) Select the print mode appropriate to your document from the Print Mode.
(5) Click Print.
NOTE
- When you select the print mode appropriate to your document from the Print Mode, the document will be printed in the color and print quality suited to the characteristics of the Media Type you have selected.
Printing a top-quality photo photo: Select when printing documents consisting mainly of photographs and graphics featuring fine color gradation.
Printing tables and charts charts: Select when printing documents consisting mainly of graphs and graphics (illustrations) with strong color definition.
Printing a composite document document: Select when printing documents consisting mainly of text.
Detailed Setting Setting: You can fine-tune Print Quality and Halftoning settings.


