Aligning the Print Head
10-May-2008
8200175100
Solution
If ruled lines are printed misaligned or print results are otherwise unsatisfactory, adjust the print head position.
1. Make sure that the machine is on, and then load a sheet of A4 or Letter-sized plain paper in the Auto Sheet Feeder.
2. Press the Maintenance button repeatedly until P appears.

3. Press the Black or Color button.
The machine prints the head alignment sheet.
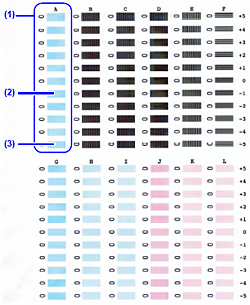
4. Beginning from column A on the printout, fill in the appropriate circles (  ) with a dark pencil to select the most solid image.
 ) with a dark pencil to select the most solid image.
(1) Column A
(2) Good example (Most solid box)
(3) Bad example (Least solid box)
5. Load the checked sheet on the Platen Glass.
When loading the checked sheet, place the front side down, and align the upper left corner of the sheet with the alignment mark on the lower right corner of the Platen Glass.
6. Press the Maintenance button repeatedly until U appears.

7. Press the Black or Color button.
The machine scans the pattern and aligns the Print Head automatically.
NOTE
If you select L in step 1, the machine prints the current Print Head Alignment setting.

NOTE
If adjustment was not successful, E, 1, and 9 appear on the LED. For details, see [ An Error Code Is Displayed on the LED ]