Solution
Printing the Nozzle Check Pattern
Print the nozzle check pattern to determine whether the ink ejects properly from the print head nozzles.
1. Make sure that the machine is turned on, then load a sheet of A4 or Letter-sized plain paper in the Rear Tray.
2. Open the Paper Output Tray, then set the Paper Thickness Lever.
(1) Put your finger in the rounded indent beside the Paper Output Tray and open it gently.
(2) Open up and set the Output Tray Extension completely by pressing down the hollow on its front side.
(3) Set the Paper Thickness Lever to the left.
3. Print the nozzle check pattern.
(1) Press the Menu button repeatedly until MAINTENANCE appears.
(2) Press the

or

button to select NOZZLE CHECK, then press the OK button.
The machine prints a nozzle check pattern.
4. Examine the pattern and take the appropriate action.
Examining the Nozzle Check Pattern
Examine the nozzle check pattern, and perform cleaning if necessary.
NOTE
The nozzle check pattern will not be printed correctly if there is not enough ink. Replace the FINE Cartridge if the remaining amount of ink is insufficient.
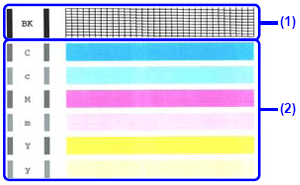
1. Check the nozzle check pattern you printed.
(1) If lines of this pattern are missing, the print head nozzles need cleaning.
Example: When lines are missing (Black ink)
(2) If these patterns have white streaks, the print head nozzles need cleaning.
Example: When white streaks appear (Color ink)
2. When cleaning is necessary, perform Print Head Cleaning.
 or
or  button to select NOZZLE CHECK, then press the OK button.


