


Printing from Your Computer
Solution
This section describes the procedure for basic printing. When printing photographs taken by your digital camera, you can perform Borderless Printing in easy steps using Easy-PhotoPrint EX. Easy-PhotoPrint EX is provided on the Setup CD-ROM. For details on using Easy-PhotoPrint EX, refer to the PC Photo Printing Guide on-screen manual.
NOTE
Easy-PhotoPrint EX supports Exif Print to optimize photographs taken by an Exif-compliant digital camera by using the print information recorded at the time of shooting to achieve higher print quality.
NOTE
Depending on your application program, operations may differ. For details, refer to the instruction manual of your application.
The steps described in this section are for printing in Windows Vista.
1. Turn on the machine and load the paper in the machine.
See "Loading Printing Paper".
2. Create a document or open a file to print using an appropriate application software.
3. Open the printer properties dialog box.
4. Specify the required settings.

(1) Select the media type of the loaded paper in Media Type.
(2) Set Print Quality and Color/Intensity as needed.
(3) Click OK.
The Print dialog box is displayed.
NOTE
- To confirm the page size, click the Page Setup tab. If the setting does not match the document's page size you set in the application software, you need to set the page size to the same size, or otherwise use Scaled Printing or Fit-to-Page Printing.
- For details on the printer driver functions, click Help or Instructions to view the online help or the PC Printing Guide on-screen manual. The Instructions button is displayed on the Main and Maintenance sheets when the on-screen manuals are installed on your computer.
- To display the preview and confirm how your document will look when printed, select the Preview before printing check box. Some application software may not have a preview function.
5. Click Print (or OK) to print the document.

Printing begins.
NOTE
- The message asking to confirm the position of the Paper Thickness Lever may be displayed. If the message appears, make sure that the Paper Thickness Lever is set appropriately. See "Compatible Media Types".
- When printing on long envelopes, the message will be displayed to tell you how to load the envelopes. If you select the "Do not show this message again" check box the message will not be displayed again
- To cancel a print job in progress, press the Stop/Reset button on the machine or click Cancel Printing on the printer status monitor. To display the printer status monitor, click Canon XXX Printer (where "XXX" is your machine's name) on the taskbar.
NOTE
- Depending on your application program, operations may differ. For details, refer to the instruction manual of your application. The steps described in this section are for printing in Mac OS X v.10.4.x.
When Using Mac OS X v.10.5.x
- For details on how to use the machine on Mac OS X v.10.5.x, refer to the PC Printing Guide onscreen manual.
1. Turn on the machine and load the paper in the machine.
See "Loading Printing Paper".
2. Create a document or open a file to print using an appropriate application software.
3. Select the page size.
(1) Select Page Setup on the application software's File menu.
The Page Setup dialog box opens.
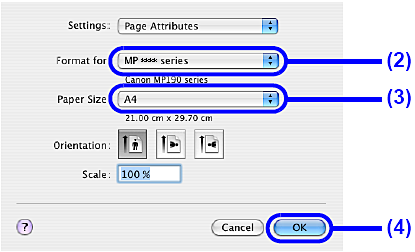
(2) Make sure that your machine's name is selected in Format for.
(3) Select the page size of the loaded paper in Paper Size.
(4) Click OK.
4. Specify the required settings.
(1) Select Print on the application software's File menu.
The Print dialog box opens.
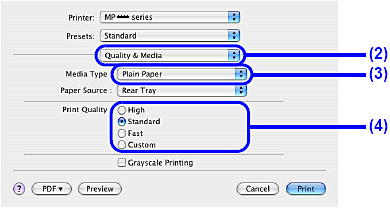
(2) Select Quality & Media in the pop-up menu.
(3) Select the media type of the loaded paper in Media Type.
(4) Select the print mode appropriate to your document in Print Quality.
NOTE
- For details on the print settings, refer to the PC Printing Guide on-screen manual.
- For details on the printer driver functions, click
 on the Quality & Media, Color Options, Special Effects, Borderless Printing, or Margin screen to view the PC Printing Guide on-screen manual. If the on-screen manuals are not installed, the PC Printing Guide on-screen manual is not displayed even if is clicked.
 - To display the preview and confirm how your document will look when printed, click Preview. Some application software may not have a preview function.
5. Click Print to print the document.
Printing begins.
NOTE
Click the printer icon in the Dock to display the list of print jobs in progress.
To cancel a print job in progress, select the desired document in the Name list and click Delete. To temporarily stop a job in progress, click Hold. To stop all the jobs in the list, click Stop Jobs.