Main Components
12-Mar-2008
8200125700
Solution

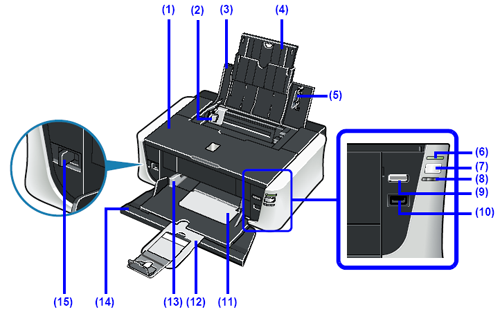
(1) Top Cover
Open when replacing the ink tanks, or when removing jammed paper.
(2) Paper Guide (Rear Tray)
Slide against the left side of the paper stack to support paper so that it feeds properly.
(3) Rear Tray
Load paper here before printing. Paper feeds automatically, one sheet at a time.
(4) Paper Support
Pull out fully to support paper loaded on the tray.
(5) Cover Guide
Supports paper so that it feeds properly.
(6) POWER lamp
Lights or flashes green to indicate the power status.
REFERENCE
POWER Lamp and ALARM Lamp
You can check the status of the printer by the POWER and ALARM lamps.
- POWER lamp Off: The power is off.
- POWER lamp lit green: The printer is ready to print.
- POWER lamp flashing green: The printer is getting ready to print, or printing is in progress.
- ALARM lamp flashing orange: An error has occurred and the printer is not ready to print.For details, see[ ALARM Lamp Flashes Orange ].
- POWER lamp flashes green once and ALARM lamp flashes orange once alternately: An error that requires contacting your Canon Service representative may have occurred. For details, see[ POWER Lamp Flashes Green and ALARM Lamp Flashes Orange Alternately ].
(7) POWER button
Turns the printer on and off.
(8) ALARM lamp
Lights or flashes orange when an error, such as paper-out or ink-out, occurs.
(9) RESUME/CANCEL button
Cancels a print job in progress.
(10) Direct Print Port
Connect your PictBridge compliant device, such as a digital camera, here to print directly from it.
(11) Paper Output Tray
Supports the printouts. Open it before printing.
(12) Output Tray Extension
Supports output printouts. Extend it before printing.
(13) Paper Guide (Front Tray)
Slide against the left side of the paper stack to support paper so that it feeds properly.
(14) Front Tray
Load A4, Letter, or B5-sized plain paper here. Paper feeds automatically, one sheet at a time.
(15) Paper Thickness Lever
Switches the clearance between the Print Head and the loaded paper to match the media type.
NOTE
The position of the Paper Thickness Lever
- Set to the right when printing on envelopes or T-shirt transfers.
- Set to the left when printing on paper other than envelopes or T-shirt transfers.

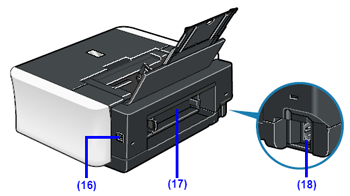
(16) USB Port
Plug in the USB cable connecting the printer to a computer here.
(17) Rear Cover
Open when removing jammed paper.
(18) Power Cord Connector
Plug in the supplied power cord here.

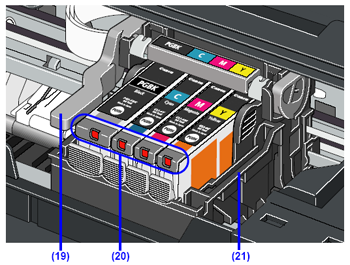
(19) Print Head Lock Lever
Locks the Print Head into place.
IMPORTANT
Do not pull up this lever after installing the Print Head.
(20) Ink lamp
Lights or flashes red to indicate the status of the ink tank.
(21) Print Head Holder
Holds the Print Head.
REFERENCE
For information on how to install the Print Head and ink tanks, refer to [ How to setup the printer ].