Solution
IMPORTANT
Canon machines whose printer drivers can be updated using this version of the driver are listed in Canon Products Supported by PCL Driver.
If you use the Installer to install new printer drivers, the Installer updates the existing ones at the same time that the new drivers are installed.
You can also update the existing drivers already installed without having to add a new driver by following the procedure below.
NOTE
You can also update an old version of the alternate printer driver simultaneously.
1. Start the Installer > follow the instructions in the dialog boxes.
2. Select [PCL Printer Driver] or [UFR II Printer Driver] > select [Update Existing Drivers] > click [Next].
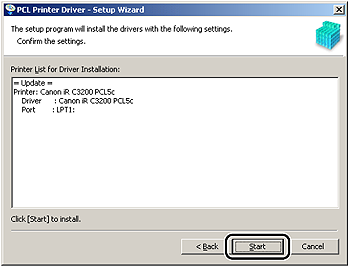
3. Verify the installation settings > click [Start].
4. After the files are copied, click [Exit] to finish the installation.
Restart your computer when a message is displayed prompting you to do so.
The printer drivers already installed are now updated.
IMPORTANT
To use the updated alternate printer driver on the client PC, first uninstall the current printer driver > double-click the shared printer icon for the updated alternate printer driver on the server PC.
Using the Add Printer Wizard
1. Insert the Software CD-ROM into the CD-ROM drive.
2. On the [Start] menu, point to [Settings] > click [Printers].
NOTE
- If you are using Windows XP Professional/Server 2003, on the [Start] menu, click [Printers and Faxes].
- If you are using Windows XP Home Edition, on the [Start] menu, click [Control Panel] > [Printers and Other Hardware] > [Printers and Faxes].
- If you are using Windows Vista, on the [
 ] (Start) menu, click [Control Panel] > [Printers].
3. In the [Printers] folder, right-click the printer icon for your printer > click [Properties].
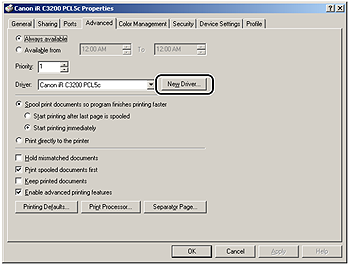
4. Click the [Advanced] tab.
5. Click [New Driver] > follow the instructions on the screen.
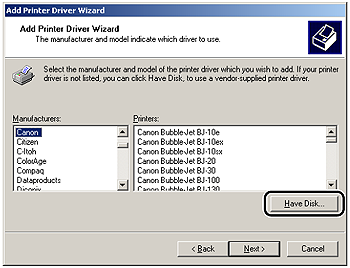
6. Click [Have Disk] to specify the driver path on the CD-ROM > follow the instructions on the screen.
7. Repeat steps 1 to 6 for all other existing drivers.
9. Check the printer configuration settings in the [Device Settings] sheet, and then reconfigure them if they have been changed.
NOTE
If you are using a shared printer in the Print Server (Point and Print) environment, it is necessary to install the Canon Driver Information Assist Service in the server PC in order to use the Job Accounting feature.


 ] (Start) menu, click [Control Panel] > [Printers].
