Solution
NOTE
The screenshots used in this section are from Windows XP Professional.
Preparing the Printer Sharing Settings
1. Perform the following procedure.
From the [Start] menu, select [Settings] > [Network and Dial-up Connections].
From the [Start] menu, select [Control Panel], and then click [Network and Internet Connections] > [Network Connections].
From the [Start] menu, select [Control Panel] > [Network Connections] > [Local Area Connection], click [Properties], and then proceed to Step 3.
From the [Start] menu, select [Control Panel], and then click [View network status and tasks] > [Manage network connections].
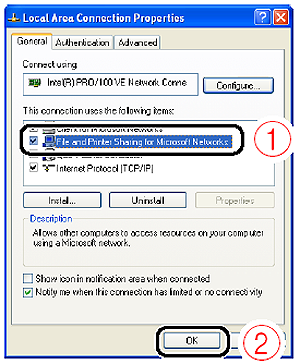
2. Right-click the [Local Area Connection] icon, then select [Properties] from the pop-up menu.
NOTE
If you are using Windows Vista and the [User Account Control] dialog box appears, click [Continue].
3. Make sure that [File and Printers Sharing for Microsoft Networks] is selected (1), then click [OK] (2).
Printer sharing settings vary depending on your operating system. See the following setting procedure according to your operating system.
NOTE

For Windows 2000/XP/Server 2003/Vista (32-bit)
NOTE
For Windows XP, the printer cannot be shared on a network at the default settings (the settings immediately after the installation).
Printer sharing settings require running [Network Setup Wizard] to enable the sharing settings.
For more details, see Windows Help.
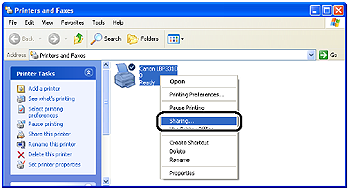
1. Display the [Printers and Faxes] folder or the [Printers] folder.
From the [Start] menu, select [Settings] > [Printers].
From the [Start] menu, select [Printers and Faxes].
From the [Start] menu, select [Control Panel], and then click [Printers and Other Hardware] > [Printers and Faxes].
From the [Start] menu, select [Control Panel], and then click [Printer].
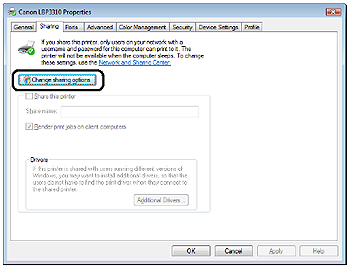
2. Right-click the icon for this printer, then select [Sharing] from the pop-up menu.
NOTE
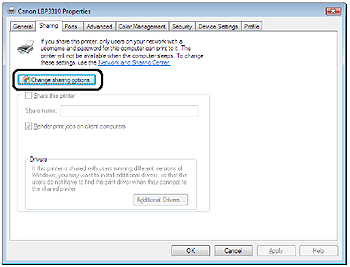
If you are using Windows Vista and [Change sharing options] appears, click [Change sharing options].
If the [User Account Control] dialog box appears, click [Continue].
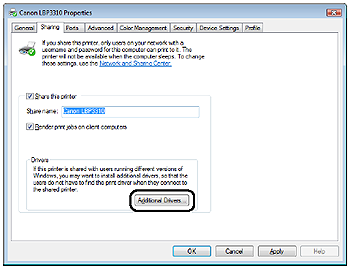
3. Perform the following procedure.
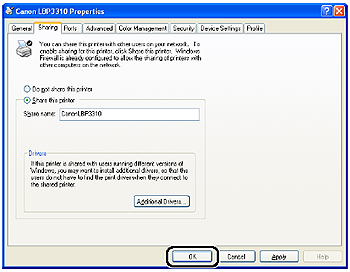
Select [Shared as]. Change the share name as needed.
Select [Share this printer]. Change the share name as needed.
Select the [Share this printer] check box. Change the share name as needed.
NOTE
- You can also specify the sharing settings during the local installation.
- Do not enter blank or special characters for the share name.
The printer icon changes to the shared printer icon.
IMPORTANT
To clear the printer sharing settings, use the following procedures.
- For an operating system other than Windows Vista: Select [Do not share this printer] ([Not shared] for Windows 2000) in the [Sharing] sheet.
- For Windows Vista: Clear the [Share this printer] check box in the [Sharing] sheet. (If [Change sharing options] appears, click [Change sharing options] to display the [User Account Control] dialog box, and then click [Continue].)
For Windows Vista (64-bit)
1. Display the [Printers] folder.
From the [Start] menu, select [Control Panel], and then click [Printer].
2. Right-click the icon for this printer, then select [Sharing] from the pop-up menu.
NOTE
If [Change sharing options] appears, click [Change sharing options].
If the [User Account Control] dialog box appears, click [Continue].
3. Select the [Share this printer] check box. Change the share name as needed.
NOTE
- You can also specify the sharing settings during the local installation.
- Do not enter blank or special characters for the share name.
4. Perform the following procedure.

If any clients are using Windows 2000/XP/Server 2003/Vista (32-bit)
Click [Additional Drivers].
NOTE
If you want to update the additional driver (alternate driver), perform the following procedure.
3. Install the additional driver again.
If no client is using Windows 2000/XP/Server 2003/Vista (32-bit)
Proceed to Step 10.
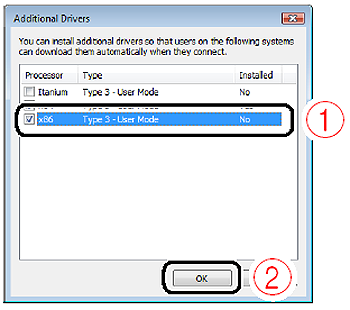
5. Select the [x86] check box (1), then click [OK] (2).
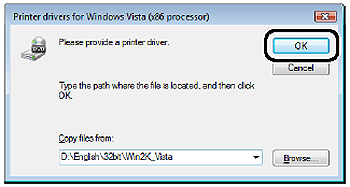
6. Insert the supplied "LBP3310 User Software" CD-ROM into the CD-ROM drive, and then click [Browse].
If CD-ROM Setup appears, click [Exit].
7. Open the folder in the supplied CD-ROM: [English] - [32bit] - [Win2K_Vista].
8. Select [CNAB7STK.INF] (1), then click [Open] (2).
Copying files is started.
You can take the CD-ROM out of the CD-ROM drive after copying files is completed.
NOTE
If the [Windows Security] dialog box appears, click [Install this driver software anyway].
10. Click [Close] or [OK].
The printer icon changes to the shared printer icon.
IMPORTANT
To clear the printer sharing settings, clear the [Share this printer] check box in the [Sharing] sheet. (If [Change sharing options] appears, click [Change sharing options] to display the [User Account Control] dialog box, and then click [Continue].)