Solution
To scan films into an application program, you can start ScanGear CS from within the program.
In the Advanced Mode, you can change the resolution and use various functions to scan, including color correction and filters.
1.Position the film guide on the document glass of the scanner, set the film in the film guide and place the film adapter unit on the film
2.Close the document cover
3.Start ScanGear CS from within the application program
<PhotoStudio is used in this example>
Windows
1.Click the [Start] menu and select [(All) Programs], followed by [ArcSoft PhotoStudio 5.5] and [PhotoStudio 5.5].
2.Click the [File] menu and select [Acquire].
Macintosh
1.Double-click the [PhotoStudio] alias on the desktop or open the [Applications] folder, and double-click the [PhotoStudio] folder, followed by the [PhotoStudio] icon.
2.Click the [File] menu and select [Acquire].
The ScanGear CS window will display.
4.If ScanGear CS is in the Simple Mode or in the Multi Scan, click the [Advanced Mode] to display the Advanced Mode window
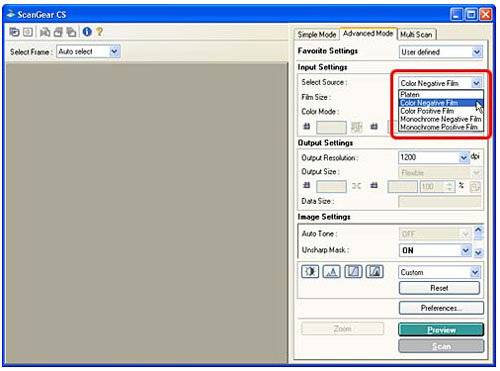
5.Set the [Select Source] category corresponding to the film
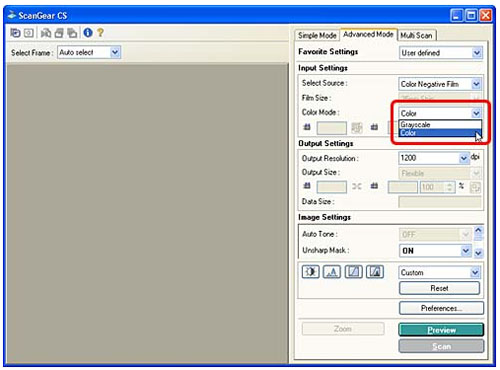
6.Set the [Color Mode] category corresponding to the image you want
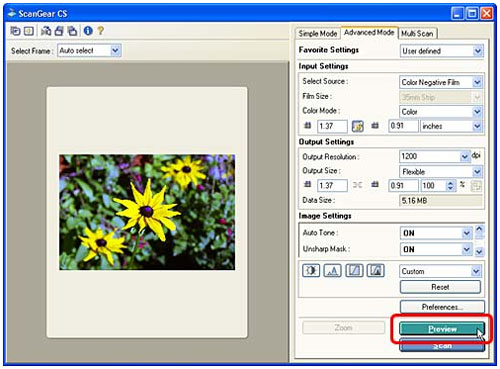
7.Click the [Preview] button
Thumbnail of a frame will display.
REFERENCE
- To preview another frame, move the film adapter unit over and click the [Preview] button again.
IMPORTANT
- If the previewed image does not display correctly, adjust the position of the film in the film guide and click the [Preview] button again.
8.Select an [Output Size]
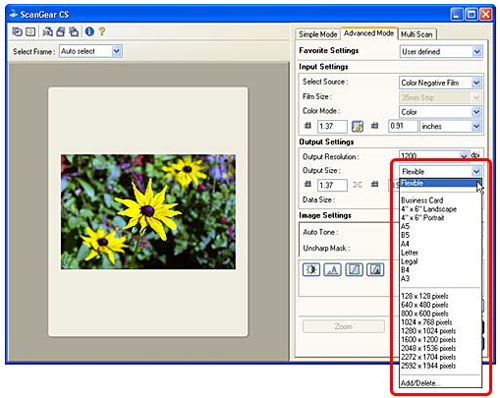
| Flexible | You can select the Output Resolution and the width, height and scale settings when you select the Flexible option. The default Output Resolution is 1200 dpi and the scale is 100%. Adjust these as required. |
|
| Paper Format Sizes | You can select from the Business Card, 4" x 6" Landscape, 4" x 6" Portrait, A5, B5, A4, Letter, Legal, B4 and A3 options. The default Output Resolution is 300 dpi. The width, height and scale settings cannot be selected. The scale will automatically change according to the size of the area selected with the cropping frame. |
|
|
| Image Display Sizes | You can select from the 128 x 128 pixels, 640 x 480 pixels, 800 x 600 pixels, 1024 x 768 pixels, 1280 x 1024 pixels, 1600 x 1200 pixels, 2048 x 1536 pixels, 2272 x 1704 pixels and the 2592 x 1944 pixels options. These dimensions conform to computer display sizes and digital camera output sizes. The default Output Resolution is 150 dpi. The width, height and scale settings cannot be selected. Choosing one of the image display sizes automatically crops the preview image to the corresponding size. The width-to-height aspect ratio will remain unchanged if you enlarge, shrink or move the cropping frame. |
|
|
|
|
IMPORTANT
- The Output Resolution can be set individually for any option within the Flexible, paper format sizes and image display sizes categories. The same Output Resolution is used within any one of the three categories.
- A warning message will display if you set the Output Resolution higher than necessary. If you proceed anyway, it may take an extremely long time to scan and yield a very large image file.
Input Resolution and file sizes vary with the selected Output Resolution and scale settings (35 mm films).
| Output Resolution (resolution of the image as passed to an application program) | Scale(magnification setting) | Input Resolution(actual resolution at which an image is scanned) | File Size(rough estimate) |
|
|
| 300 dpi | Approx. 400% | 1200 dpi (300 dpi x 400%) | Approx. 6.5 MB |
|
| 600 dpi | Approx. 400% | 2400 dpi (600 dpi x 400%) | Approx. 25.9 MB |
|
| 1200 dpi | Approx. 400% | 4800 dpi(1200 dpi x 400%) | Approx. 105.7 MB |
|
| 2400 dpi | Approx. 400% | 9600 dpi(2400 dpi x 400%) | Approx. 414.7 MB |
|
*The data volumes are shown for BMP and PICT format images. Images saved in compressed file formats, such as the JPEG format, will be smaller.
9.Set the other categories as required
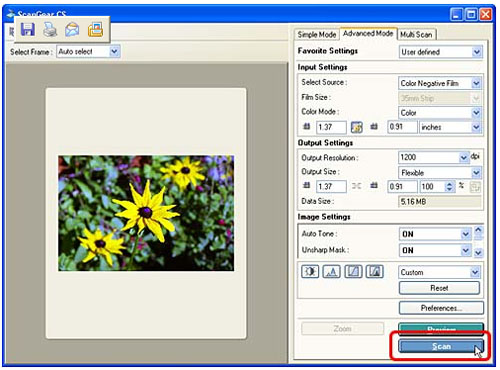
10.Click the [Scan] button
REFERENCE
- Move the film adapter unit over and repeat the procedures listed above (Steps 7-10) to scan additional frames.
11.After the scan is complete, click the close box Windows or Macintosh to close ScanGear CS
The image will display in the application program.
12.Save the displayed image
13.When you have finished scanning film, put the protective cap back on the film adapter unit, film guide and scanned film
IMPORTANT
- Always put the protective cap back on the film adapter unit when it is not in use. Dust, dirt or scratches on the light panel of the film adapter unit may affect image quality or damage the film.
- Film may be damaged if it is left on the document glass for extended periods of time.
