Adjusting Picture Styles (EOS M6)
Solution
You can customize a Picture Style by adjusting individual parameters such as [Sharpness] and [Contrast]. To see the resulting effects, take test shots.
To change Picture Style values, follow the steps below.
IMPORTANT
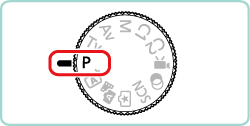
- Instructions in this section apply to the camera with [Shooting mode] set to [Program AE] (
 ).
).
1. Set the camera’s power to <ON>.
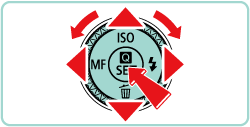
2. Press the [  ] button, then press the [
  ], [
], [  ] buttons to select
  [
[  ] in the menu. Press the [
  ], [
], [  ] buttons or turn the [
  ] dial to choose the desired
  picture style.
 ] button, then press the [
  ], [
], [  ] buttons to select
  [
[  ] in the menu. Press the [
  ], [
], [  ] buttons or turn the [
  ] dial to choose the desired
  picture style.
3. Press the [INFO.] button.

4. Press the [  ], [
], [  ] buttons to choose an item, and then choose an option by pressing the [
  ], [
], [  ] buttons or turning the [
  ], [
], [  ] dials.
 ], [
], [  ] buttons to choose an item, and then choose an option by pressing the [
  ], [
], [  ] buttons or turning the [
  ], [
], [  ] dials.
To undo any changes, press the [INFO.] button.

| Sharpness |  Strength Strength | Adjust the level of edge enhancement. Choose lower values to soften (blur) subjects, or higher values to sharpen them. |
 Fineness Fineness | Indicates the edge thinness that enhancement applies to. Choose lower values for more enhanced details. | |
 Threshold Threshold | Contrast threshold between edges and surrounding image areas, which determines edge enhancement. Choose lower values to enhance edges that do not stand out much from surrounding areas. Note that with lower values, noise may also be emphasized. | |
 Contrast Contrast | Adjust the contrast. Choose lower values to decrease the contrast, or higher values to increase it. | |
 Saturation*1 Saturation*1 | Adjust the intensity of colors. Choose lower values to make colors faded, or higher values to make them deeper. | |
 Color tone*1 Color tone*1 | Adjust skin color tone. Choose lower values to produce redder hues, or higher values to produce yellower hues. | |
 Filter effect*2 Filter effect*2 | Emphasize white clouds in monochrome images, the green of trees, or other colors. N: Normal black-and-white image with no filter effects. Ye: The blue sky will look more natural, and the white clouds will look crisper. Or: The blue sky will look slightly darker. The sunset will look more brilliant. R: The blue sky will look quite dark. Fall leaves will look crisper and brighter. G: Skin tones and lips will appear muted. Green tree leaves will look crisper and brighter. | |
 Toning effect*2 Toning effect*2 | Choose from the following monochrome hues: [N:None], [S:Sepia], [B:Blue], [P:Purple], or [G:Green]. | |
*1 Not available with [  ]. ]. *2 Only available with [  ]. ]. | ||
IMPORTANT
- In [Sharpness], [
 Fineness] and [
  Threshold] settings are not applied to movies.
5. When finished, press the [  ] button.
 ] button.
NOTE
Press the [INFO.] button in step 4 to revert the Picture Style to its defaults.
Increasing the [Contrast] will make the [Filter effect] more pronounced.
Save presets (such as [  ] or [
  ]) that you have customized as new styles. You can create several Picture Styles with different settings for parameters such as sharpness or contrast.
 ] or [
  ]) that you have customized as new styles. You can create several Picture Styles with different settings for parameters such as sharpness or contrast.
You can save a customized picture style after performing steps 1 - 2 above.
3. Select a Picture Style to save.
Choose [  ] [
] [  ] [
] [  ] as described in "Customizing Picture Styles".
 ] [
] [  ] [
] [  ] as described in "Customizing Picture Styles".
4. Select the Picture Style to be used as the base.
Press the [INFO.] button.
Press the [  ], [
], [  ] buttons or turn the [
  ], [
], [  ] dials to choose the Picture Style that serves as the basis.
 ], [
], [  ] buttons or turn the [
  ], [
], [  ] dials to choose the Picture Style that serves as the basis.
REFERENCE
● In step 4, you can also select styles added to the camera using the EOS Utility software.
5. Customize the style.
Press the [  ], [
], [  ] buttons to choose an item to modify, and then customize it, either by pressing the [
  ], [
], [  ] buttons or turning the [
  ], [
], [  ] dials.
 ], [
], [  ] buttons to choose an item to modify, and then customize it, either by pressing the [
  ], [
], [  ] buttons or turning the [
  ], [
], [  ] dials.
6. When finished, press the [  ] button.
 ] button.
